How to Rename Physical Disks in Windows 11 Storage Pool

Renaming physical disks in a Windows 11 storage pool lets you give each drive a custom label so you can tell them apart. A storage pool combines several physical drives into one virtual pool, which Windows then uses to create the drives you actually work with.
Default labels like “Physical Disk 1” say nothing about the hardware behind them. A name like “Backup Drive” or “Samsung 4TB Bay 2” lets you spot a specific drive without digging through serial numbers. The rename only changes the label Windows shows. It does not touch your data, and the pool keeps working as before.
Open Control Panel System and Security Storage Spaces, click Change settings, expand your pool, then click Rename next to the physical disk you want to rename. Type a new name and click Rename drive. The disk shows the new label immediately without requiring a restart.
Why Rename Your Disks?
- Makes it easier to find a specific disk when you have several of the same model in one pool.
- Helps when you need to replace or fix a disk, because you know exactly which drive Windows is complaining about.
- Prevents confusion between disks from different brands or sizes.
How to Rename Physical Disks Using Control Panel
The Control Panel is the easiest way to rename a physical disk. You open Storage Spaces, expand your pool and use the Rename link next to the drive. This works on both Windows 11 Home and Pro, and you do not need to restart afterwards.
If you are signed in as a standard user, Windows will ask for admin credentials when you click Change settings.
- Open the Control Panel on your Windows 11 computer.
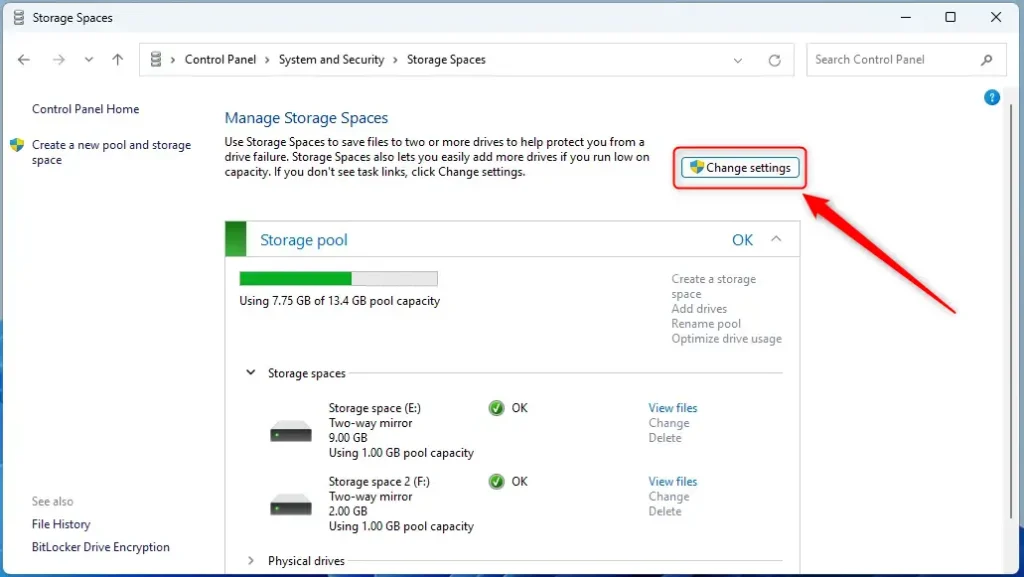
- Go to Control Panel System and Security Storage Spaces You should see a page listing your storage pool and the storage spaces (virtual drives) created from it.
- Click the Change settings button at the top of the Storage Spaces page. Approve the User Account Control prompt if one appears. The pool details now become editable. If the button is missing or does nothing, check that you are using an administrator account.
- Find your storage pool and click it to expand it. You should see the pool’s storage spaces, along with a list of the drives it uses.
- Under Physical drives, click the Rename link next to the disk you want to rename. If you are not sure which drive is which, compare the current name and capacity before you click.
The pool expands and lists each physical drive with its own Rename link. Only drives that belong to the pool appear here. A disk that is not in the pool will not be listed.
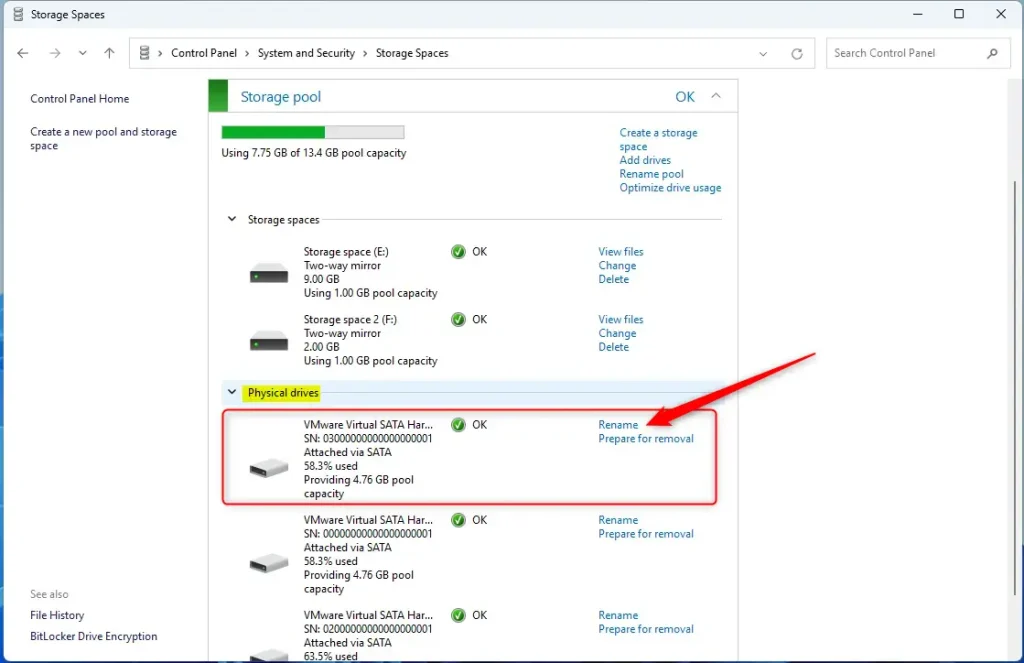
Check that you are renaming the drive you intend to. If you pick the wrong one, you can simply rename it again later, so nothing is lost.
- A box pops up asking for a new name. Type a unique name for your disk and click Rename drive. Keep the name short and descriptive, such as the drive's brand, size or bay number.
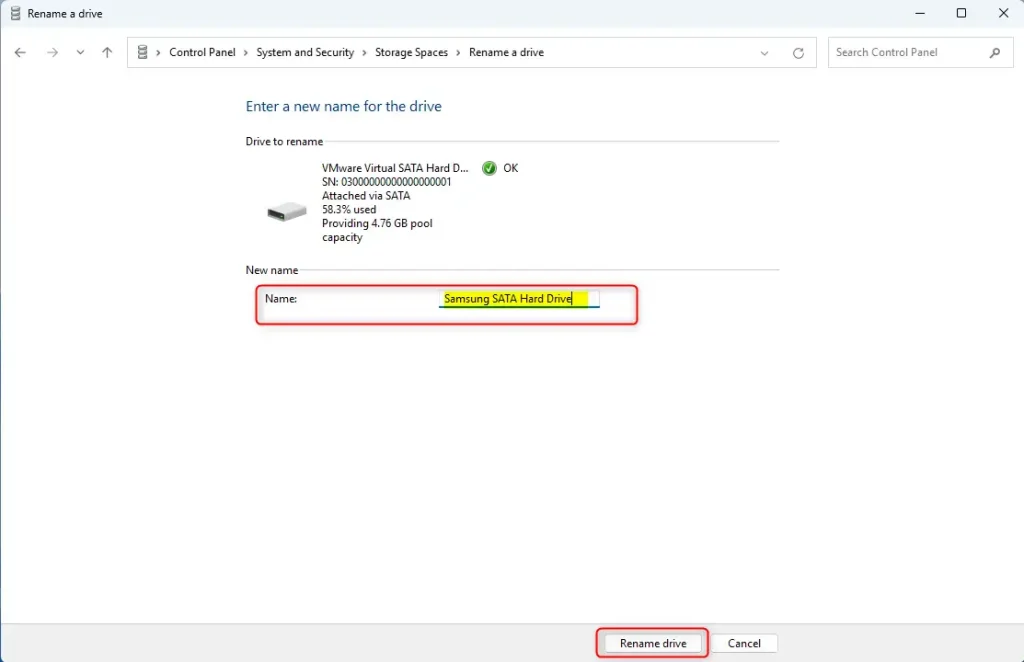
After you click the button, the box closes and the drive appears in the list under its new name. Repeat the steps for any other disks you want to rename.
When you are done, close the Control Panel. The disk now shows the new name. To undo the change, follow the same steps and enter the old name or a different one.
How to Rename Physical Disks Using PowerShell
PowerShell is the better choice if the Control Panel does not show the Rename link, or if you want to script the change. You find the disk by name or ID, then run a command to assign a new friendly name. The change takes effect straight away, with no restart.
The commands below use a disk's current friendly name or its unique ID to pick the right drive. Use the unique ID if you have several disks with the same name, because the name alone would be ambiguous.
Open PowerShell as Administrator. Search for PowerShell, right-click it and choose Run as administrator. Approve the User Account Control prompt. The window title should start with "Administrator".
⚠️ Requires admin privileges
Type this command to see all your physical disks:
PowerShellGet-PhysicalDisk | Select-Object FriendlyName, SerialNumber, UniqueIDPress Enter. PowerShell prints a table with each disk's friendly name, serial number, health status and size.
- Look for the disk you want to rename by its name or ID. Note it down exactly, because the next command needs it. Matching the size shown in the table to the drive you know helps you avoid picking the wrong disk.
Use one of these commands to rename the disk. Replace the names and IDs with your own:
PowerShellSet-PhysicalDisk -FriendlyName "OldDiskName" -NewFriendlyName "NewDiskName"OR
PowerShellSet-PhysicalDisk -UniqueId "DiskUniqueID" -NewFriendlyName "NewDiskName"Example: your disk is named SAMSUNG HD5555 or its unique ID is 1234567890, and you want to rename it to SAMSUNG HD1. You would type one of these:
PowerShellSet-PhysicalDisk -FriendlyName "SAMSUNG HD5555" -NewFriendlyName "SAMSUNG HD1"OR
PowerShellSet-PhysicalDisk -UniqueId "1234567890" -NewFriendlyName "SAMSUNG HD1"- Press Enter to run the command. PowerShell usually prints nothing when it works, so a return to the prompt without an error means the rename went through. To confirm, run the command from step 2 again and check that the new name appears in the list. If you see a red error, check the spelling of the name or ID and make sure PowerShell is running as administrator.
Summary
You can rename physical disks in a Windows 11 storage pool using either the Control Panel or PowerShell. Both methods let you give each drive a custom name, so you never mix up your storage drives. Neither method needs a restart, and you can undo a rename by running it again with a different name.
How do you do it? You can rename disks in two ways: through the easy-to-use Control Panel, or with PowerShell commands run as administrator.
What should you remember? Always use unique names for your disks to avoid confusion. Make sure you have picked the right drive before you confirm the rename, especially if several disks are the same model.
Renaming physical disks within a Windows 11 storage pool lets you identify specific drives at a glance. After you finish the steps, the updated disk names show in the Storage Spaces management page, which makes the pool easier to manage and maintain, particularly when a drive needs attention.
Have a question about this guide?
Answered by AI from this guide. Good questions may be added to this page — please don't include personal details.
Did this guide fix your problem?

About the Author
Richard
Tech Writer, IT Professional
Richard is a writer at Geek Rewind who turns complex IT tasks into clear, step-by-step guides. He draws on years of hands-on experience in system administration and enterprise IT operations, focusing on Windows, Linux and WordPress: the problems people actually run into, and the fixes that work. His server and WordPress guides come from systems he runs himself. Richard builds and maintains the platform behind Geek Rewind, from its Ubuntu servers and Nginx configuration to its custom WordPress plugins. Many new tutorials start with readers' questions, and he's always glad to answer them in the comments.
No comments yet — be the first to share your thoughts!