How to Add a Drive to a Storage Pool in Windows 11

Adding a drive to a Storage Pool in Windows 11 lets you grow your PC storage without reinstalling Windows or touching the files already in the pool. A Storage Pool is a built-in Windows feature that groups two or more physical hard drives or solid-state drives so they act as one larger virtual drive.
You can add an extra drive to an existing pool whenever you run low on room. Windows 11 combines drives of different sizes into one space, and if the pool uses a resiliency setting such as mirroring, your data survives the failure of a single disk. One warning up front: the drive you add is wiped when it joins the pool, so back up anything on it first.
Open Settings System Storage Advanced storage settings Storage Spaces, click your pool, expand Physical Disks, press Add a disk, select the new drive, and click Add. The drive formats and joins the pool. Back up any files on it first—they will be erased.
What is Storage Spaces?
Storage Spaces is the Windows 11 feature that combines multiple hard drives or solid-state drives into one storage pool. You use it to group physical disks, add capacity as your files grow, and keep automatic extra copies of your data across the connected drives so one hardware failure does not cost you your files. It works the same on Windows 11 Home and Pro.
- Get more storage space by combining drives together. Drives of different sizes can share a pool.
- Protect your files with redundancy (backup copies of your data). Mirroring and parity spaces let the pool survive a failed drive. Redundancy is not a replacement for a real backup, because deleted or corrupted files are copied too.
- Speed up storage by using multiple drives at the same time. How much you gain depends on the drives and the resiliency type you chose.
A Windows 11 storage pool accepts additional drives at any time. Adding a drive increases the total space the pool can offer, and it gives Windows more places to put redundant copies of your data, so your information stays safer if a drive fails. Resiliency does cost capacity. For example, with three equal drives and two-way mirroring, every file is stored twice, so you get roughly half of the raw space, about one and a half drives' worth of usable data. The rest holds the second copies.
How to Add a Drive to Your Storage Pool
You add the drive from the Settings app, on the Storage Spaces page under System Storage Before you start, connect the new drive and make sure Windows sees it. It must be a separate physical disk, not a partition of a disk already in the pool. You also need to be signed in with an administrator account, because Windows asks for permission before it changes the pool.
- Open Windows Settings . Click the Start menu and select Settings, or press Win+I on your keyboard. The Settings window opens.
- Go to System settings. In the Settings window, click System on the left side. The System page appears on the right.
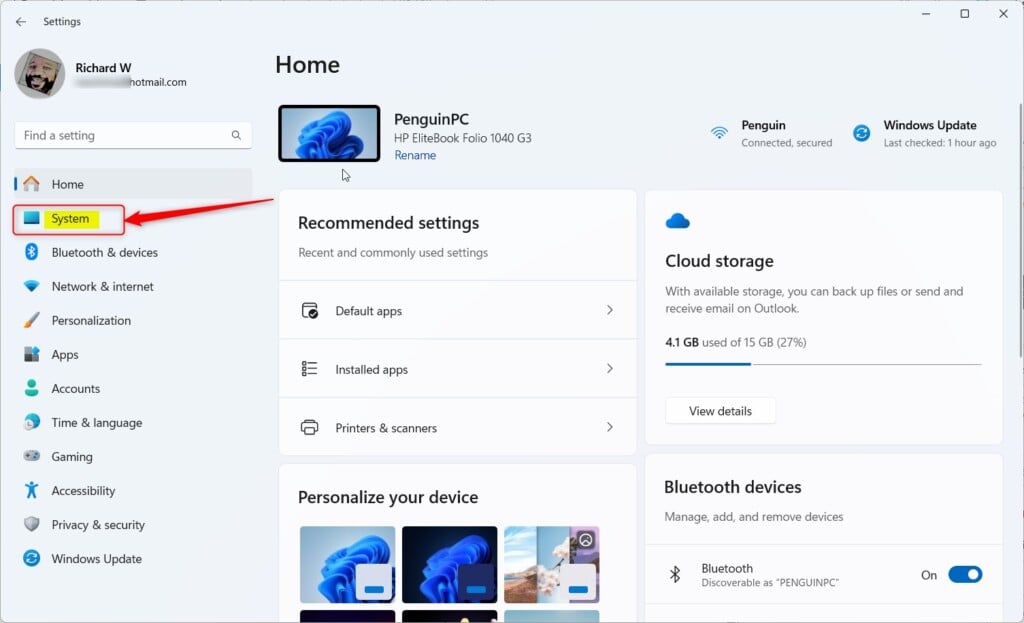
Windows 11 System button in Settings - Open Storage settings. On the right side, click Storage. You now see your drives and how much space each category is using.
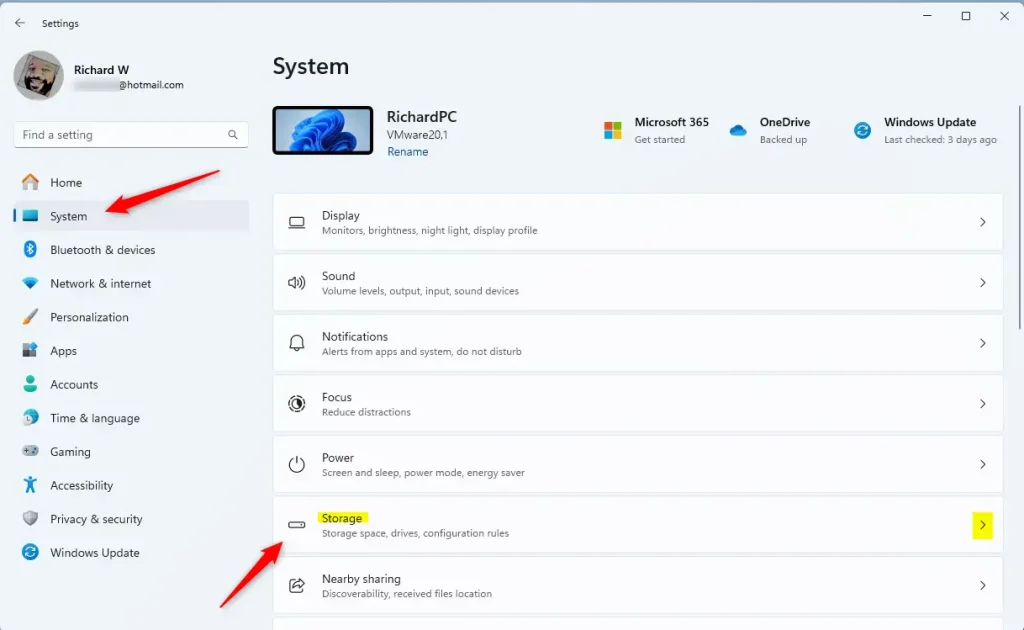
Windows 11 Settings app with System and Storage options highlighted. - Find Storage Spaces. Scroll down and click Advanced storage settings to expand it, then click Storage Spaces. The page lists any pools on this PC.
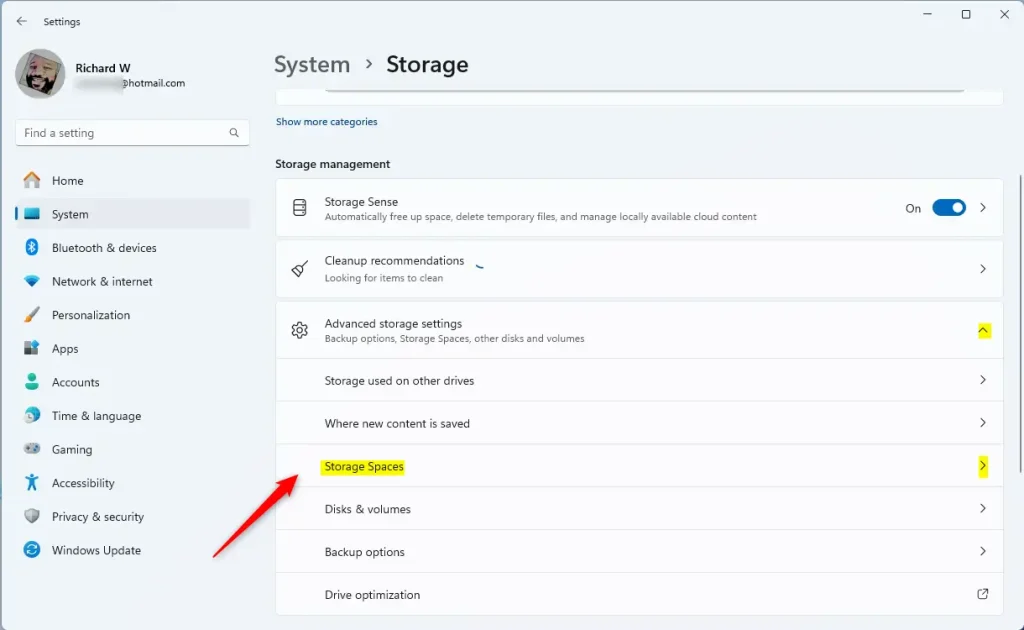
Windows 11 Storage Spaces tile in Settings app - Open your storage pool. Click your existing Storage pool to see its details. If no pool is listed, you have not created one yet, so there is nothing to add a drive to.
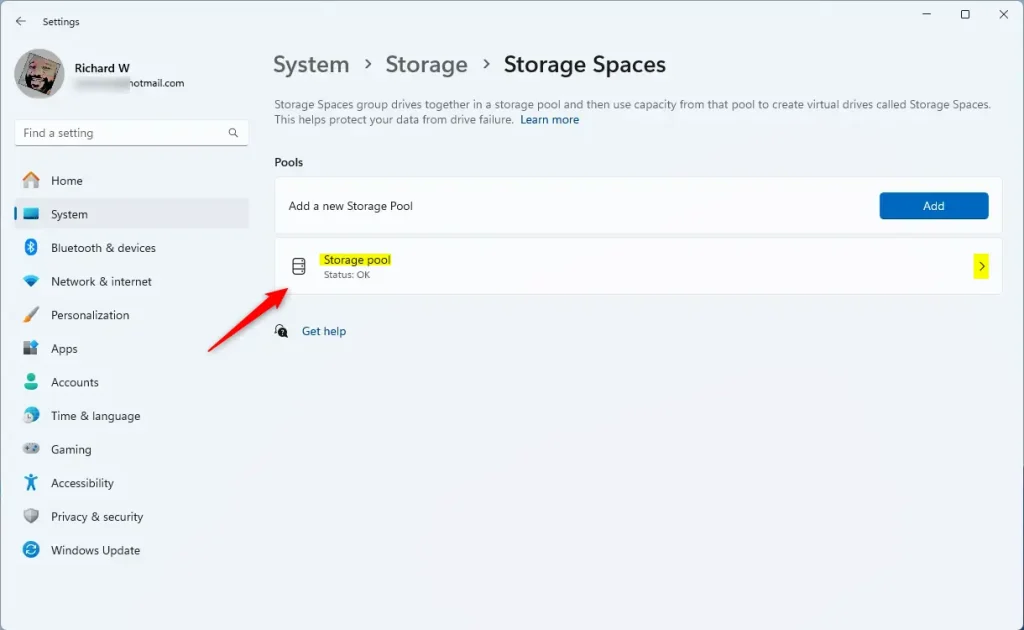
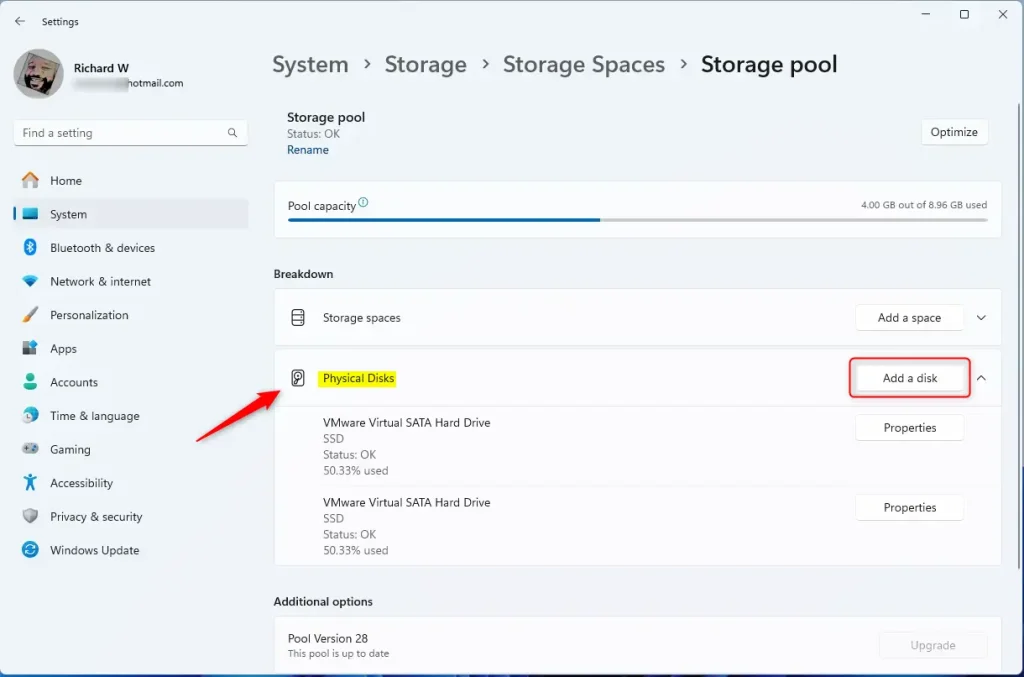
Windows 11 storage pool tile - Open the drive list. Click the Physical Disks section to expand it. You see the drives already in the pool.
- Start adding a drive. Press the Add a disk button. This needs administrator rights, so approve the User Account Control prompt if one appears. ⚠️ Admin privileges required. Wording on this button can differ slightly between Windows 11 builds, so look for the option that adds a drive to the pool. If it is greyed out or no drive is offered, check that the drive is connected and shows up in Disk Management, and that it is not already in use by another pool.
Add physical disk to pool in Windows 11 - Select the drive. Choose the new drive you want to add and click Add. Important: This drive will be formatted (all data erased) before joining the pool. Make sure you have backed up any important files first. Files already in the pool are not affected.
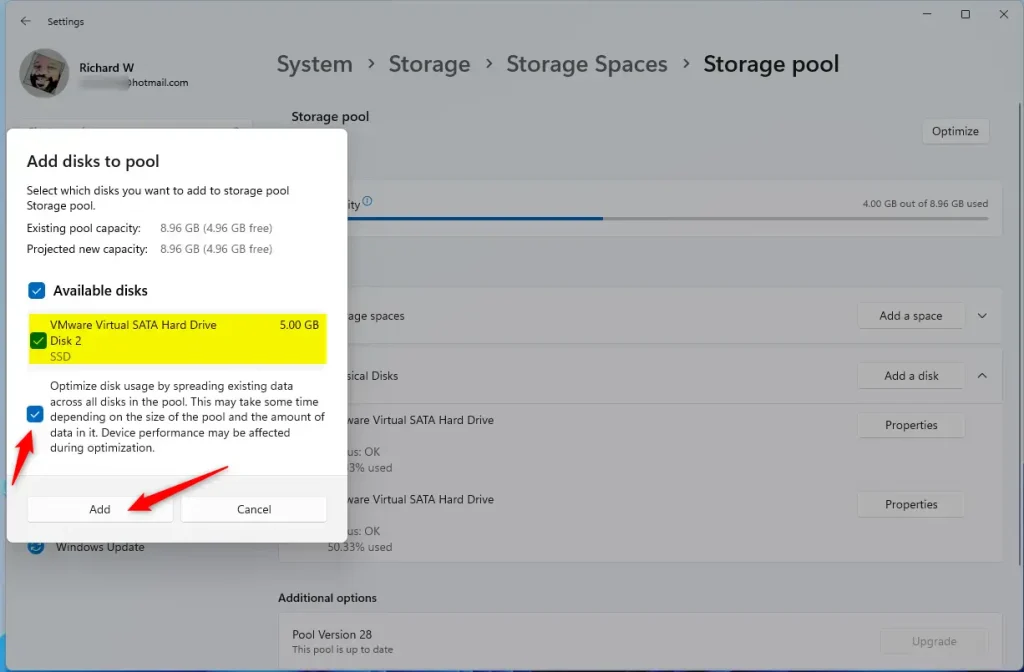
Add physical disk to pool window in Windows 11
After the process finishes, your new drive will be part of the Storage Pool. The drive should now appear in the Physical Disks list, and the pool's total capacity should have gone up. No restart is needed. Depending on your build, Windows may also offer to optimize drive usage, which spreads existing data across the new drive. It is worth running, and it can take a while on a large pool.
If you later want to take a drive out of the pool, use the same pool page. Windows has to move the data off that drive first, so the rest of the pool needs enough free space to hold it.
Why Add Drives to a Storage Pool?
The main reasons to add a drive are more capacity and better protection against drive failure. A larger pool gives you room for big files, and with several physical disks sharing the work, reads and writes can be faster. The amount of speed-up depends on your drives and the resiliency type you picked.
If one drive fails, you don't lose your files. You still need a separate backup for accidental deletion, ransomware or a fire.
Improved Speed: Multiple drives can work together to read and write files faster.
Adding drives to Storage Spaces helps you keep your data safe. It also gives you more room to store your files.
For more details about creating and managing Storage Pools, check out this guide: How to Create a New Storage Pool with Storage Spaces in Windows 11
Summary
Storage Spaces in Windows 11 lets you combine multiple drives into one storage pool for more space, better data protection, and faster performance. To grow a pool, go to Settings System Storage Advanced storage settings Storage Spaces, open your pool and add the new disk. Back up the new drive first, because Windows erases it when it joins.
Have a question about this guide?
Answered by AI from this guide. Good questions may be added to this page — please don't include personal details.
Did this guide fix your problem?

About the Author
Richard
Tech Writer, IT Professional
Richard is a writer at Geek Rewind who turns complex IT tasks into clear, step-by-step guides. He draws on years of hands-on experience in system administration and enterprise IT operations, focusing on Windows, Linux and WordPress: the problems people actually run into, and the fixes that work. His server and WordPress guides come from systems he runs himself. Richard builds and maintains the platform behind Geek Rewind, from its Ubuntu servers and Nginx configuration to its custom WordPress plugins. Many new tutorials start with readers' questions, and he's always glad to answer them in the comments.
No comments yet — be the first to share your thoughts!