How to Install Drupal Locally with XAMPP on Windows 11

Installing Drupal locally on Windows 11 with XAMPP lets you build and test websites on your PC without an internet connection. Drupal is a free content management system (software used to build and manage websites). XAMPP is a tool that turns your computer into a local web server.
This setup takes about 15 minutes. It gives you a private space to try out new themes, test modules, and build custom designs before you publish anything online. Nothing you do here is visible to anyone else, so you can break things and start over without risk.
Install XAMPP, create a Drupal database via its shell or phpMyAdmin, and download Drupal files into a htdocs/drupal folder. Restart Apache, then access http://localhost in your browser to complete the Drupal setup.
What is XAMPP?
XAMPP is a free software package that lets you run websites on your Windows 11 computer without an internet connection. For a Drupal XAMPP Windows setup, it bundles the three pieces Drupal needs: Apache for serving web pages, MariaDB for storing data, and PHP for running Drupal’s code.
- Apache (the web server that displays your website)
- MariaDB (a database that stores your website’s information)
- PHP (the programming language that Drupal uses)
With XAMPP, you can run Drupal and other websites without needing an internet connection. Everything runs only on your own PC, so it is a safe place to learn and experiment.
Step 1Install XAMPP
Don’t have XAMPP yet? Follow this guide first. One thing to check while you do: current Drupal releases need a reasonably recent PHP version. Pick a XAMPP build whose PHP version meets the requirements listed on the Drupal download page.
Step 2Create a Database for Drupal
Drupal stores all your content, settings and user accounts in a database, so you need to create one before you run the installer. You do this from the XAMPP Control Panel by opening the built-in command shell and running a few database commands. The database server (MySQL, which is MariaDB in XAMPP) must be running first, or the commands will fail.
What you'll do:
- Open the XAMPP Control Panel.
- Click Start next to Apache and next to MySQL. Both module names should turn green. If Windows shows a firewall prompt, allow access on private networks.
- Click the Shell button on the left side. A command window will open.
- Type this command and press Enter to open the database tool:
mysql -u root - If the tool asks for a password, just press Enter. A fresh XAMPP install has no password on the root account. When the tool is ready, the prompt in the window changes to the database prompt.
- Decide on a password for your Drupal database user and write it down. The commands below contain
your_password_hereas a placeholder. Replace it with your password. You will need it again in the Drupal installer. - Type the first command and press Enter:
CREATE DATABASE drupaldb CHARACTER SET utf8mb4 COLLATE utf8mb4_general_ci; - Type the next command and press Enter:
CREATE USER 'drupaldbuser'@'localhost' IDENTIFIED BY 'your_password_here'; - Type the next command and press Enter:
GRANT ALL ON drupaldb.* TO 'drupaldbuser'@'localhost'; - Type the next command and press Enter:
FLUSH PRIVILEGES; - Type the last command and press Enter:
exit
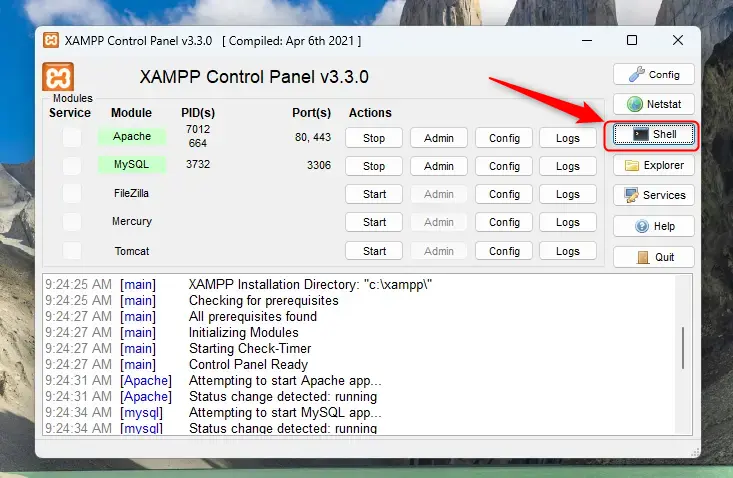
Enter the commands one at a time and wait for the reply before you type the next one. Most of them should answer with a short success message such as Query OK. If you get an error, check for a typo or a missing semicolon at the end of the line, then retype the command. Don't paste several lines at once.
Click the Admin button next to MySQL in the XAMPP Control Panel. phpMyAdmin opens in your browser. Use its Databases tab to create the database and its User accounts tab to add a user with access to it. Use the same database name, username and password in the Drupal installer later. The button only works while MySQL is running.
Step 3Download and Prepare Drupal
Next you download the official Drupal files and put them inside XAMPP's main server folder. Apache only serves files from that folder, so Drupal has to live there. A dedicated subfolder keeps it separate from anything else you host locally.
- Open your
C:\xampp\htdocsfolder on your computer. - Create a new folder called
drupalinside thehtdocsfolder. This is where your Drupal files will go. - Download the latest Drupal version from here: Drupal Downloads
- Extract the Drupal files you downloaded directly into the
drupalfolder. Windows 11 can open a .zip file with right-click > Extract All. For a .tar.gz file, use a tool like 7-Zip if Windows doesn't handle it.
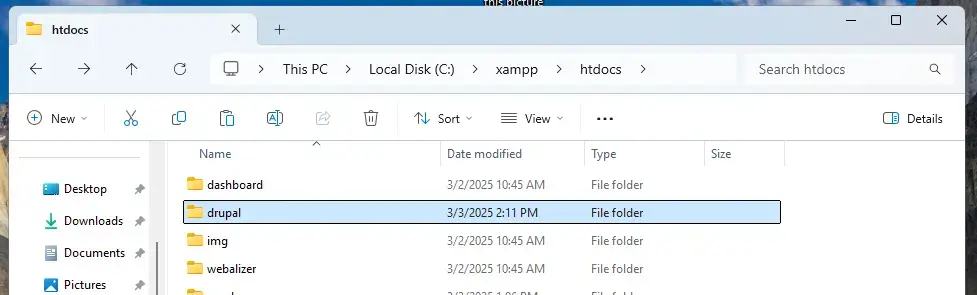
Check the result before moving on. The Drupal files should sit directly in your new folder, so you see items such as core, modules, themes, sites and an index.php file. If you see only one more folder named after the Drupal version, the archive extracted one level too deep. Move everything from that inner folder up into your new folder.
Step 4Change Apache's Default Page to Your Drupal Site
By default, http://localhost shows the XAMPP welcome page. This step changes the main index file so that visiting your local server sends you straight to your Drupal folder. It is optional, but it saves you typing the folder name every time.
What you'll do:
- Go to
C:\xampp\htdocsand open theindex.htmlfile with a text editor like Notepad. Right-click the file and choose Open with to pick Notepad. - Copy the original contents somewhere safe, or save a copy of the file under another name. This lets you restore the XAMPP welcome page later.
- Replace everything in the file with this code:⚠️Warning
<?php

  if (!empty($_SERVER['HTTPS']) && ('on' == $_SERVER['HTTPS'])) {

    $uri = 'https://';

  } else {

    $uri = 'http://';

  }

  $uri .= $_SERVER['HTTP_HOST'];

  header('Location: '.$uri.'/drupal/');

  exit;

?>

Something is wrong with the XAMPP installation :-( - Save the file. If Windows says you don't have permission, close Notepad, reopen it with right-click > Run as administrator, and open the file again.
Step 5Restart Apache
What happens when you do this? Apache will apply the changes you just made. It reads its settings when it starts, so a quick restart makes sure everything is picked up.
What you'll do:
- Go back to the XAMPP Control Panel.
- Stop Apache by clicking the Stop button. The Apache name loses its green background.
- Start Apache again by clicking the Start button. Apache should turn green again. Leave MySQL running, because Drupal needs it.
Step 6Start Drupal Installation
Now you open your web browser and go to http://localhost to launch the online setup wizard. The wizard walks you through choosing a language, connecting to the database you created, and setting up your site. Keep your database password and the database name nearby.
- Open your web browser and go to:
http://localhost - You should see the Drupal setup page. If you still see the XAMPP welcome page, the index file edit didn't save or Apache wasn't restarted. Add the Drupal folder name after localhost/ in the address bar, or go back and check those steps.
- Choose your language and click Save and continue.
- Select the installation type (usually "Standard" works fine) and continue. "Standard" installs a ready-to-use set of features, which suits most first-time installs.
- Enter the database information you created earlier:
- Database name:
drupaldb - Username:
drupaldbuser - Password: (the password you chose in Step 2)
- Database host: leave this as
localhost. This field sits under Advanced options, so expand that section if you don't see it.
- Database name:
- Continue and fill in your website's name. The installer shows a progress bar first. It can take a minute or two, so don't close the tab.
- Create an admin username and password for yourself. The form also asks for an email address. For a local site, any address works.
- Finish the setup. You now have your own Drupal site running locally!

While the installer runs, the progress bar may sit still for a short while. That is normal on a local machine. Don't refresh the page or stop Apache until it finishes.

If the installer can't connect to the database, check three things. MySQL must show as running in the XAMPP Control Panel. The database name, username and password must match what you created. The host must be as shown above. If the installer lists missing requirements instead, read the message. It usually names a PHP setting or extension, and you can fix it in XAMPP's PHP configuration and then restart Apache.

Write down your admin username and password. You will use them to log in to your local site and manage content, themes and modules from the admin area.

This site is for development only. It can't be reached from the internet, and you shouldn't use it for a live site. When you finish for the day, you can stop Apache and MySQL in the XAMPP Control Panel with their Stop buttons. Start them again next time before you open the site.

To undo the whole setup, delete the Drupal folder from your server folder, drop the database (phpMyAdmin makes this easy), and restore the original index file you saved earlier.
Summary
- Install XAMPP on your Windows 11 computer.
- Create a database and user for Drupal using XAMPP's Shell or phpMyAdmin.
- Download Drupal and put the files in a
drupalfolder insidehtdocs. - Change the default page to redirect to Drupal.
- Restart Apache to apply the changes.
- Open your browser at
http://localhostto complete Drupal setup.
Going through this list helps you spot any step you missed, from installing XAMPP and creating your database to placing the core files in the server folder and running the web installer. If something doesn't work, the cause is almost always one of these checkpoints: MySQL not running, a mistyped database detail, or Drupal files in the wrong folder.
Was this guide helpful?

About the Author
Richard
Tech Writer, IT Professional
Richard is a writer at Geek Rewind who turns complex IT tasks into clear, step-by-step guides. He draws on years of hands-on experience in system administration and enterprise IT operations, focusing on Windows, Linux and WordPress: the problems people actually run into, and the fixes that work. His server and WordPress guides come from systems he runs himself. Richard builds and maintains the platform behind Geek Rewind, from its Ubuntu servers and Nginx configuration to its custom WordPress plugins. Many new tutorials start with readers' questions, and he's always glad to answer them in the comments.

… liked this!