Multitasking features in Windows 11 help you organize open windows, switch between programs, and separate different workflows on your display. Built-in tools like Snap layouts, Alt+Tab, Task View, and Multiple Desktops let you manage up to four windows at once on a single screen and keep your workspace structured. All of them work the same on Windows 11 Home and Pro, and none needs a restart.
Advertisement
⚡ Quick Answer
Open Settings›System›Multitasking to manage how you work. Use Snap to resize and position up to four windows into grids, press Win+← or Right Arrow to snap windows side by side, press Alt+Tab to cycle through running apps, or create Multiple Desktops to separate workflows on different virtual screens.
Advertisement
Snap
Snap lets you quickly resize and position open windows into neat grids on your screen without manually dragging borders. You can arrange two windows side by side, snap three windows into vertical columns, or place four windows into quadrants to organize your workspace efficiently. The layouts you see depend on your screen size. Small or low-resolution displays offer fewer options, and the four-window layout needs a screen large enough to fit it.
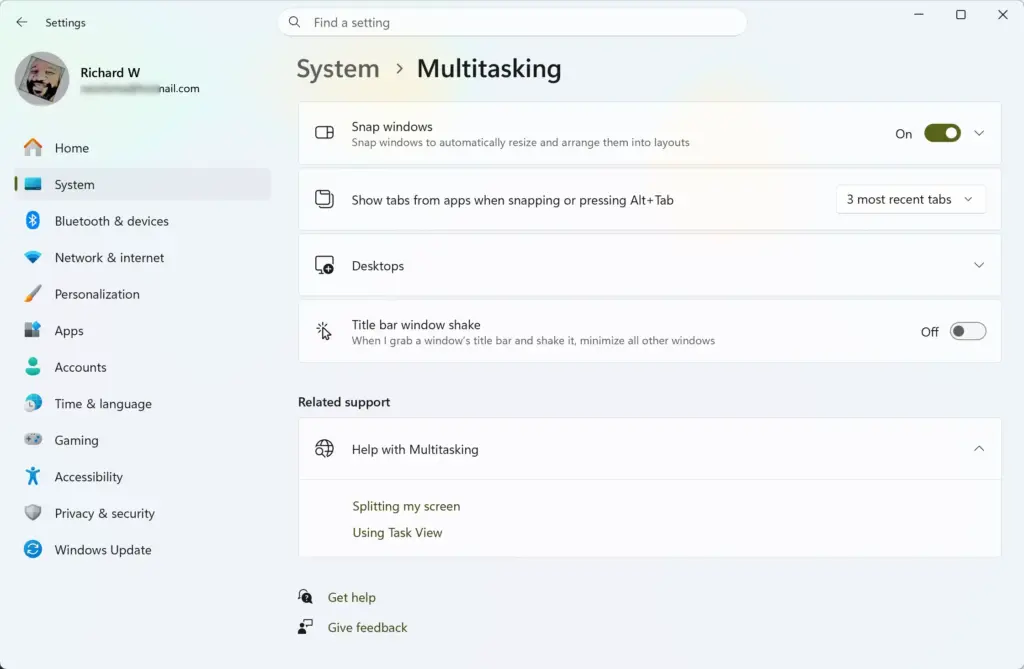
📝Good to KnowIf Snap does nothing, open Settings, go to System, then Multitasking, and make sure Snap windows is switched on.
To use Snap with your mouse:
Click and hold the title bar of the window you want to move.
Drag the window to the left, right, or any corner of your screen until you see a transparent outline appear. The outline shows where the window will land.
Release the mouse button to snap the window into place.
Look at the other side of the screen. Windows shows thumbnails of your remaining open windows. Click one to fill the empty space.
To use a layout instead, hover your mouse cursor over the Maximize button on any open window until the Snap layouts box appears. Then click the zone where you want that window to sit. You should see the window jump into that zone, and Windows will offer your other windows for the remaining zones.
To use Snap with your keyboard:
Press the Win+← Arrow or Win+→ Arrow to snap the active window to the corresponding half of the screen.
Press the Up Arrow or Down Arrow while holding the Win to position the window into a corner once it is snapped to a side.
Press the Win+Z if you want to open the Snap layouts box for the active window and choose a layout with the keyboard.
To undo a snap, drag the window away from its position, or press the Win+↓ Arrow. The window returns to its earlier size.
Advertisement
Task switch with Alt + Tab
Alt + Tab lets you cycle through every currently running application on your system to bring a specific program to the foreground instantly. This keyboard shortcut opens a visual switcher overlay showing thumbnails of all your open windows so you can jump between tasks without using the mouse.
Press and hold the Alt key on your keyboard.
Press the Tab key once while keeping Alt held down. The visual switcher overlay opens, showing thumbnails of your open windows.
Press Tab repeatedly to cycle forward through the open windows, or press Shift + Tab to cycle backward. You can also use the arrow keys or click a thumbnail.
Release the Alt key when the window you want to view has a border around it. That window comes to the front.
Configure Alt + Tab settings
Alt + Tab settings let you change how the switcher handles open tabs inside Microsoft Edge and whether it shows windows from all your active virtual workspaces or only your current display. You can easily adjust these preferences in the Windows Settings app to fit your exact workflow.
Open Settings.
Select System, then click Multitasking. Settings › System › Multitasking
Click the dropdown menu next to Alt + Tab.
Choose whether you want the switcher to show open windows only, open windows and all tabs in Microsoft Edge, open windows and the most recent tabs in Microsoft Edge, or to turn off tab integration entirely. The exact wording and the number of recent tabs offered can vary slightly between Windows 11 builds.
Press Alt + Tab to test the change. It takes effect straight away.
On the same Multitasking page, the Desktops section has a similar option for Alt + Tab. It controls whether the switcher lists windows from every virtual desktop or only the one you are using. Look for it if windows seem to be missing from the switcher, or if you see too many of them.
Task view
Task View gives you a full-screen overview of all your open application windows and lets you manage multiple virtual workspaces from a single interface. It removes desktop clutter by providing a clean visual timeline of your active programs so you can switch projects instantly.
Advertisement
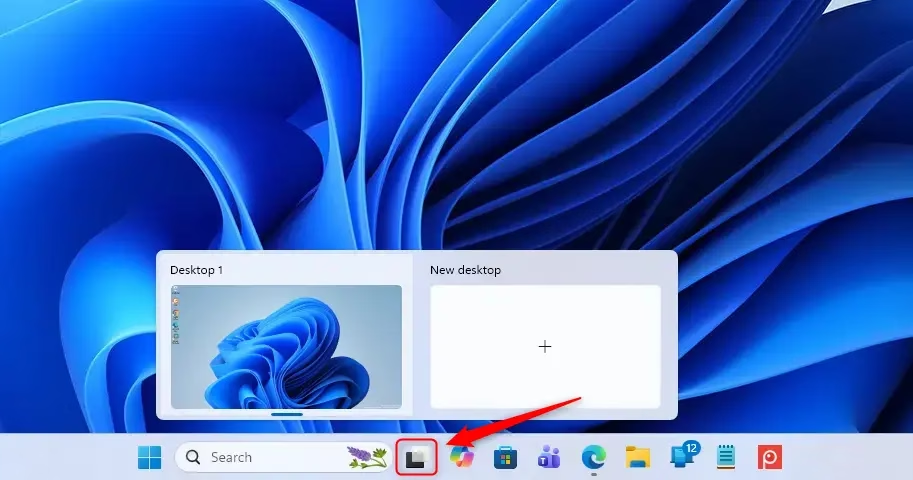
Click the Task View button on the taskbar (it looks like two overlapping rectangles), or press the Windows key + Tab on your keyboard. Windows 11 Task View button on the taskbar for multiple desktops. The screen shows a grid of your open windows, with your virtual desktops along the bottom.
Click any thumbnail in the window grid to switch directly to that application.
If the Task View button is not on your taskbar, it has been hidden. Open Settings, go to Personalization, then Taskbar, and switch on Task view. The Windows key + Tab shortcut works whether the button is shown or not.
Multiple desktops
Separate different projects, such as isolating personal apps from work software, by creating distinct virtual workspaces on the same physical monitor using Multiple desktops. Each desktop keeps its own set of open windows, so you can leave a full work setup on one desktop and switch to a clean one for personal tasks.
Open Task View by clicking the Task View button or pressing the Windows key + Tab.
Click New desktop near the bottom of the screen. A new thumbnail, such as Desktop 2, appears. You can also press the Windows key + Ctrl + D to create one directly.
Click the new desktop to switch to it. You will see an empty desktop with no windows open.
Open the apps you want on that desktop. To move an existing window across, open Task View, then drag that window's thumbnail onto the desktop you want.
Switch between desktops by pressing the Windows key + Ctrl + Left Arrow or Windows key + Ctrl + Right Arrow.
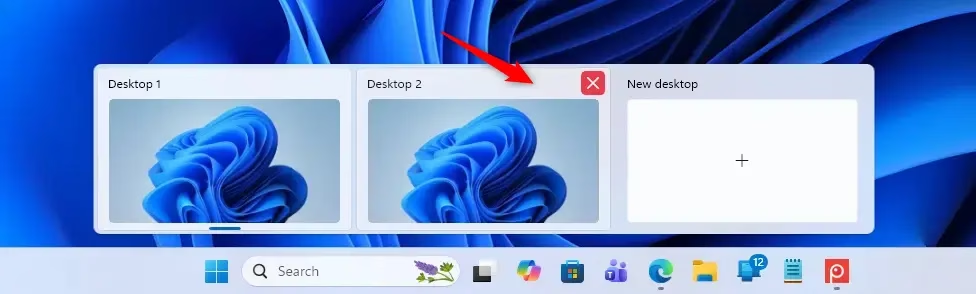
⚠️WarningTo close a desktop, open Task View, hover over its thumbnail and click the Close button (X), or press the Windows key + Ctrl + F4 while on that desktop.
Windows does not close your apps. It moves any open windows to the neighboring desktop, so you do not lose unsaved work.
Create and close a desktop
Virtual desktops allow you to separate different projects and tasks into distinct workspaces on the same computer screen. You can create a brand new desktop in seconds using Task View, and easily close it later without losing any open apps since Windows automatically moves them to your remaining workspace.
Open Task View by clicking its icon on the taskbar or pressing the Windows key + Tab.
Click the New desktop button at the top of the screen to create an additional workspace. Windows 11 Task view displaying open applications and option for new desktop.
Open Task View again, hover your mouse cursor over the desktop thumbnail you want to remove, and click the Close button (the 'x' icon) to delete it. Any open apps on that desktop automatically move to your remaining primary workspace.
Switch between desktops
Press the Windows key + Ctrl + Left Arrow or Windows key + Ctrl + Right Arrow to cycle instantly through your open desktops without opening Task View.
Alternatively, open Task View and click the thumbnail of the desktop you want to view.
Move open applications between desktops
Open Task View by pressing the Windows key + Tab.
Right-click the thumbnail of the application window you want to relocate.
Hover your mouse cursor over Move to, then select the destination desktop from the menu.
Configure backgrounds for each desktop
Virtual desktop backgrounds let you assign a unique desktop wallpaper to each workspace so you can identify your current active project at a glance. This visual cue helps you keep track of different tasks without needing to check the taskbar or open Task View every time.
Advertisement
Open Settings.
Select Personalization, then click Background.
Right-click your preferred background image.
Select the desktop where you want that specific image to appear from the context menu.
Customize your multiple desktop experience
Multiple desktop settings let you configure Windows to display only the windows relevant to the specific workspace you are currently using. This keeps your taskbar and Alt + Tab switcher clean by hiding distractions from your other active projects.
Open Settings.
Select System, then click Multitasking.
Locate the section for Desktops.
Select whether the taskbar and Alt + Tab switcher should show all open windows across every desktop or only the windows open on your current desktop.
Multitask with multiple desktops
Multiple desktops allow you to run complex multi-window workflows across different projects without crowding a single monitor. You can combine these virtual workspaces with Snap layouts by assigning communication apps to one desktop while keeping coding environments isolated on a separate workspace.
Advanced Window Management and Hidden Multitasking Controls
Advanced window management controls how applications behave when you connect external displays, dock your laptop, or rearrange monitors using built-in automation features. Windows can automatically minimize open windows when you disconnect a secondary screen and restore them to their exact positions when you plug the monitor back in.
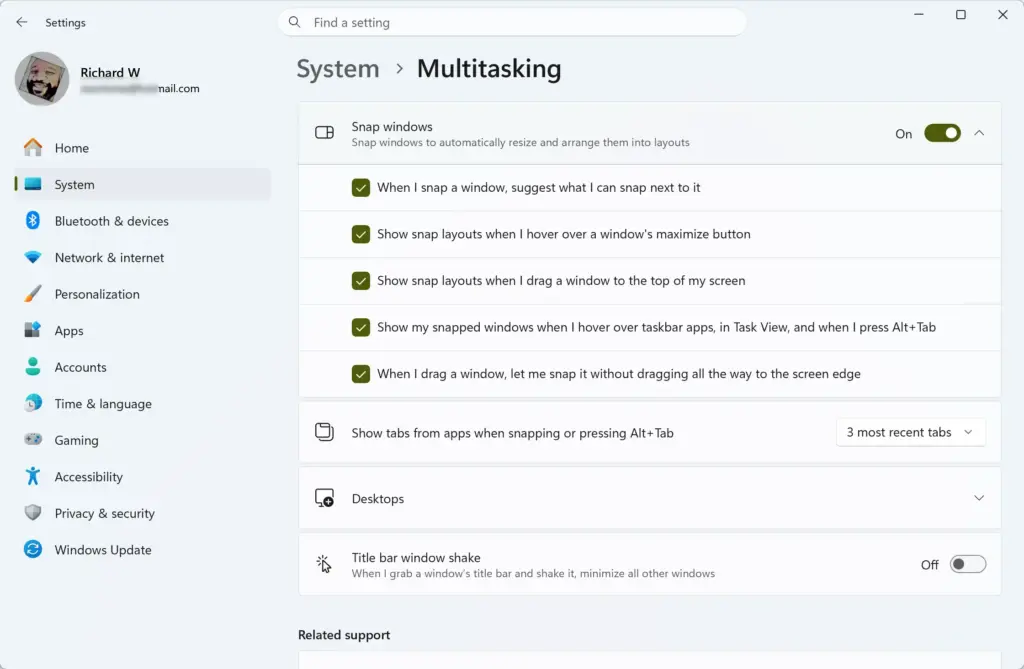
Control your window snapping sensitivity and automatic layout suggestions by navigating to Settings, selecting System, and clicking Multitasking. Toggle off options such as "Show my snapped windows when I hover over taskbar buttons" or "Show snap layouts when I hover over a window's maximize button" to streamline the interface if you prefer keyboard-driven navigation over mouse-based window helpers.
Advertisement
What to do next
Organise your active programs using Snap layouts, navigate between open apps with Alt + Tab, and separate different projects using multiple virtual desktops. Explore how to set up custom keyboard shortcuts or configure virtual desktop hotkeys to speed up your daily navigation.
Frequently asked questions
How to do multitasking in 🪟 Windows 11?
Windows 11 multitasking works through Snap layouts, Alt + Tab, Task View, and Multiple Desktops. Press Windows key + Z to pick a Snap layout, or drag a window to the edge of the screen. Press Alt + Tab to switch between open windows, and press Windows key + Tab to open Task View.
Why isn't my Windows update downloading?
Windows Update usually stalls because of a pending restart, low storage, or a connection problem. Open Settings, go to Windows Update, and select Check for updates. If nothing changes, open Settings, go to System, then Troubleshoot, then Other troubleshooters, and run Windows Update. Restarting your PC first often clears the problem.
How do I turn off multitasking on 🪟 Windows 11?
To turn off Snap, open Settings, go to System, then Multitasking, and switch off Snap windows. Alt + Tab and Task View will still work because they are separate features. Dragging windows to the edges will no longer arrange them into layouts, since Snap windows is the only switch for this.
How do I multitask on Windows?
On Windows, you multitask by placing windows side by side with Snap, switching with Alt + Tab, and viewing everything with Task View. Drag a window to the left or right edge to fill half the screen. Use Multiple Desktops from Task View to keep separate work sets on their own screens.
Still have a question?
Answered by AI from this guide. Good questions may be added to this page — please don't include personal details.
📬 Get new Windows tips in your inbox
One email when we publish something worth your time. No spam, unsubscribe anytime.
Richard is a writer at Geek Rewind who turns complex IT tasks into clear, step-by-step guides. He draws on years of hands-on experience in system administration and enterprise IT operations, focusing on Windows, Linux and WordPress: the problems people actually run into, and the fixes that work.
His server and WordPress guides come from systems he runs himself. Richard builds and maintains the platform behind Geek Rewind, from its Ubuntu servers and Nginx configuration to its custom WordPress plugins.
Many new tutorials start with readers' questions, and he's always glad to answer them in the comments.
One email when we publish a guide worth your time — new Windows features, the fixes that actually
work, and a heads-up when Microsoft breaks something. Unsubscribe in one click.
📬 Get new Windows tips in your inbox
One email when we publish something worth your time. No spam, unsubscribe anytime.


No comments yet — be the first to share your thoughts!