How to Enable or Disable BitLocker to Unlock OS Drive with PIN or USB at Startup in Windows 11


BitLocker Drive Encryption in Windows 11 scrambles the files on your drive so your data stays unreadable if your computer is lost or stolen. You can add a startup PIN or a USB key, so the PC asks for something you know or something you hold before Windows starts.
Most modern motherboards include a Trusted Platform Module (TPM) 2.0 security chip, which handles the hardware-level checks. Full BitLocker management, including startup authentication, is available in Windows 11 Pro, Enterprise and Education. Windows 11 Home only offers a limited device encryption feature and does not have the Group Policy Editor.
Open Settings System BitLocker, click Manage BitLocker, select your OS drive, then click Change protector to add a startup PIN. Or press Win+R, type gpedit.msc, navigate to BitLocker Drive Encryption Operating System Drives, enable Require additional authentication at startup, set UseTPMPIN to Require, then restart your PC.
Enable or Disable BitLocker Settings (Admin Required)
Before you change anything, make sure you have a copy of your BitLocker recovery key stored somewhere other than this PC. Changing startup settings can occasionally trigger a recovery prompt, and without the key you could lose access to your files.
If you’re using Windows 11 Pro or higher, the Group Policy Editor is the easiest route. Home users should skip to the Registry Editor method.
Using Group Policy Editor
The built-in Group Policy Editor lets you change how your operating system drive unlocks, and you can turn the startup authentication policy on or off from the same place. Follow these steps to allow or require a PIN or USB startup key.
- Press Win+R, type
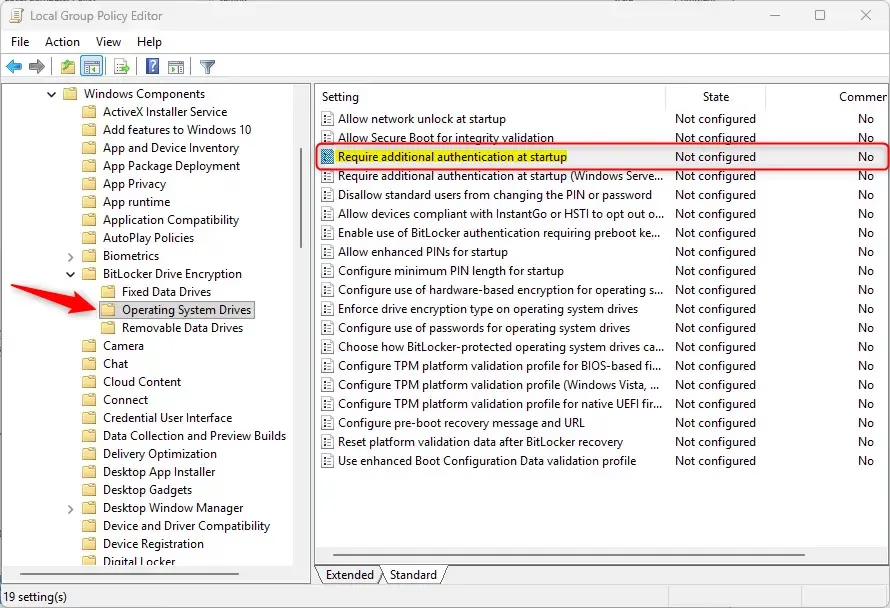
gpedit.msc, and press Enter. The Local Group Policy Editor opens. If you get a “cannot find” error, you are on Windows 11 Home and should use the registry method instead. - Navigate to Computer Configuration Administrative Templates Windows Components BitLocker Drive Encryption Operating System Drives.
- Double-click Require additional authentication at startup. The policy window opens.
- Select Enabled. Make sure the box for Allow BitLocker without a compatible TPM is unchecked, unless your PC has no TPM. Leaving it unchecked keeps the TPM requirement in place.
With the policy enabled, the drop-down lists in the same window control which methods are allowed, such as TPM startup PIN or startup key. Set the option you want to Require or Allow. Setting an option to Do not allow blocks that method.
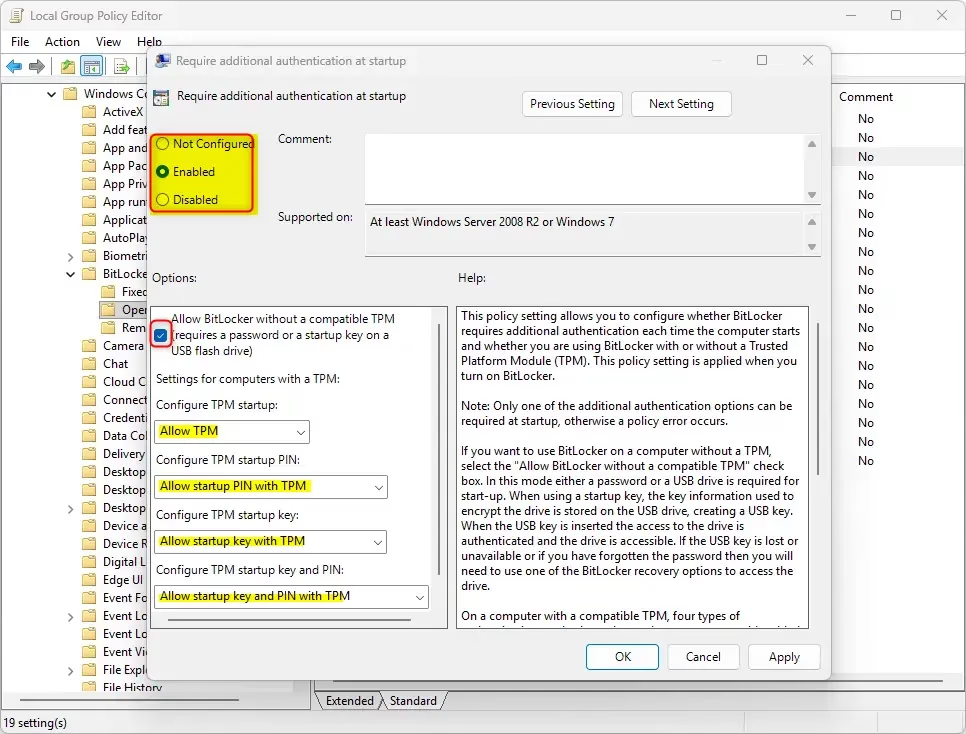
- Click OK. The policy now shows as Enabled in the list.
This policy only controls what is permitted. To actually apply a PIN or USB key to your drive, you still need to turn on BitLocker or change the startup protector for the drive. To undo the change, open the same policy again and select Not Configured or Disabled, then click OK.
Using Registry Editor (GUI Alternative)
The registry values below are what the policy writes for you. Back up the registry or create a restore point first, since a wrong edit here can cause problems.
- Press Win + R, type
regedit, and press Enter. Click Yes if User Account Control asks for permission. - Navigate to
HKEY_LOCAL_MACHINE\SOFTWARE\Policies\Microsoft\FVE. If a key in that path doesn't exist, right-click its parent key, choose New Key, and create it with the name that is missing. - In the right-hand pane, right-click an empty space and select New DWORD (32-bit) Value. Name the new value
UseAdvancedStartup, then double-click it and set its value to1. - Repeat this for each of the other values below, setting them as follows:
EnableBDEWithNoTPMset to 0UseTPMset to 2UseTPMPINset to 2UseTPMKeyset to 2UseTPMKeyPINset to 2
Restart the PC so the new values are picked up. To restore the default behavior, delete the values created above and restart again.
Using Command Line (manage-bde)
Advanced users can also use the manage-bde command-line tool. Open Command Prompt as an administrator by searching for it, right-clicking the result and choosing Run as administrator. Then type: manage-bde -protectors -add C: -TPMAndPIN. This command sets up the PIN requirement for your C: drive.
If the command is refused with a message about policy, the startup authentication policy from the earlier methods has not been enabled yet. Set that first and try again.
Troubleshooting 'PIN Not Available'
If your PIN isn't working, check these things first:
- Your BIOS/UEFI must be set to UEFI mode, not legacy or CSM mode.
- Secure Boot must be enabled in the firmware settings.
- The TPM must be turned on in the firmware. It may be listed as fTPM, PTT or Security Device.
If you can't enter a PIN at startup, use your recovery key to boot into Windows. Once you're in, remove and re-add the PIN protector in the BitLocker settings menu. Remember that the PIN is typed on the pre-boot screen, which may use a different keyboard layout than Windows, so check for typing errors there.
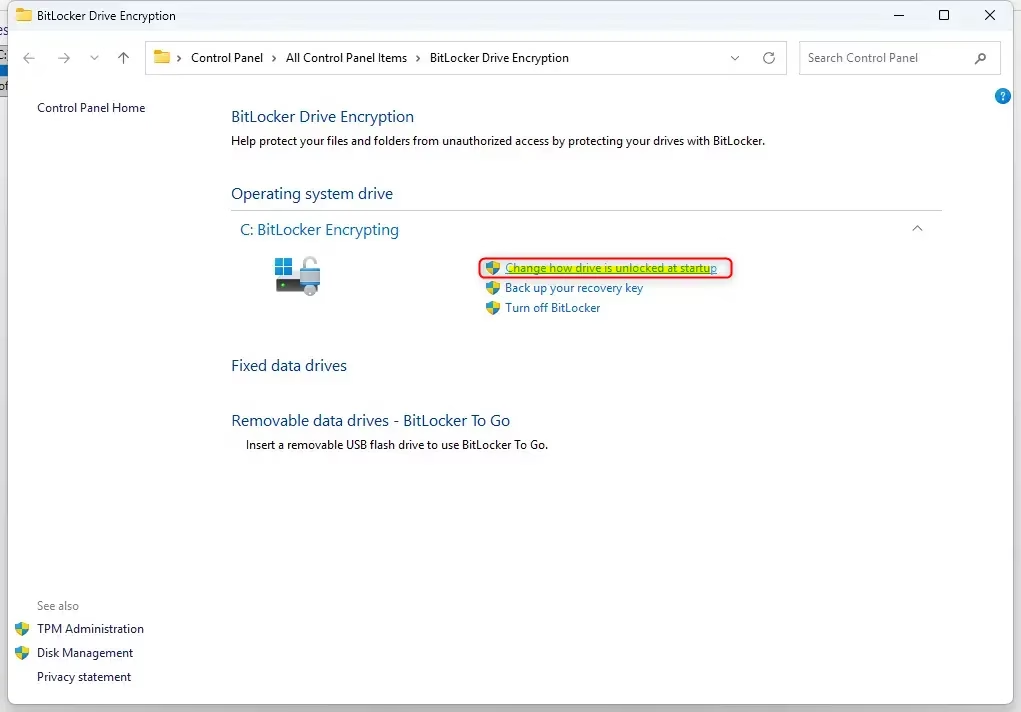
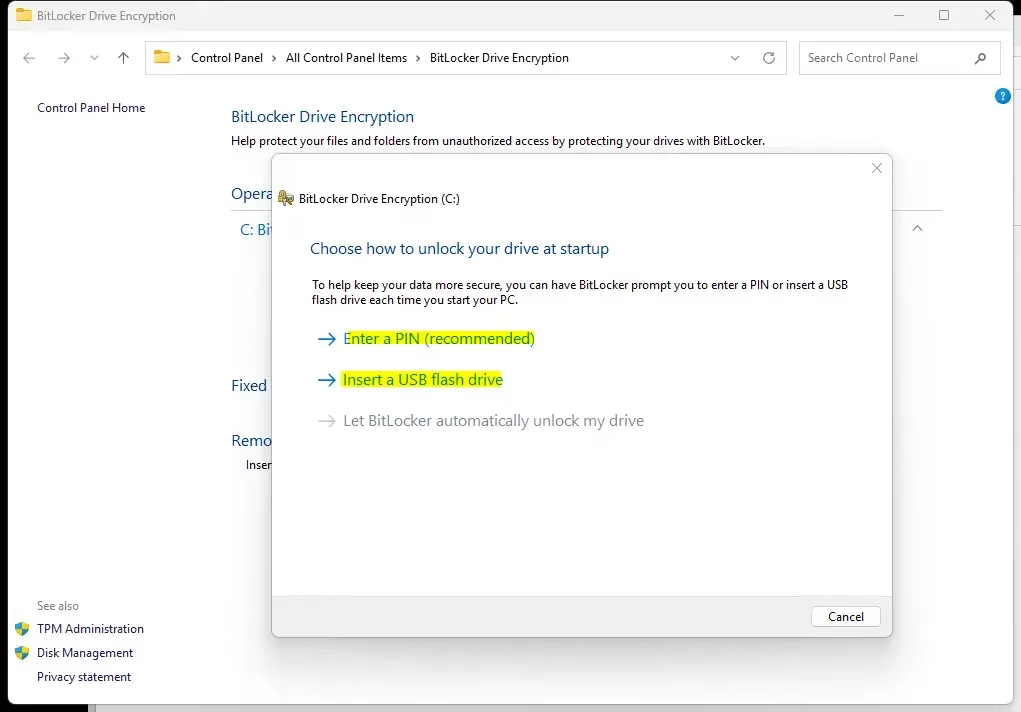
Summary
Adding a BitLocker PIN or USB key at startup makes your Windows 11 computer more secure, because a thief who has only the hardware can't get past the pre-boot screen. Keep your recovery key safe, and keep the USB key away from the laptop if you use one.
Was this guide helpful?

About the Author
Richard
Tech Writer, IT Professional
Richard is a writer at Geek Rewind who turns complex IT tasks into clear, step-by-step guides. He draws on years of hands-on experience in system administration and enterprise IT operations, focusing on Windows, Linux and WordPress: the problems people actually run into, and the fixes that work. His server and WordPress guides come from systems he runs himself. Richard builds and maintains the platform behind Geek Rewind, from its Ubuntu servers and Nginx configuration to its custom WordPress plugins. Many new tutorials start with readers' questions, and he's always glad to answer them in the comments.


No comments yet — be the first to share your thoughts!