How to Show Labels on Taskbar Pins in Windows 11

Taskbar labels in Windows 11 show the text name next to each pinned or open app icon, so you can tell windows apart at a glance. The original Windows 11 release removed them. Microsoft brought them back with version 23H2. If you are on an older build, update Windows first or the option will not be there.
Turn the labels on if you often have several windows open and are tired of guessing which icon is which. This guide covers two methods: the Settings app, which is the easy one, and the Registry Editor, which is the fallback if the setting is missing.
You can show text labels on your Windows 11 taskbar pins by going to Settings Personalization Taskbar Taskbar behaviors. Check the box for “Show labels on Taskbar pins” to enable this feature. This option is available in Windows 11 version 23H2 and later.
Option 1Using the Settings App (The Easy Way!)
The Settings app is the fastest and safest way to get your taskbar labels back. It works on both Home and Pro editions.
Open Settings
Start by opening Settings. You have two ways to do it:
- Press Win+I. The Settings window opens straight away.
- Or click the Start button and then the gear icon (Settings).
Navigate to Personalization
The Personalization section controls how your PC looks, including the taskbar .
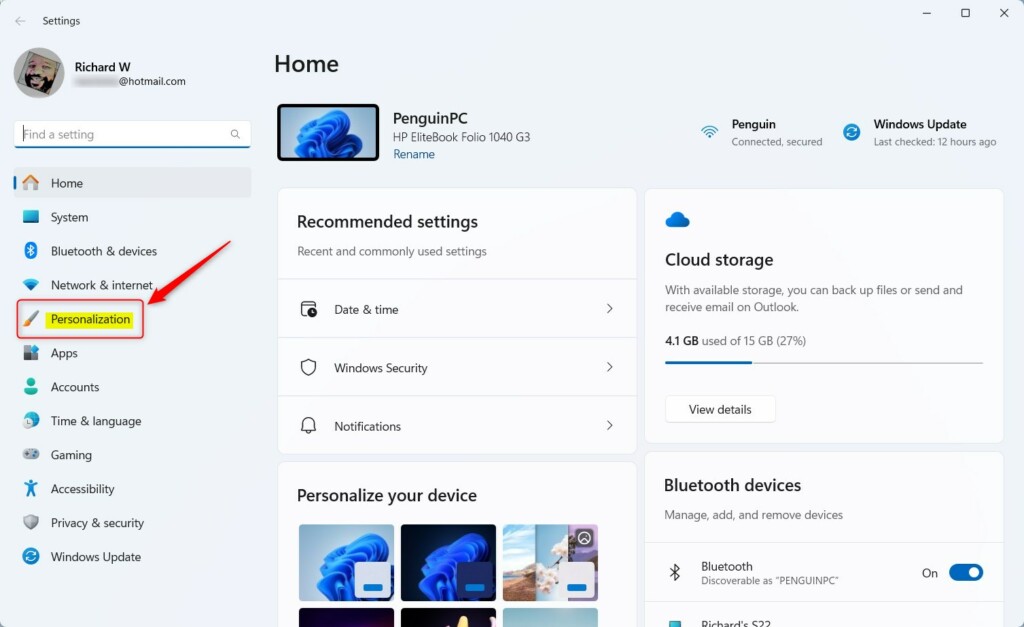
- In the list on the left side of the Settings window, click Personalization.
- The right side now shows the appearance options: themes, colors, background and so on.
Find Taskbar Settings
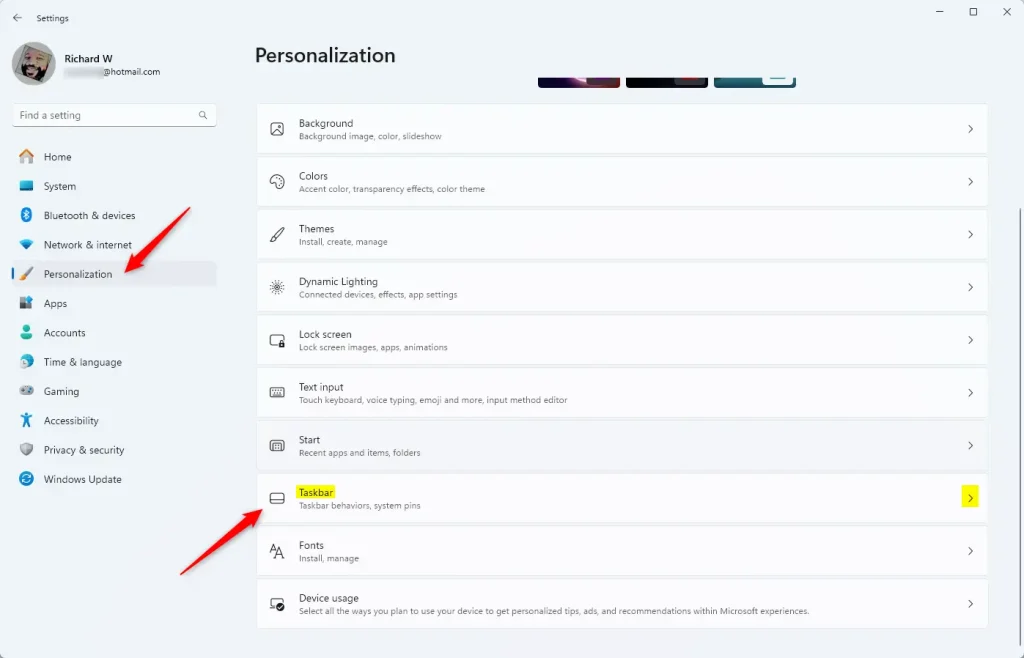
- On the right side of the Personalization screen, scroll down until you see Taskbar.
- Click Taskbar. You should now see the taskbar settings page, with sections such as taskbar items and taskbar behaviors.
Expand Taskbar Behaviors
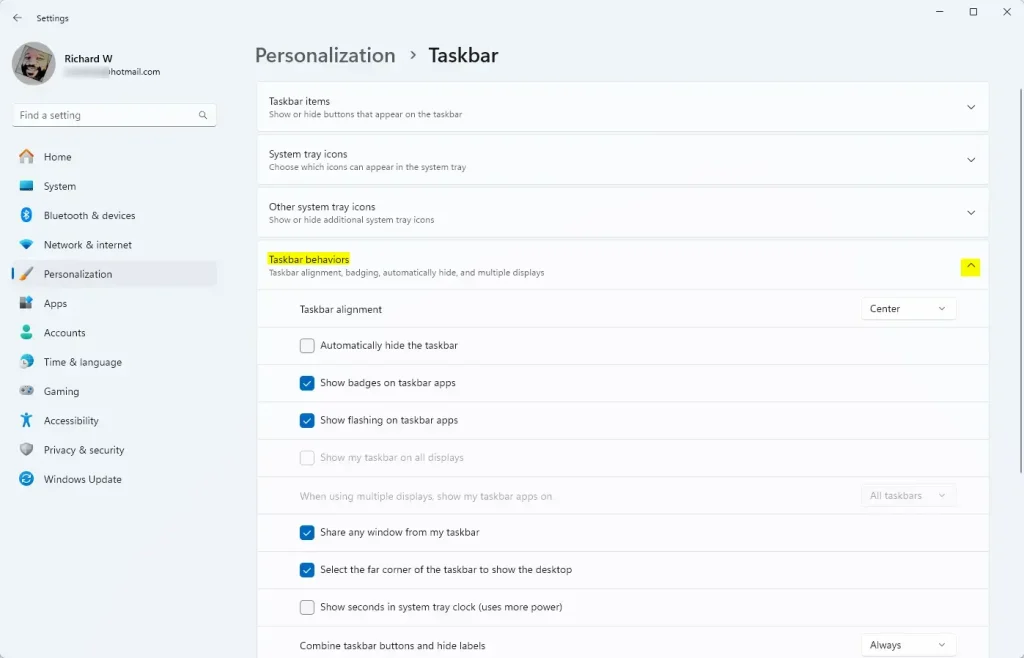
- Scroll down to the Taskbar behaviors section.
- Click Taskbar behaviors to expand it. More options for how your taskbar icons appear are now listed.
If you cannot find this section, check your Windows version under Settings System About. Builds older than 23H2 do not have the labels option.
Enable Taskbar Labels
The full route to the setting is Settings Personalization Taskbar Taskbar behaviors. Once you are in that section:
- Find Show labels on taskbar pins.
- Check the box next to it.
The labels turn on right away. On some builds, the same control is worded differently, for example as a drop-down named Combine taskbar buttons and hide labels. If you see that drop-down instead, set it to Never to show labels. The result is the same.
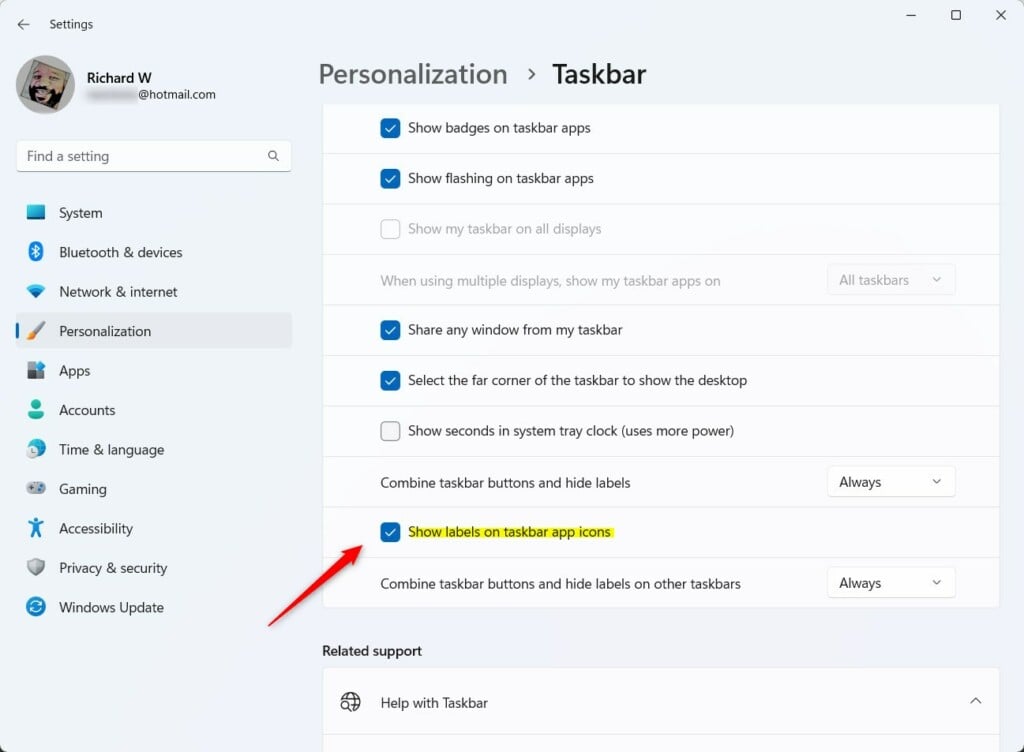
To turn the labels off again:
- Go back to Settings Personalization Taskbar Taskbar behaviors
- Uncheck Show labels on taskbar pins.
This setting decides whether text appears next to your pinned icons. Unchecking it returns the taskbar to icons only.
See the Change
As soon as you check the box, labels should appear next to your pinned and open apps. You do not need to restart the computer. If nothing changes, close Settings and look at the taskbar again. If it still shows icons only, use the Registry method below.
Option 2Using the Registry Editor (For the Adventurous!)
Use the Registry Editor if the setting is missing from Settings or if you prefer to make the change by hand. This method changes an internal value that tells the taskbar whether to display text next to your pinned apps.
Important Warning: Incorrect changes to the Windows Registry can destabilize Windows or stop it from booting. Back up your registry before you start. In Registry Editor, click File Export, choose All as the export range, and save the file somewhere safe. To restore it later, double-click the saved file. If you feel uncertain, stick to Option 1.
Understanding the Registry
The Windows Registry is a database that stores settings for Windows and your apps. Think of it as the control panel behind the control panel. We will change one value in it that manages the taskbar labels. The change applies only to your user account, since it sits under HKEY_CURRENT_USER.
Steps to Manually Edit the Registry
The steps below open Registry Editor, go to the right key, set the value, and restart Windows Explorer so the change shows up. Follow them in order.
Open Registry Editor
- Press Windows key + R to open the Run box.
- Type
regeditinto the box and press Enter, or click OK. - If a User Account Control (UAC) prompt appears asking for permission, click Yes. Registry Editor should now open.
If your account is a standard user rather than an administrator, Windows will ask for an administrator password at this prompt.
Navigate to the Correct Registry Key
Now go to the key that holds the taskbar settings. You can click through the folders in the left pane, or copy and paste the path into the address bar at the top of the Registry Editor window. The required path is:
HKEY_CURRENT_USER\Software\Microsoft\Windows\CurrentVersion\Explorer\Advanced
Check the spelling and capitalization of every part of the path. A single wrong letter will take you to a different key, or to none at all. When you arrive, the right-hand pane fills with a long list of values.
Locate or Create the 'TaskbarShowLabels' Value
With the Advanced key selected, look in the right-hand pane for a value named TaskbarGlomLevel.
- If it exists: Double-click
TaskbarGlomLevelto open it for editing. - If it does not exist: You need to create it. Right-click an empty space in the right-hand pane, choose New, then select DWORD (32-bit) Value. Name the new value exactly
TaskbarGlomLevel, then press Enter. Double-click the newTaskbarGlomLevelvalue to open it.
Create a 32-bit DWORD even if you are on a 64-bit version of Windows. That is the type this setting uses.
Set the Value Data
A small window titled Edit DWORD (32-bit) Value appears. This is where you choose whether labels are shown or hidden:
- To show labels on your taskbar pins, set Value data to
1. - To hide labels (the default), set Value data to
0.
Then confirm the following:
- Check that Base is set to Hexadecimal.
- Click OK to save the value. The edit window closes and the value in the list shows your new data.
Apply the Changes
The change does not appear until Windows Explorer restarts. The quickest way is through Task Manager:
- Press Ctrl + Shift + Esc to open Task Manager.
- On the Processes tab, find Windows Explorer.
- Right-click Windows Explorer and select Restart.
Your taskbar will briefly disappear and then come back. This is normal, and your open windows stay open. If you do not want to bother with Task Manager, signing out and back in, or restarting the PC, has the same effect. Your taskbar labels should now be visible.
Closing the Registry Editor
You can now close the Registry Editor window. To undo the change later, open the same value again, set Value data back to 0, and restart Windows Explorer the same way.
Summary
Showing labels on taskbar pins makes Windows 11 easier to navigate, because each app has its name next to its icon. Use the Settings app first, since it is quick and easy to reverse. Use the Registry Editor only if the setting is missing or does not work. Either way, you get a clearer view of your open and pinned programs.
Enjoy having your open and pinned applications labeled right on your taskbar.
Have a question about this guide?
Answered by AI from this guide. Good questions may be added to this page — please don't include personal details.
Did this guide fix your problem?

About the Author
Richard
Tech Writer, IT Professional
Richard is a writer at Geek Rewind who turns complex IT tasks into clear, step-by-step guides. He draws on years of hands-on experience in system administration and enterprise IT operations, focusing on Windows, Linux and WordPress: the problems people actually run into, and the fixes that work. His server and WordPress guides come from systems he runs himself. Richard builds and maintains the platform behind Geek Rewind, from its Ubuntu servers and Nginx configuration to its custom WordPress plugins. Many new tutorials start with readers' questions, and he's always glad to answer them in the comments.
No comments yet — be the first to share your thoughts!