How to Turn On or off Drag Two Fingers to Scroll on Touchpad in Windows 11


Dragging two fingers to scroll lets you move up and down long pages by sliding two fingers along the touchpad. You don’t need a mouse or the scroll bars. It is on by default on nearly all Windows 11 laptops.
You can turn it on or off in a few seconds in the Settings app . If you scroll by accident while resting your hand on the pad, or you prefer a different scrolling method, this is the setting to change. You can reverse it at any time.
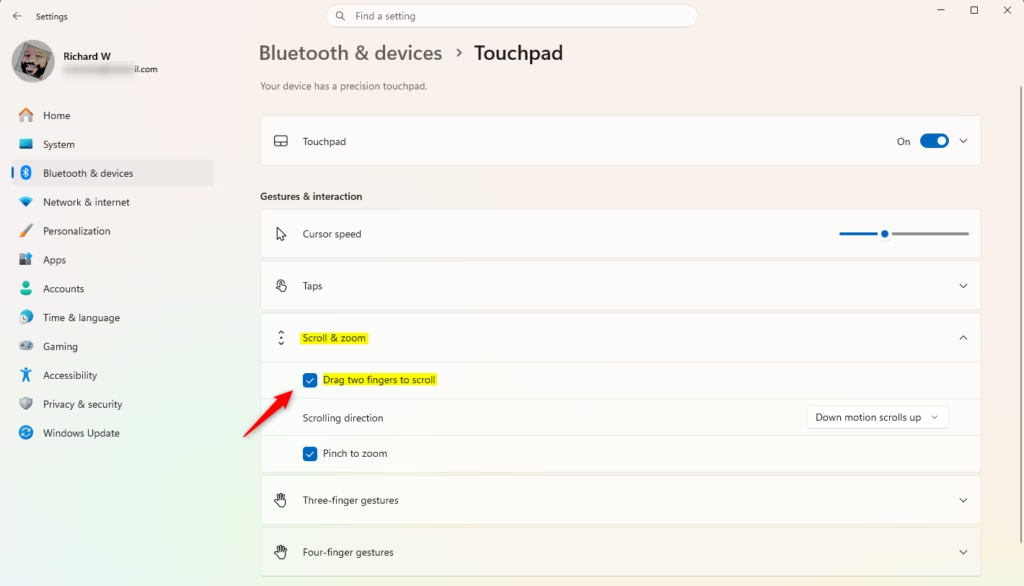
Open Settings with Win+I, go to Bluetooth & devices Touchpad Scroll & zoom, then check or uncheck the box next to Drag two fingers to scroll. The change takes effect immediately without restarting.
Turn On or Off Drag Two Fingers to Scroll in Settings
- Open Settings by pressing
Win+I. The Settings window opens with the navigation list on the left. - Click Bluetooth & devices on the left side, then click Touchpad on the right side. The touchpad options appear, starting with the main touchpad on/off switch.
This is the main way to turn two-finger scrolling on or off, and it controls how the touchpad responds to your fingers. If you don’t see a Touchpad entry, your PC may have no built-in touchpad, or it may be a desktop with a mouse only. Some older laptops use a touchpad driver from the maker (Synaptics, for example) instead of the Windows precision touchpad driver. In that case, Windows may show fewer options, and the gesture settings may live in the maker’s own mouse or touchpad software.
- Click Scroll & zoom to expand it. (see screenshot below step 4) You should now see the scrolling options, including Drag two fingers to scroll.
- Check the box next to Drag two fingers to scroll to turn it on (the default). Uncheck it to turn it off. The change takes effect right away.
- Close Settings. You don’t need to restart. To test it, put two fingers on the touchpad and slide them up or down over a long web page or document.
If the option is greyed out, check that the main touchpad switch at the top of the page is set to On. In the same Scroll & zoom area you can also change the scrolling direction, which decides whether sliding your fingers down moves the page down or up. To undo any change, return to this page and set the box back the way it was.
Option Two
Turn On or Off Drag Two Fingers to Scroll Using Registry
This changes the stored system value that controls the touchpad gesture. Applying the entry below updates that value for you, so you don’t have to browse through registry folders by hand.
If the change doesn’t show up in Settings straight away, close and reopen Settings. If it still doesn’t, sign out and back in, or restart the PC.
Turn On "Drag two fingers to scroll"
This is the default setting.
reg add "HKEY_CURRENT_USER\Software\Microsoft\Windows\CurrentVersion\PrecisionTouchPad" /v PanEnabled /t REG_DWORD /d 0xFFFFFFFF /f
Turn Off "Drag two fingers to scroll"
reg add "HKEY_CURRENT_USER\Software\Microsoft\Windows\CurrentVersion\PrecisionTouchPad" /v PanEnabled /t REG_DWORD /d 0 /f
Summary
Turning the two-finger drag scroll gesture on or off takes only a moment. The Settings app is the easier route and works the same on Windows 11 Home and Pro. The registry method gives you another option if Settings is unavailable or doesn't apply the change. Use whichever suits you. If you want to go back, repeat the same steps and choose the opposite option.
Have a question about this guide?
Answered by AI from this guide. Good questions may be added to this page — please don't include personal details.
Did this guide fix your problem?

About the Author
Richard
Tech Writer, IT Professional
Richard is a writer at Geek Rewind who turns complex IT tasks into clear, step-by-step guides. He draws on years of hands-on experience in system administration and enterprise IT operations, focusing on Windows, Linux and WordPress: the problems people actually run into, and the fixes that work. His server and WordPress guides come from systems he runs himself. Richard builds and maintains the platform behind Geek Rewind, from its Ubuntu servers and Nginx configuration to its custom WordPress plugins. Many new tutorials start with readers' questions, and he's always glad to answer them in the comments.
No comments yet — be the first to share your thoughts!