How to Turn On or off Scroll Inactive Windows in Windows 11

Scroll inactive windows lets you hover your mouse over a background app and scroll it without clicking it first. It helps when you have two or more windows open side by side, for example reading a document in one window while you type notes in another. You don’t lose your place in the window you’re working in.
The setting is in the Windows 11 Settings app and takes under 30 seconds to change. It’s on by default, and you can switch it off or back on whenever you like. It applies to your user account, so it doesn’t change anything for other people who use the PC.
Open Settings, go to Bluetooth & devices, select Mouse, then toggle on Scroll inactive windows when hovering over them. This lets you scroll background windows by hovering your mouse over them without clicking first.
Turn On or Off Scroll Inactive Windows in Settings
The Settings app is the easiest way to change this. Follow these steps to reach your mouse preferences.
- Press Win+I on your keyboard to open Settings. You should see the Settings window with a list of categories on the left.
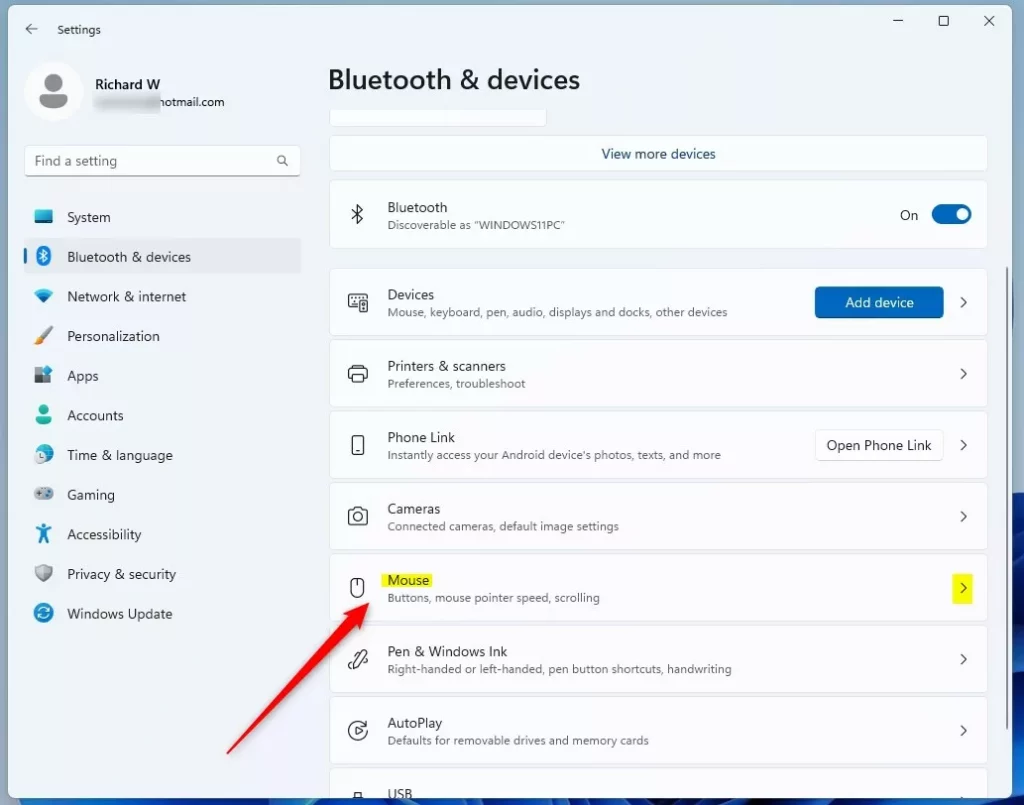
- Click Bluetooth & devices on the left side. The device options appear on the right.
- Click Mouse on the right side. The page with your pointer and scrolling options opens.
This page controls how your mouse behaves. The scroll setting on it lets you scroll background windows and documents just by hovering over them, even when the window isn’t active or selected.
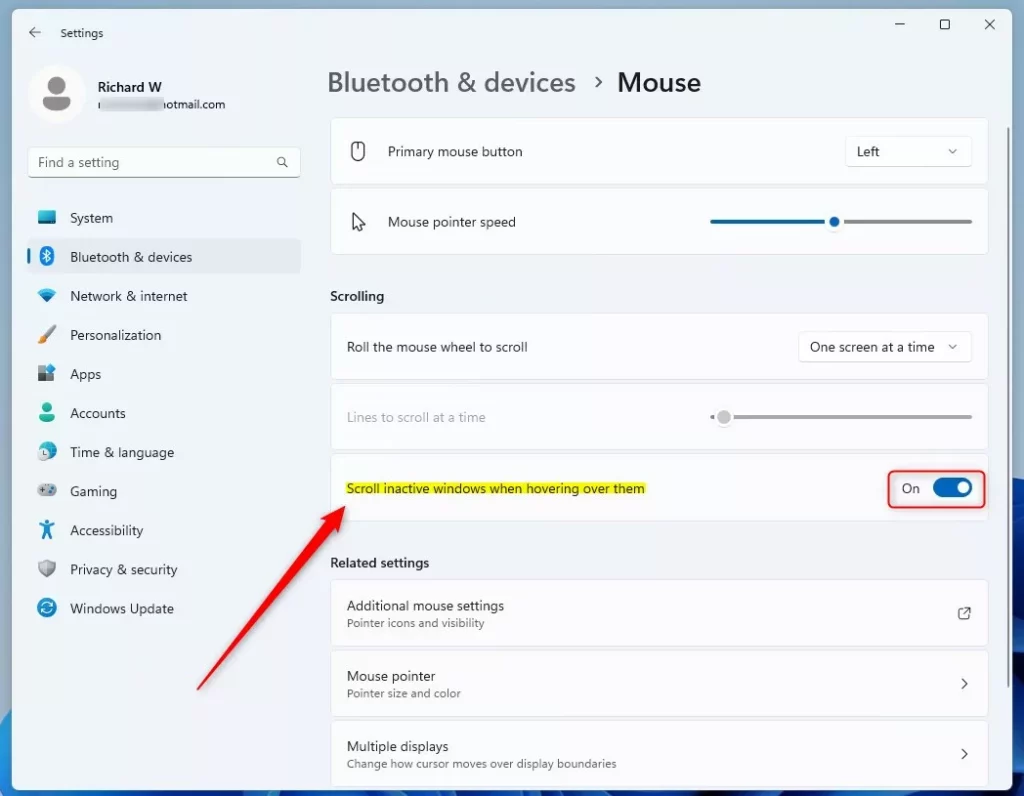
- Find the option Scroll inactive windows when hovering over them. It sits near the other scrolling options on the Mouse page.
- Set the toggle to On or Off, depending on what you want. On is the default.
- Close Settings when you’re done. The change applies straight away, so you don’t need to restart or sign out.
To test it, open two windows side by side, rest the pointer over the one in the background and turn the mouse wheel. With the setting on, the background window scrolls. With it off, you have to click the window first. A few apps handle scrolling in their own way, so they may not respond the same as standard windows do.
Option Two
Turn On or Off Scroll Inactive Windows Using Command Line
This saves you from digging through the Settings pages, and it’s handy if you set up several PCs. Here’s how to run the commands.
- Open Windows Terminal. You can right-click the Start button and pick it from the menu, or search for it in Start.
- Select either Windows PowerShell or Command Prompt. Use the down arrow next to the plus tab to pick one, or just use the tab that opens by default if it’s the one you want.
- Copy and paste one of the commands below and press Enter. Use the first to turn the feature on and the second to turn it off.
To Turn On:
reg add "HKCU\Control Panel\Desktop" /V MouseWheelRouting /T REG_DWORD /d 2 /F
To Turn Off:
reg add "HKCU\Control Panel\Desktop" /V MouseWheelRouting /T REG_DWORD /d 0 /F
To check it, open Settings Bluetooth & devices Mouse and look at the Scroll inactive windows when hovering over them toggle. If the toggle still shows the old state, close Settings and open it again. To undo a change, run the other command.
Summary
Now you know both ways to control scrolling in inactive windows: the toggle in Settings and the commands in Windows Terminal. Whichever you use, you can switch back at any time, which makes it easy to try the setting and see if it suits how you work with multiple open apps.
Have a question about this guide?
Answered by AI from this guide. Good questions may be added to this page — please don't include personal details.
Did this guide fix your problem?

About the Author
Richard
Tech Writer, IT Professional
Richard is a writer at Geek Rewind who turns complex IT tasks into clear, step-by-step guides. He draws on years of hands-on experience in system administration and enterprise IT operations, focusing on Windows, Linux and WordPress: the problems people actually run into, and the fixes that work. His server and WordPress guides come from systems he runs himself. Richard builds and maintains the platform behind Geek Rewind, from its Ubuntu servers and Nginx configuration to its custom WordPress plugins. Many new tutorials start with readers' questions, and he's always glad to answer them in the comments.
No comments yet — be the first to share your thoughts!