How to Set Individual Speech Synthesis Speed for Separate Languages in Windows 11

Windows 11 lets you set the text-to-speech speed for each language voice separately, so a voice in one language can read faster or slower without changing the others. Each language pack on your PC has its own voice data and synthesis engine. A speed that sounds right for English can sound too fast or too slow for Spanish or French.
Older versions of Windows forced a single speaking rate across every language you installed, which made some voices hard to understand. Adjusting each voice on its own fixes that.
Windows has more than one speech system. Narrator has its own voice and speed settings in Settings. Older apps use the classic Speech Properties window. This tutorial covers both, and notes where they differ so you change the right one.
Open Settings Accessibility Narrator, select your target language voice from the dropdown, then drag the Voice speed slider to set its speed. Alternatively, press Win+R, type control speech, and use the Voice speed slider in the Text To Speech tab. Each language’s speed adjusts independently.
Checking Installed Language Packs and Voice Options
A voice that is missing or only partly downloaded will not show up in the speed controls, and there is nothing to adjust until it does.
- Press Win+I to open Settings.

Windows 11 Start menu with Settings gear icon highlighted. - Select Time & language from the left-hand navigation menu.

Settings › Time & language - Click Language & region. You should now see a list of your installed languages.
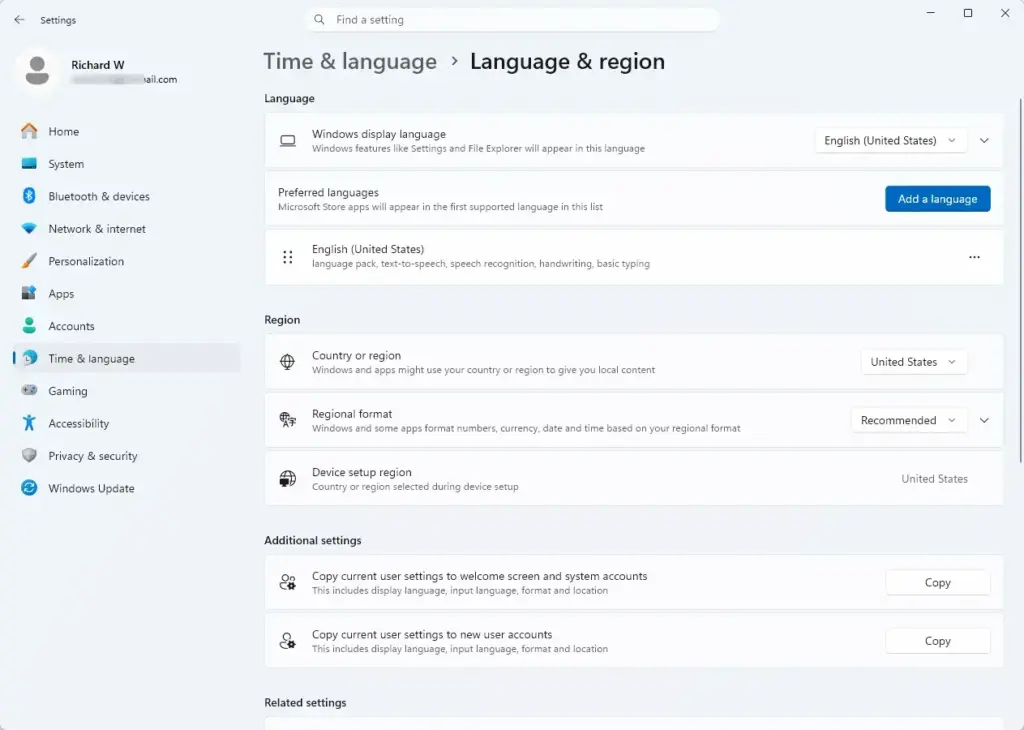
Settings › Time & language › Language & region - Find your target language, click the three dots icon next to it, and select Language options. The language’s page opens and lists its features.
- Scroll down to the speech features and confirm that Text-to-speech (and Speech recognition, if you need it) is installed. If text-to-speech is missing, click Install next to it. On some builds the button reads Download.
- Wait for the download to finish. It needs an internet connection, and it can take a few minutes on a slow link. You don’t normally need to restart, but sign out and back in if the voice doesn’t appear in the next sections.
If the language itself is not in the list, add it first with the Add a language button on the same page, then repeat the steps above.
Navigating to Speech Settings in 🪟 Windows 11
Windows 11 has two places for speech settings. The Narrator page in Settings controls the voice Narrator uses. The classic Speech Properties window controls the voice used by older apps built on the Windows speech API. Start with Settings.
- Open Settings.
- Select Accessibility in the left sidebar.
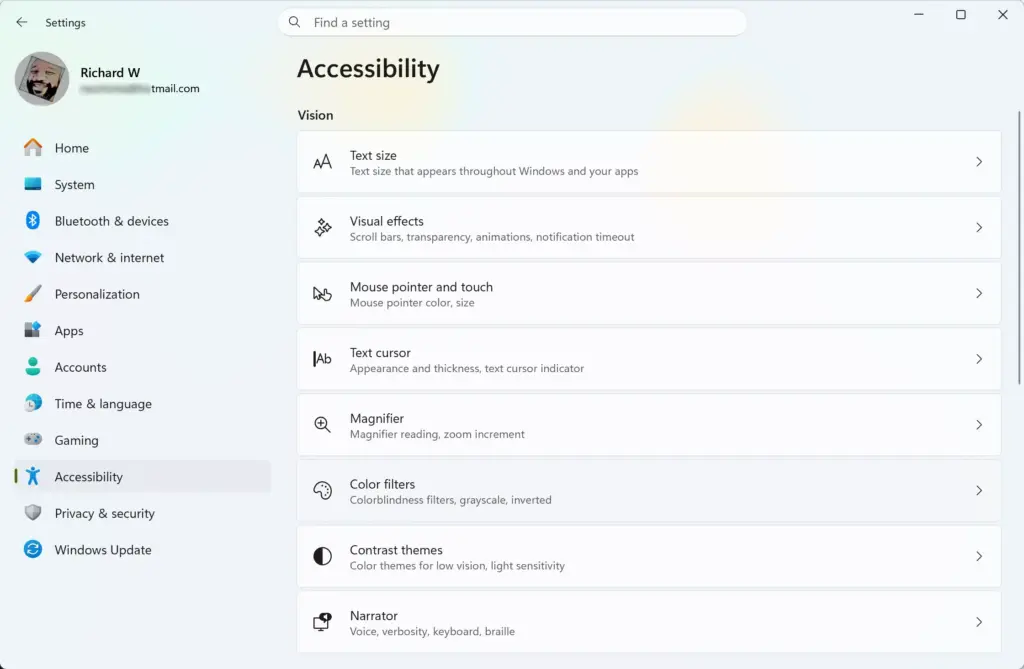
Settings › Accessibility - Click Narrator, or type Speech into the Settings search box to jump to audio output settings.
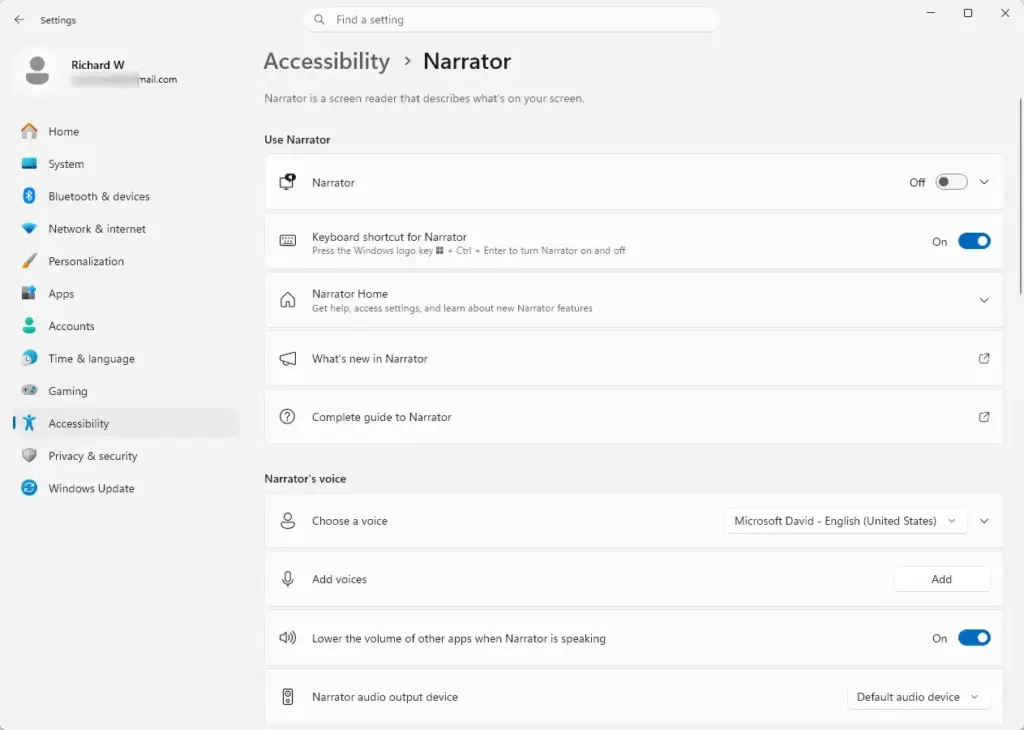
Settings › Accessibility › Narrator - In the Narrator page, look for the voice options. You can pick a voice and set its speed there. Narrator keeps these settings for Narrator only, not for other apps.
To reach the classic window instead, press Windows key + R to open the Run dialog, type control speech, and press Enter. This opens the classic speech properties window.
If nothing opens, the Run command may not be available on your build. Use the Settings route above, or the steps in the next section.
Configuring Individual Speech Rates via Speech Properties
The classic Speech Properties window is where you pick a voice and set its speed for apps that use the Windows speech API. It is the quickest way to hear a speed change before you commit to it.
- Press Windows key + R to open the Run dialog.
- Type
control speechand press Enter. The Speech Properties window opens. - Open the Text To Speech tab. The Voice selection area and the Voice speed slider are on this tab.
- Choose the voice for your target language from the Voice selection drop-down. It lists the installed speech synthesis voices that this window can use.
- Drag the Voice speed slider between Slower and Faster to set the speed for that voice.
- Click Preview Voice to hear a sample in the chosen language. If it is too quick or too slow, move the slider and preview again.
- Click Apply, then OK, to save your changes.
Two things to keep in mind. First, this window may not list every voice you installed, because some newer voices are only available through Settings and Narrator. If your language is missing here, set its speed on the Narrator page instead. Second, the slider is one control. After you switch to a different voice, open the window again and check that the slider still suits that voice.
Managing Voice Profiles with PowerShell for Advanced Control
PowerShell helps when you are not sure which voices are installed, or when a voice you expect is missing from the normal menus. The steps below only list the voices. They do not change any speed. Use the earlier sections to change speeds.
- Right-click the Start button and select Terminal (Admin) or PowerShell (Admin).
- Click Yes on the User Account Control prompt. Administrator rights are not strictly needed just to list voices, but they do no harm here.
- Type the following command to list the installed speech synthesis voices and their identifiers:
Add-Type -AssemblyName System.Speech; (New-Object System.Speech.Synthesis.SpeechSynthesizer).GetInstalledVoices() | Select-Object -ExpandProperty VoiceInfo - Read the output and note the exact name of the voice for your target language. Use that name to pick the matching voice in the Speech Properties window.
The command works through the .NET class System.Speech.Synthesis.SpeechSynthesizer. It reports the voices that class can see, which may be fewer than the ones shown in Settings. A voice missing from this list can still be installed and working in Narrator.
Troubleshooting Common Speech Synthesis Speed Issues
Background synchronization services and third-party accessibility tools are the usual causes, and a Windows or language pack update can also reset them. Work through the checks below in order.
- Open Settings, go to Windows Update, and check for pending cumulative updates. Install them and restart, since an unfinished update can leave speech settings in a half-changed state.
- Press Windows key + R, type
services.msc, and press Enter. In the list, find Windows Audio, right-click it, and select Restart. This clears audio problems that can make a voice sound wrong even though the speed setting is correct. - Re-apply your preferred speed in the Speech Properties window if a language pack update overwrote it. Click Apply and OK again, then use Preview Voice to confirm.
- If the speed still resets, temporarily turn off any third-party screen reader or accessibility tool, set the speed again, and restart. If the setting now holds, that tool is the cause.
What to do next
Each language voice should now read at a pace that suits it. If you want to go further, look at custom keyboard shortcuts for switching languages quickly, or set up localized speech recognition profiles to match your voice configuration.
Was this guide helpful?

About the Author
Richard
Tech Writer, IT Professional
Richard is a writer at Geek Rewind who turns complex IT tasks into clear, step-by-step guides. He draws on years of hands-on experience in system administration and enterprise IT operations, focusing on Windows, Linux and WordPress: the problems people actually run into, and the fixes that work. His server and WordPress guides come from systems he runs himself. Richard builds and maintains the platform behind Geek Rewind, from its Ubuntu servers and Nginx configuration to its custom WordPress plugins. Many new tutorials start with readers' questions, and he's always glad to answer them in the comments.

No comments yet — be the first to share your thoughts!