How to Restart a Network Adapter in Windows 11


Restarting the network adapter can fix slow or dropped internet connections on Windows 11. This guide offers simple methods to perform the restart.
Restart your network adapter by clicking the Network icon and toggling Wi-Fi off and on. Alternatively, go to Network Connections, find your adapter, disable it, then enable it again. For a command-line option, use PowerShell to restart the adapter by name.
What is a Network Adapter?
A network adapter, a computer hardware component connecting to the internet or other networks, is sometimes called a network card or NIC. Restarting this network adapter means turning the hardware off and then back on. This action clears out minor issues that may have accumulated.
Why Restart the Network Adapter?
Restarting your network adapter fixes common connection problems. It resets your network settings and clears temporary errors that slow down or stop your internet.
How to Restart Your Network Adapter
Method 1Turn Wi-Fi Off and On
- Click the Network icon in the lower-right corner of your screen near the clock.
- Click the Wi-Fi button to turn it off.
- Wait a few seconds, then click it again to turn Wi-Fi back on.
Here’s a helpful video showing how to do this step by step:
%📂%SC0%%
Method 2Disable and Enable Your Network Adapter
- Press the Windows key + X and select Network Connections.
- Click Advanced network settings.
- Under More settings, click Network adapters.
- Find your network adapter like “ Wi-Fi”, click it, then click Disable.
- Wait a few seconds, then click Enable to turn it back on.
More detailed steps can be found here: How to Disable or Enable a Network Adapter in Windows 11
Method 3 Restart the Network Adapter Using PowerShell
If you’re comfortable using commands, you can restart your network adapter in Windows 11 using PowerShell, which gives you more control.
If you like using commands, you can restart your network adapter with PowerShell:
- Press Windows key + S, type PowerShell, right-click it, and choose Run as administrator.
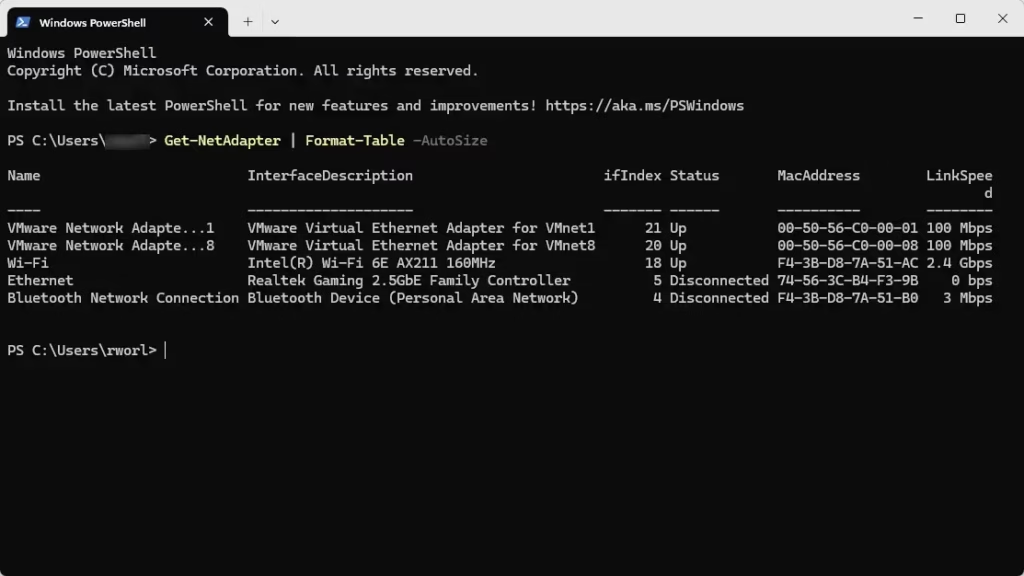
- Type this command to see all your network adapters:
Get-NetAdapter | Format-Table -AutoSize - Look for the name of the adapter you want to restart like “ Wi-Fi”.
- Then type this command and replace Wi-Fi with your adapter’s name:
Restart-NetAdapter -Name "Wi-Fi"
Here’s an example screenshot showing the list of network adapters:
Summary
Restarting your network adapter is a simple fix for internet problems in Windows 11, helping clear small errors that slow things down.
- Turn Wi-Fi off and on from the Network icon.
- Disable and enable the adapter through Network settings.
- Use PowerShell commands for a quick restart if you’re comfortable with typing commands.
Restarting the network adapter in Windows 11 quickly improves your network connection. This action helps you get back online without hassle by refreshing the adapter's connection to your Wi-Fi or Ethernet. This process is crucial when experiencing internet slowdowns or disconnections.
Was this guide helpful?

About the Author
Richard
Tech Writer, IT Professional
Richard, a writer for Geek Rewind, is a tech enthusiast who loves breaking down complex IT topics into simple, easy-to-understand ideas. With years of hands-on experience in system administration and enterprise IT operations, he’s developed a knack for offering practical tips and solutions. Richard aims to make technology more accessible and actionable. He's deeply committed to the Geek Rewind community, always ready to answer questions and engage in discussions.


No comments yet — be the first to share your thoughts!