How to Rename Your Microphone in Windows 11

Renaming your microphone in Windows 11 changes generic factory labels like “Realtek Audio” to custom names like “Desk Mic”, so you can spot the right recording device at a glance. Clear labels stop you from picking the wrong audio input when you join a video call or record sound. They matter most when you have a headset, a webcam mic and a USB mic all plugged in at once.
You can update these names through the built-in sound settings in less than 60 seconds, without installing extra software. There are two ways to do it: the Settings app and the classic Control Panel. Both work on Windows 11 Home and Pro, and both change the same device name.
Open Settings, go to System Sound All sound devices, select your microphone, click Rename, and type your new name. Alternatively, use Control Panel Hardware and Sound Sound, select the microphone, click Properties, and enter the new name.
Rename Your Microphone Using Windows Settings
Use Windows Settings when you want a quick way to change the label without opening older tools. This is the method Microsoft now points you to, and it takes a few clicks. The steps below match Windows 11 version 22H2 and later. On the original 21H2 release the Sound page is laid out differently and may not have the All sound devices page, so if you can’t follow along, use the Control Panel method further down.
- Open Settings
- Click the Start menu (the Windows icon on the taskbar) and select Settings. The Settings window opens with a list of categories on the left.
- Or press Win+I on your keyboard to open Settings straight away.
- Go to System Sound
- In Settings, click System on the left side.
- Then click Sound on the right. You should see your output devices at the top and your input devices (microphones) a little further down.
- Open All Sound Devices
- Scroll down to the Advanced section and click All sound devices. A page opens listing every output and input device Windows knows about.
- Choose Your Microphone
- Under Input devices, find the microphone you want to rename. If you’re not sure which one it is, tap or speak into the mic and watch which entry reacts, or unplug it and see which one disappears.
- Click it. The properties page for that microphone opens.
- Rename Your Microphone
- On the next page, click the Rename link next to your microphone’s current name. The name turns into an editable text box.
- Type a new name and click Save. Keep it short and specific, such as “Desk Mic” or “Headset Mic”. You should now see the new name at the top of the page.
- Close the Settings app when you’re done. You don’t need to restart Windows. Apps that were already open, such as Teams, Zoom or OBS, may keep showing the old name until you close and reopen them. To undo the change, follow the same steps and enter the original name.
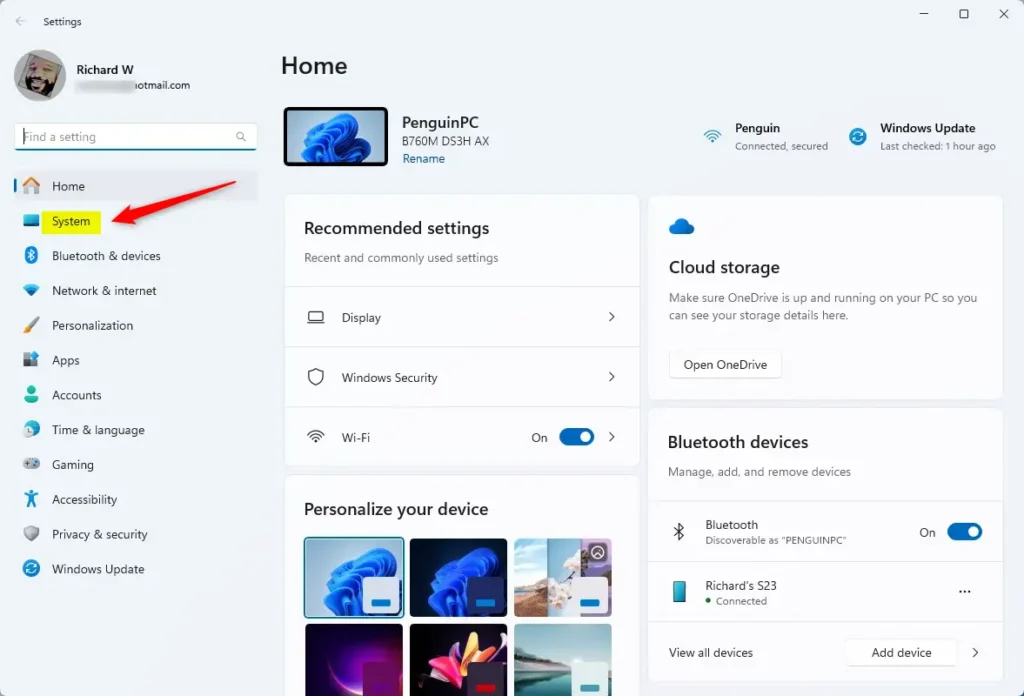
Click “System” in the Windows Settings app.
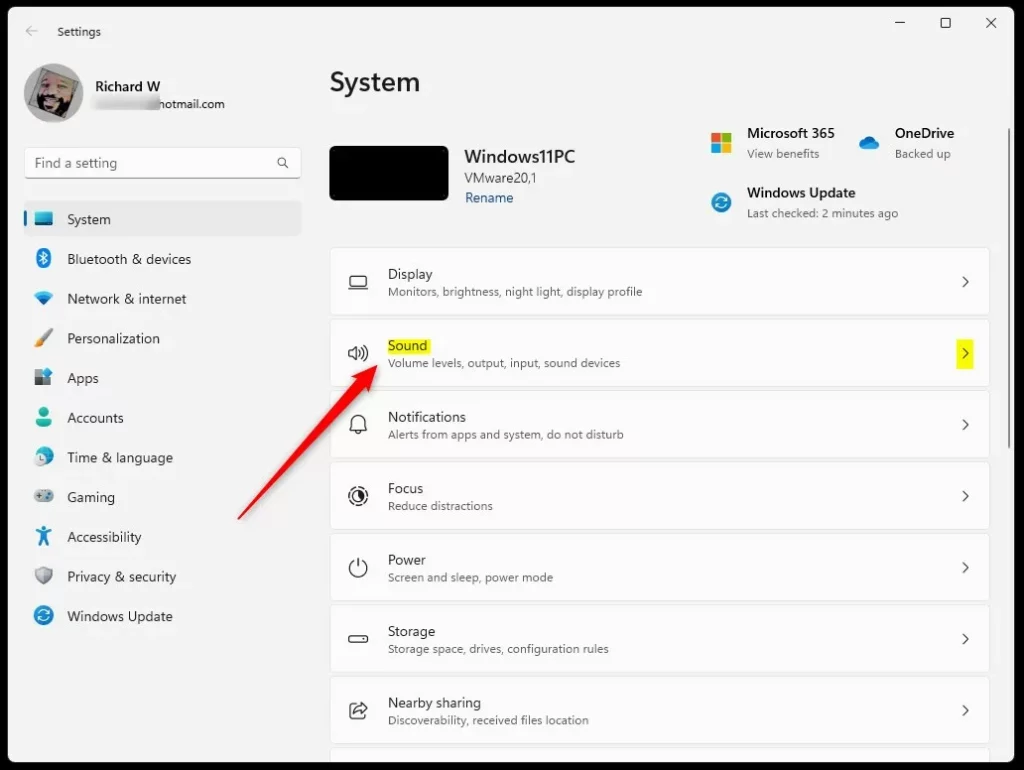
Click the “Sound” tile in Settings.
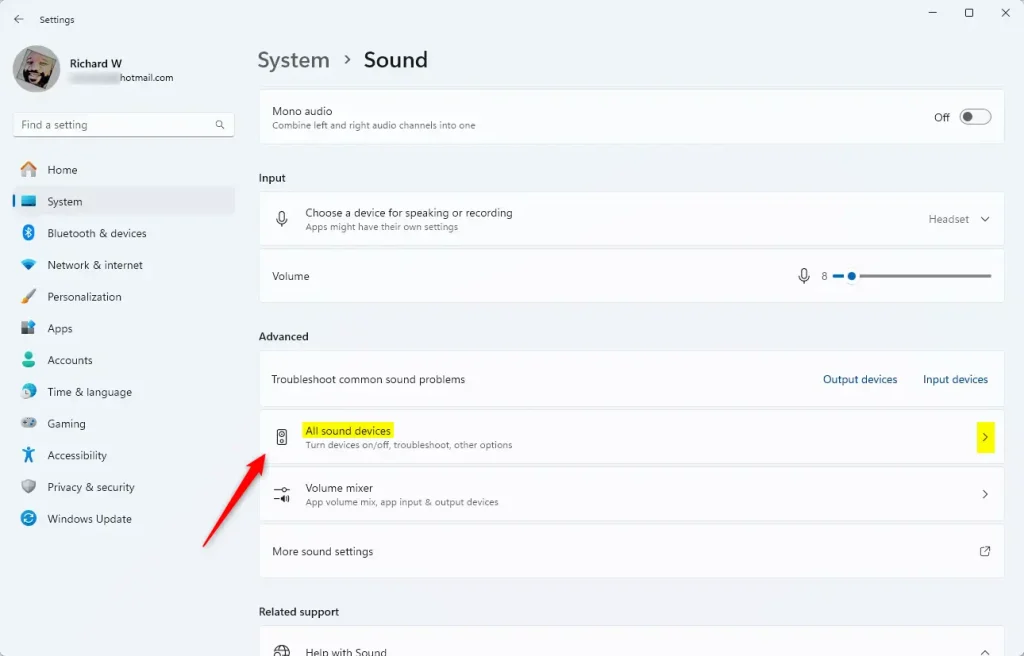
Find and click “All sound devices”.
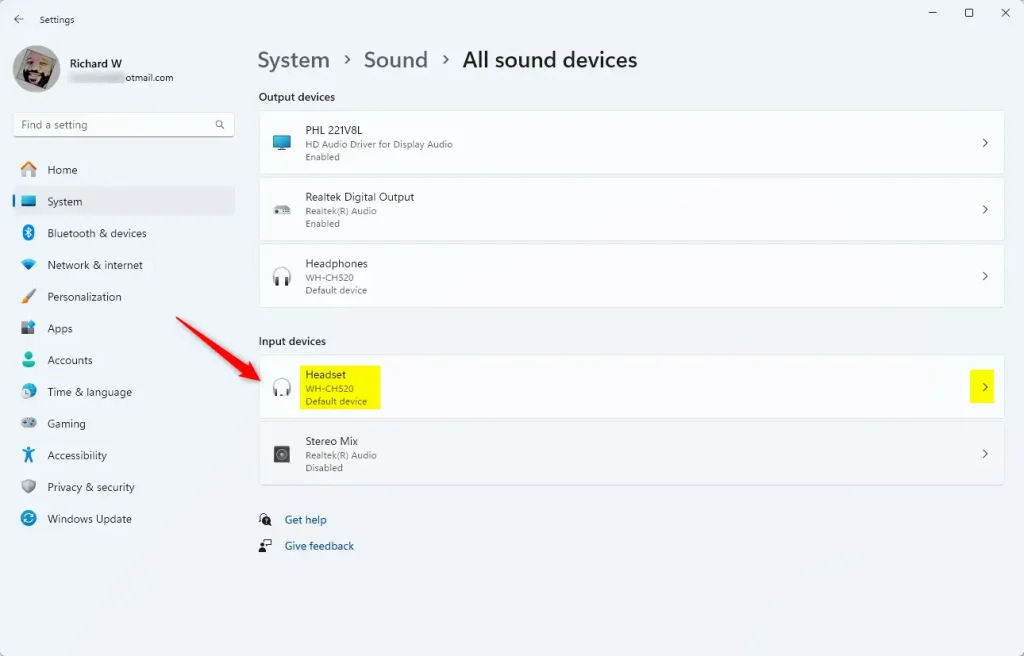
Select the microphone you want to rename.
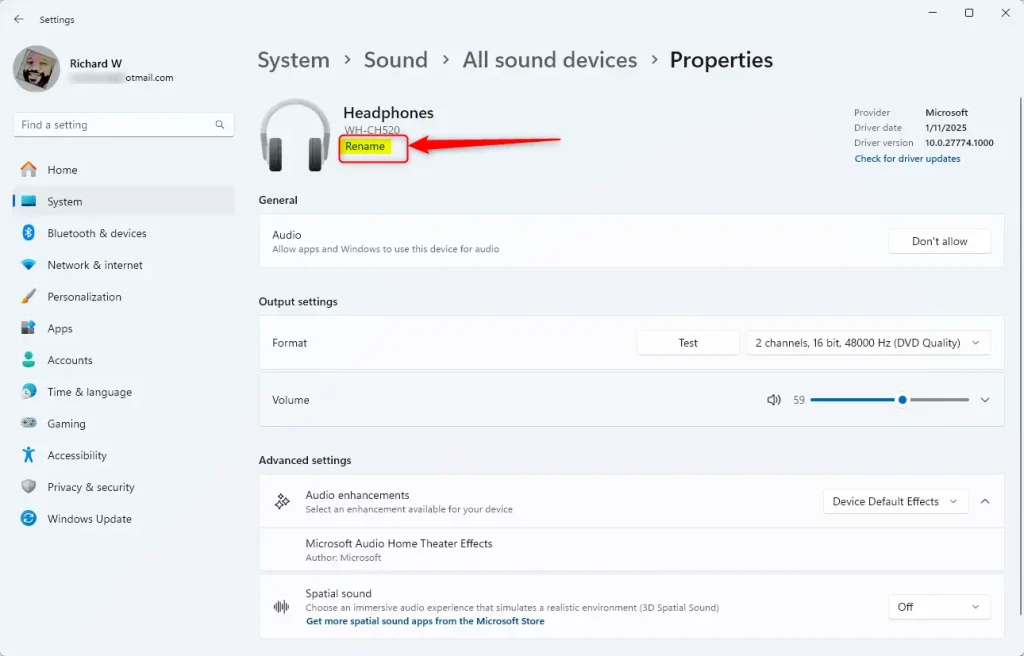
Click “Rename” and type your new name.
Rename Your Microphone Using Control Panel
Use Control Panel if you prefer the classic Windows interface for managing hardware. This older menu gives you a direct way to change recording device names, so you can tell your connected audio gear apart without going through the newer Settings app. It is also the fallback if the Rename link is missing in Settings. Control Panel is still included in Windows 11 Home and Pro.
- Open Control Panel
- Click the Start menu.
- Type Control Panel and press Enter. The Control Panel window opens.
- Go to Hardware and Sound Sound
- In Control Panel, click Hardware and Sound. If your view is set to large or small icons instead of categories, you can click Sound directly.
- Then click Sound. A small Sound window opens with several tabs.
- Find Your Microphone
- In the Sound window, click the Recording tab. Your microphones are listed here, and the one that is picking up sound shows a moving level bar. If your mic isn’t listed, right-click an empty area and tick Show Disabled Devices.
- Select Your Microphone
- Click the microphone you want to rename.
- Then click Properties. The Properties window for that device opens on the General tab.
- Rename It
- In the Properties window, type the new name in the box at the top, replacing the current name.
- Click Apply, then OK. The new name should now show in the Recording list. If Windows asks for administrator approval, approve it. To undo the change, open the same window and type the old name back in.
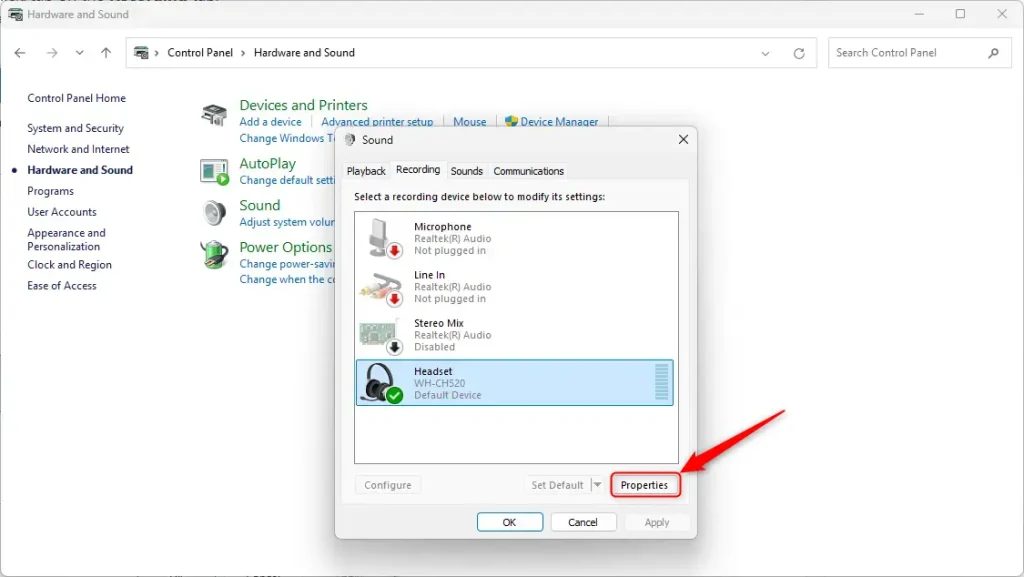
Select your microphone and click “Properties.”
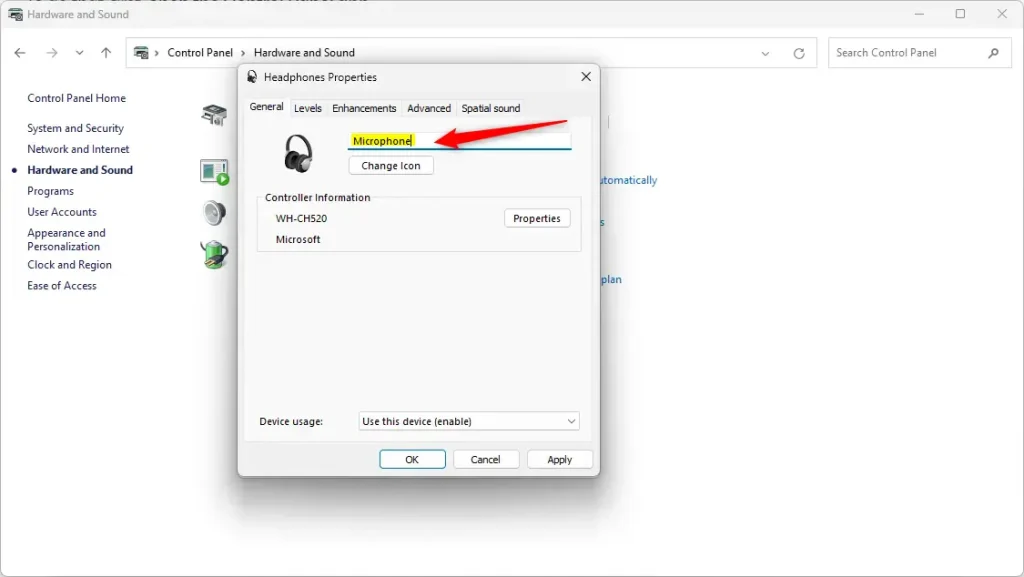
Type a new name and click Apply.
Why Rename Your Microphone?
Custom audio labels stop you from picking the wrong input device during video calls, online meetings, or streaming sessions. Giving your recording gear clear names helps you manage multiple inputs much faster, especially when Windows shows confusing serial numbers or generic driver names instead of real device names. One caution: a USB microphone moved to a different port can show up as a new device with its default name, so you may need to rename it again.
- Personalized NamesGive your microphones names that make sense to you.
- Better OrganizationEasily tell one microphone from another if you have several.
- Faster SelectionPick the right microphone quickly when recording or chatting.
- Easy AccessRename microphones anytime using either Settings or Control Panel.
- Simple ProcessIt only takes a few clicks and seconds to rename your device, and you can change the name back at any time.
Summary
Custom labels keep audio hardware organized, making input selection much faster during calls or recording sessions. Pick whichever method suits you, Settings or Control Panel, and give each microphone a name you will recognize at a glance.
Have a question about this guide?
Answered by AI from this guide. Good questions may be added to this page — please don't include personal details.
Did this guide fix your problem?

About the Author
Richard
Tech Writer, IT Professional
Richard is a writer at Geek Rewind who turns complex IT tasks into clear, step-by-step guides. He draws on years of hands-on experience in system administration and enterprise IT operations, focusing on Windows, Linux and WordPress: the problems people actually run into, and the fixes that work. His server and WordPress guides come from systems he runs himself. Richard builds and maintains the platform behind Geek Rewind, from its Ubuntu servers and Nginx configuration to its custom WordPress plugins. Many new tutorials start with readers' questions, and he's always glad to answer them in the comments.
No comments yet — be the first to share your thoughts!