How to Refresh Wi-Fi Networks in Windows 11
Refreshing Wi-Fi networks in Windows 11 helps fix connection problems and makes sure you see all available networks.
This process updates the list of Wi-Fi signals your PC can detect. It’s a simple way to troubleshoot when your computer doesn’t find a network it should, like your home Wi-Fi or a public hotspot.
For instance, if your Windows 11 laptop suddenly stops seeing your usual Wi-Fi network, refreshing the list is often the first step to getting reconnected.
You can easily refresh your Wi-Fi list using Windows 11’s own tools, without needing any extra programs.
Refresh your Wi-Fi networks in Windows 11 by opening Quick Settings (⊞ Win+A), clicking the arrow next to Wi-Fi, and then clicking Refresh. Alternatively, use Windows Terminal commands like Restart-Service -Force -Name “wlansvc” to restart the Wi-Fi service.
What is Wi-Fi?
Wi-Fi is a way for your computer to connect to the internet wirelessly – no cables required! You can see a list of Wi-Fi networks nearby and connect to any you have the password for.
Why Refresh Your Wi-Fi List?
Sometimes, your computer might not show all Wi-Fi networks right away. Instead of waiting, you can refresh the list to see if new networks appear. This is helpful if you just turned on a Wi-Fi hotspot or moved to a new location.
How to Refresh Wi-Fi Networks Using Quick Settings
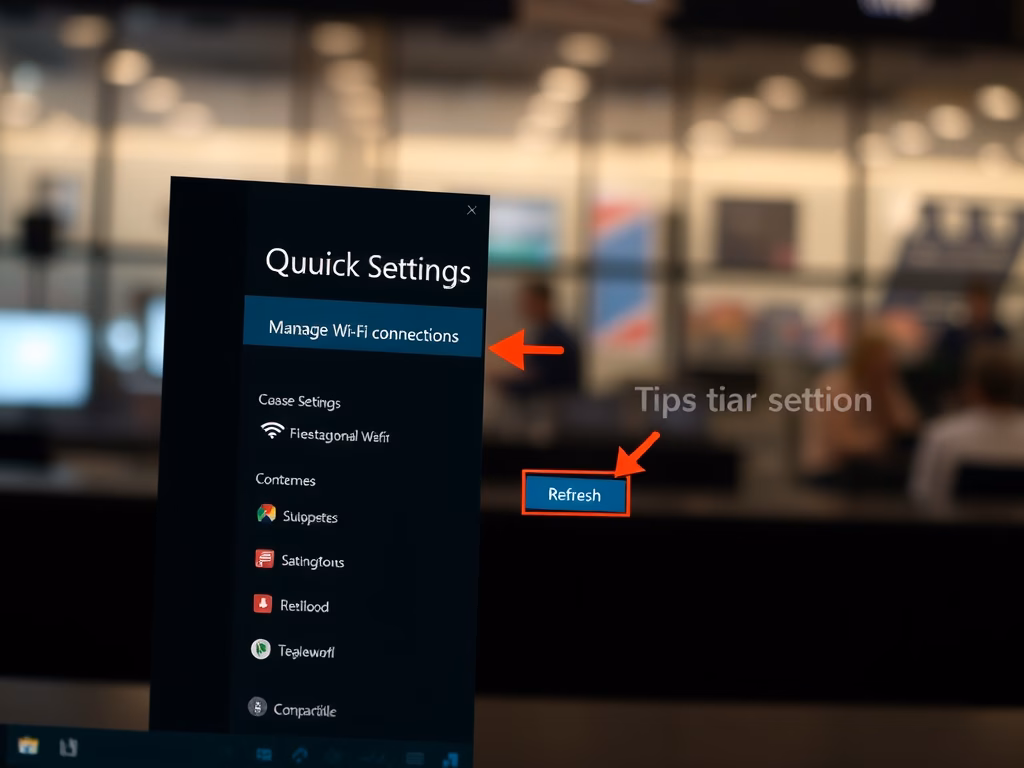
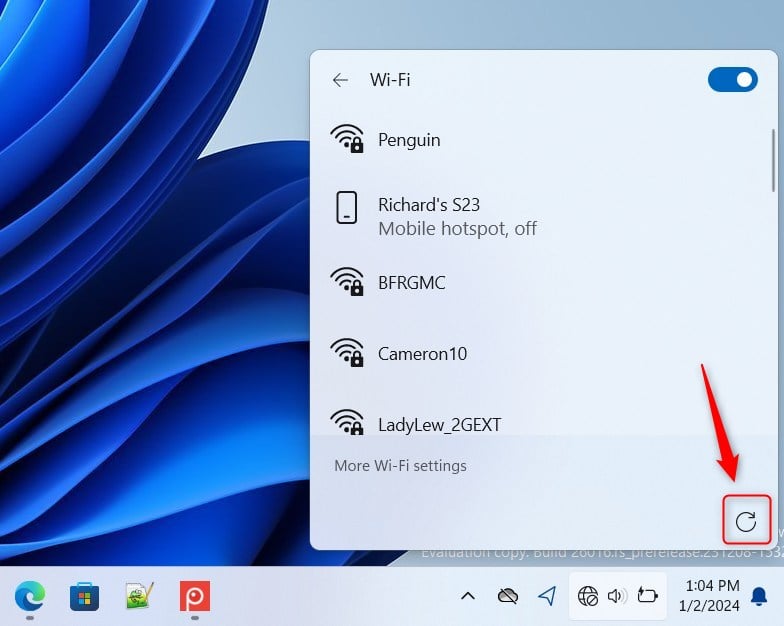
Refreshing Wi-Fi networks in Windows 11 is accessible through Quick Settings. Press the Windows key and A together to open the Quick Settings panel. From there, click the arrow next to the Wi-Fi icon; this will show all available connections and trigger a fresh scan for networks that might be hidden. This helps you find any missing Wi-Fi signals.- Open Quick Settings: Press
Win + Aon your keyboard. This opens a small panel with quick access buttons. - Find the Wi-Fi Section: Look for the Wi-Fi icon in Quick Settings. Click the arrow next to it labeled Manage Wi-Fi connections.
- Click the Refresh Button: In the Wi-Fi list that opens, click the Refresh button to rescan for available networks.
How to Refresh Wi-Fi Networks Using Windows Terminal
You can refresh Wi-Fi networks in Windows 11 using commands in Windows Terminal if Quick Settings isn’t sufficient. This method involves opening PowerShell and running a command to restart the Wi-Fi service. This action prompts your computer to scan again for nearby wireless networks, including any that might be hidden or not showing up.
- Open Open Windows Terminal by searching for it in the Start menu.
- Choose the PowerShell tab (usually the default).
- Type or copy-paste one of these commands and press
Enter:
Get-Service wlansvc | Restart-ServiceOR
Restart-Service -Force -Name "wlansvc"If you want to use the Command Prompt tab inside Windows Terminal, try this:
PowerShell "Get-Service wlansvc | Restart-Service"OR
PowerShell Restart-Service -Force -Name "wlansvc"This will restart the Wi-Fi service and refresh the list of available networks.
Summary
- Refreshing the Wi-Fi list helps you find networks that might not show up right away.
- Windows 11’s Quick Settings now has a simple refresh button to scan for networks again.
- You can also refresh Wi-Fi networks by restarting the Wi-Fi service using Windows Terminal commands.
- Try these steps whenever you want to see the latest Wi-Fi networks around you!
Refreshing your Wi-Fi list in Windows 11 helps you find networks that might not show up right away. Windows 11 offers a simple refresh button in Quick Settings to scan for networks again. Alternatively, you can refresh Wi-Fi networks by restarting the Wi-Fi service using commands in Windows Terminal. Try these steps whenever you need to see the most current Wi-Fi networks in your area.
How do I refresh Wi-Fi on 🪟 Windows 11?
Go to the “Start” menu and open “Settings.” Navigate to “Network & Internet,” then click “Advanced network settings.” Select “Network reset,” and finally, click the “Reset now” button. Click “Yes” to confirm, and after a system restart, test your Wi-Fi connection.
How do I refresh my Wi-Fi?
If you’re already connected to a Wi-Fi network you wish to reset, or one that isn’t connecting properly, click the gear icon next to it. Then, click “Forget.”
Was this guide helpful?

About the Author
Richard
Tech Writer, IT Professional
Richard, a writer for Geek Rewind, is a tech enthusiast who loves breaking down complex IT topics into simple, easy-to-understand ideas. With years of hands-on experience in system administration and enterprise IT operations, he’s developed a knack for offering practical tips and solutions. Richard aims to make technology more accessible and actionable. He's deeply committed to the Geek Rewind community, always ready to answer questions and engage in discussions.


No comments yet — be the first to share your thoughts!