How to Pin Recent Folders in Quick Access on Windows 11

Pinning recent folders in Quick Access on Windows 11 keeps your most-used directories in the File Explorer sidebar, so you can jump straight to them without digging through your drive. Windows normally drops folders from the Recent list as you stop opening them, and it fills the list with newer ones. A pinned folder stays put until you remove it yourself. This works the same on Windows 11 Home and Pro, and you don’t need to restart.
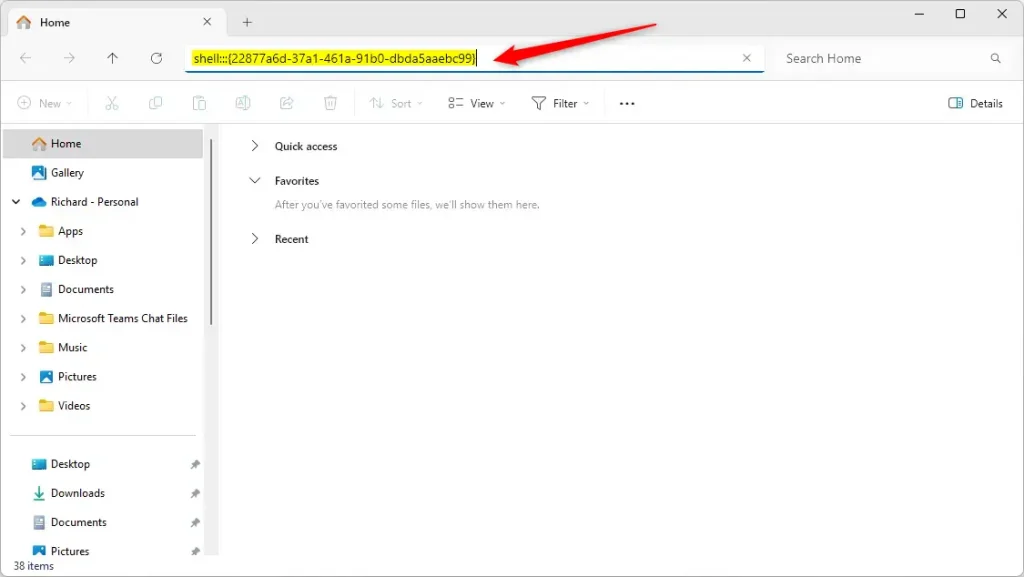
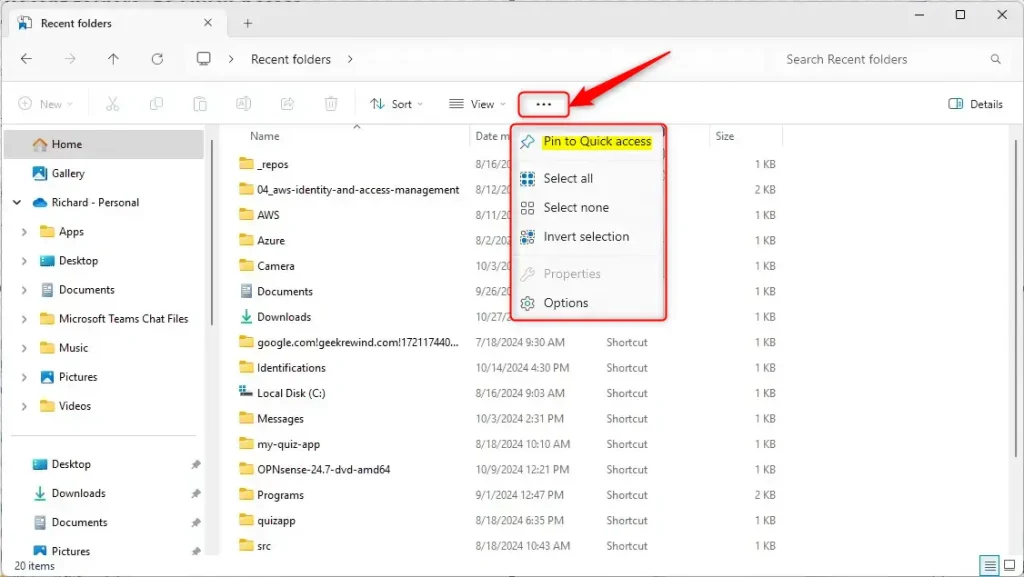
Open File Explorer, click the address bar, paste shell:::{22877a6d-37a1-461a-91b0-dbda5aaebc99} and press Enter. Right-click any folder in the list and select Pin to Quick access. The folder now appears pinned in your Quick Access sidebar.
Steps to Pin Your Recent Folders in Quick Access
Here is the short version. Open File Explorer by pressing the Win plus E. Click the address bar at the top of the window, clear the current text, and paste the special command shell:::{22877a6d-37a1-461a-91b0-dbda5aaebc99} to open the hidden recent items list. From there, right-click any folder you want to keep and select the pin option so it stays visible in your sidebar. The full steps are below.
- Open File Explorer . Click the folder icon on your taskbar , or press
Win + Eon your keyboard. A File Explorer window opens, usually on Home or Quick access, with the navigation pane on the left. If the folder icon isn’t on your taskbar , the keyboard shortcut is the quickest route. - Go to the Recent folders section using a special command. Click the address bar at the top of File Explorer and erase anything there. Copy and paste this command:
shell:::{22877a6d-37a1-461a-91b0-dbda5aaebc99}
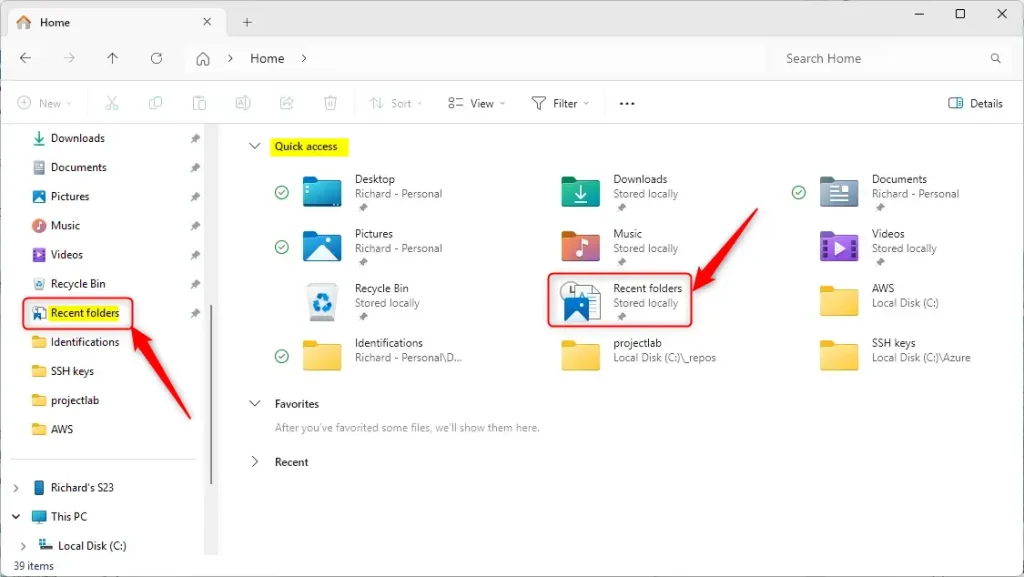
Then press Enter. File Explorer should now show your recently used folders. If you get an error instead, the paste was probably incomplete. Clear the address bar and paste it again, making sure nothing was cut off at the start or the end. - Pin Recent folders to Quick Access. At the top of File Explorer , click the three dots (called the See more button). From the menu, select Pin to Quick access. The Recent folders view is now pinned and should appear in the Quick access list in the left pane. To pin one specific folder instead, right-click it and choose Pin to Quick access. If you don’t see the option, click Show more options first, because the Windows 11 right-click menu is shortened.
Once pinning is done, the Quick Access pane on the left side of File Explorer shows the folders you chose. Pinned items stay in the list across restarts and sign-outs, and they don't move around like the automatic Recent entries do. Click an entry to open it straight away:
How to Remove Pinned Recent Folders
This only removes the shortcut, and your files and the folder itself are not touched.
- Open File Explorer and look at the Quick access list in the left pane.
- Right-click the pinned folder you want to remove.
- Select Unpin from Quick access. The folder disappears from the pinned list. If you opened it recently, it may still show up in the automatic Recent list until Windows replaces it with newer items.
Summary
You can open an important project without clicking through multiple subfolders. It's a small layout change, but it speeds up routine file management in File Explorer. Review your pins now and then and unpin what you no longer use, so the list stays short enough to be useful.
Additional tutorials covering File Explorer and Quick Access provide further workflow enhancements:
Have a question about this guide?
Answered by AI from this guide. Good questions may be added to this page — please don't include personal details.
Did this guide fix your problem?

About the Author
Richard
Tech Writer, IT Professional
Richard is a writer at Geek Rewind who turns complex IT tasks into clear, step-by-step guides. He draws on years of hands-on experience in system administration and enterprise IT operations, focusing on Windows, Linux and WordPress: the problems people actually run into, and the fixes that work. His server and WordPress guides come from systems he runs himself. Richard builds and maintains the platform behind Geek Rewind, from its Ubuntu servers and Nginx configuration to its custom WordPress plugins. Many new tutorials start with readers' questions, and he's always glad to answer them in the comments.
No comments yet — be the first to share your thoughts!