How to Pause and Restart BitLocker on Windows 11


Pausing BitLocker on Windows 11 temporarily turns off your drive encryption protection so you can safely make major system changes like updating your BIOS or swapping hardware. BitLocker is a built-in Windows security tool that scrambles the data on your drive to protect it from thieves. When you pause it (Microsoft calls this “suspending”), your drive stays encrypted. Windows just stores the key in a way that lets the PC start without the usual checks.
Skipping this pause step can cause Windows to lock you out and demand a long recovery key before you can boot up again. Turning BitLocker back on takes just a couple of clicks once you finish your updates, and pausing never deletes your files or your recovery keys. Before you change anything on a PC you care about, check that you can find your recovery key. It is usually saved to your Microsoft account, a file, a printout, or your organization’s directory.
Open Control Panel , go to System and Security BitLocker Drive Encryption, find your drive, and click Suspend protection next to it. BitLocker pauses immediately, letting you make system changes without lockout until you click Resume protection.
What is BitLocker?
BitLocker (a built-in Windows security feature) encrypts your hard drives and USB sticks to protect your personal files from unauthorized access. It locks your data using advanced encryption so that nobody can read your files if your computer is stolen or if someone removes your hard drive. The data only becomes readable once the drive is unlocked, either automatically by your own PC or with a password or recovery key.
A note on editions: full BitLocker management is available in Windows 11 Pro, Enterprise and Education. Windows 11 Home usually offers a simpler version called device encryption on supported hardware. If you are on Home, the Control Panel steps below may not be available to you.
You can use BitLocker to protect:
- Your main computer drive where Windows is installed (called the OS drive)
- Other internal drives inside your PC (called fixed data drives)
- External drives like USB sticks or external hard drives (called removable drives)
For your main Windows drive, BitLocker usually unlocks automatically when you start your PC using a special security chip called TPM. The TPM checks that the startup files and firmware settings have not changed since BitLocker was set up. If they have changed, it refuses to release the key, and Windows asks for your recovery key instead. This is exactly why firmware and hardware changes cause lockouts.
Why Pause (Suspend) BitLocker?
Suspending protection stops Windows from locking you out of your own device while deep system changes happen, though your data is left unprotected until you turn it back on.
Typical examples include updating the BIOS/UEFI firmware, replacing the motherboard, or changing startup-related settings. Ordinary Windows updates usually handle BitLocker on their own. Pause it yourself when an update, a driver package or a firmware tool tells you to.
- When you change computer hardware
- When you update Windows or the operating system
However, during a paused state, user data lacks full protection, because anyone with access to the drive could read it. Users must resume BitLocker protection after completing their tasks. Keep the paused period as short as you can.
How to Pause and Resume BitLocker Using Control Panel
- Open the Control Panel on your PC. Learn how to open Control Panel If it opens in the "Large icons" or "Small icons" view, switch View by to Category so you can see System and Security.
- Click System and Security, then click BitLocker Drive Encryption. You should see a list of your drives and their BitLocker status.
- Find the drive you want to pause BitLocker on under Operating system drive or the other drive sections (fixed data drives, removable drives).
- Click Suspend protection next to that drive. If you do not see it, the drive is either not encrypted or already paused. If Windows asks for administrator approval, accept it.
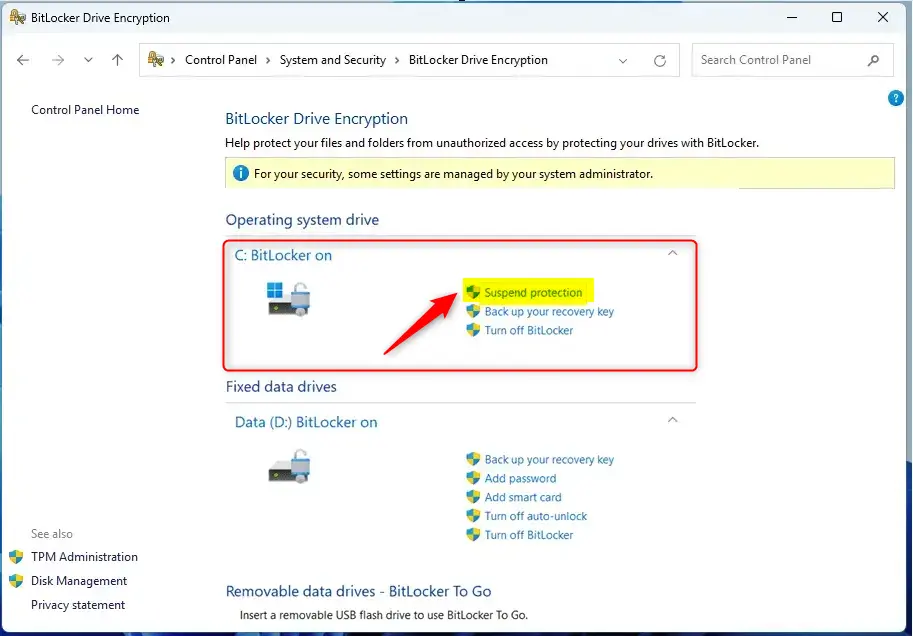
Suspend BitLocker link in Control Panel - When a pop-up appears, click Yes to confirm. The drive's entry should now show that protection is suspended, and the link next to it changes to Resume protection.
You can pause and resume BitLocker using the Control Panel by opening System and Security, clicking BitLocker Drive Encryption, and choosing Suspend protection next to your locked drive. This is the easiest way to temporarily turn off drive protection without using advanced command-line tools. No restart is needed to suspend. Your files stay encrypted on the disk, and nothing is deleted.
To Resume (Turn Back On) BitLocker Protection:
- Go back to Control Panel System and Security BitLocker Drive Encryption You will see the paused drive with a warning that protection is suspended.
- Click Resume protection for the paused drive. The drive should go back to showing BitLocker as on. You do not need to restart.
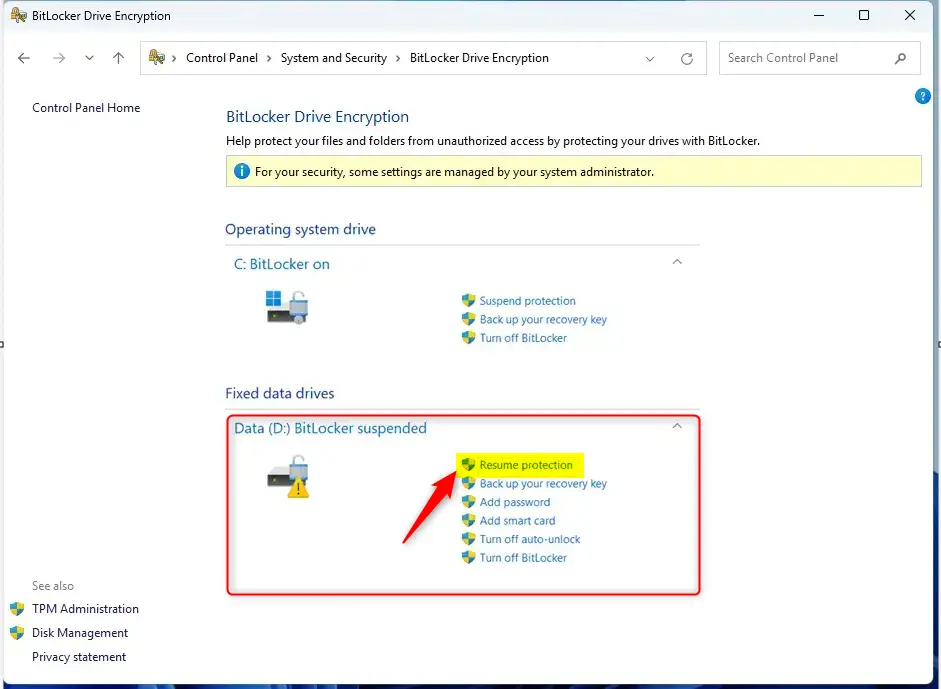
Resume BitLocker protection in Control Panel
How to Resume BitLocker Using File Explorer
- Open File Explorer and select This PC so your drives are listed.
- Right-click the drive that has BitLocker paused. A context menu opens.
- Click Show more options (or press Shift + F10), then select Resume BitLocker protection. This entry only appears while protection is suspended. If you cannot find it, use the Control Panel steps above instead.
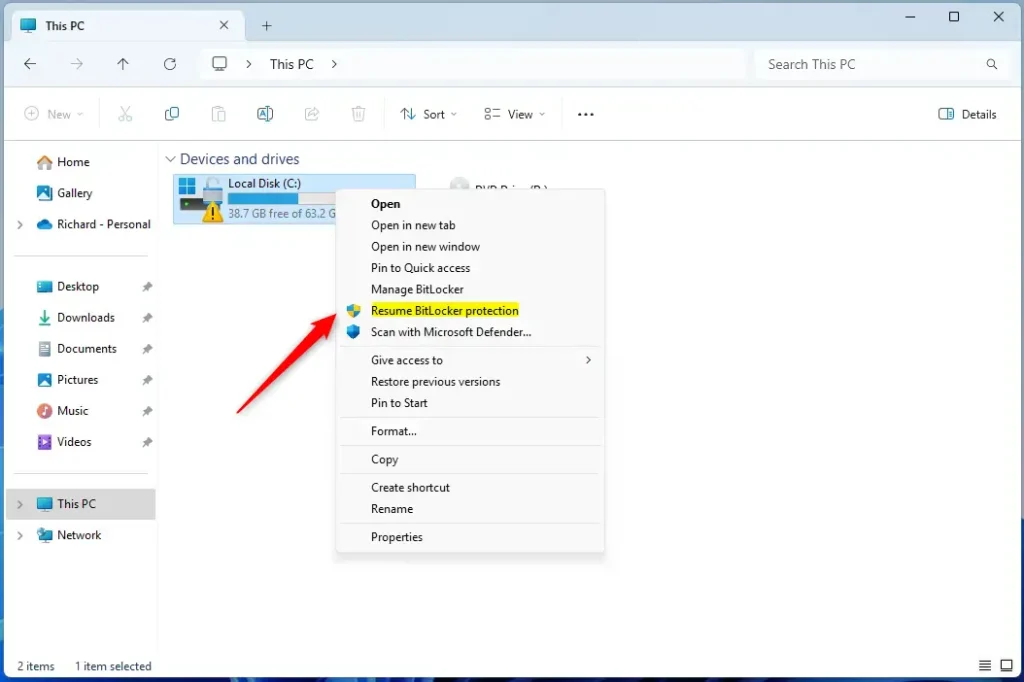
Resume BitLocker protection from context menu
Pause and Resume BitLocker Using PowerShell (Advanced)
You can pause and restart BitLocker using PowerShell commands if you prefer working outside the standard Windows interface. Open Windows Terminal as an administrator, choose PowerShell, and run the command for your chosen drive letter. Suspending does not decrypt the drive. It only stops BitLocker from checking the startup state until you resume it. Administrator rights are required, or the commands will fail with an access error.
- Admin privileges required. Open Windows Terminal as administrator, then choose the PowerShell tab. Approve the User Account Control prompt if it appears.
To pause BitLocker on a drive, type the following and press Enter:
manage-bde -protectors -disable <drive letter>:Replace <drive letter> with the letter of your drive. For example:
manage-bde -protectors -disable C:To turn BitLocker back on, type the following and press Enter:
manage-bde -protectors -enable C:You can also pause or resume BitLocker for all drives with these commands:
Get-BitLockerVolume | Suspend-BitLocker
Get-BitLockerVolume | Resume-BitLocker
Pause BitLocker for OS Drive with Automatic Resume After Restarts
You can set BitLocker on your main Windows drive to automatically turn back on after a specific number of computer restarts by using the Suspend-BitLocker command with a reboot count. This saves you from having to remember to turn security back on manually after finishing multiple system updates, such as a firmware update that restarts the PC several times. If you check the Control Panel afterwards, you can confirm that protection is back on.
Suspend-BitLocker -MountPoint "C:" -RebootCount <number_of_restarts>Replace <number_of_restarts> with a number from 0 to 15. A higher number means more restarts before protection comes back. With 0, BitLocker stays paused until you resume it yourself. For example, to pause until you manually resume, use:
Suspend-BitLocker -MountPoint "C:" -RebootCount 0Summary
- BitLocker keeps your files safe by locking your drives.
- You can pause BitLocker when making system changes to avoid problems, such as recovery key prompts after a BIOS update or hardware swap.
- Remember to resume BitLocker as soon as possible to keep your data protected.
- You can pause or resume BitLocker using Control Panel, File Explorer, or PowerShell.
- For the main Windows drive, you can control how many restarts before BitLocker turns back on automatically.
BitLocker keeps your sensitive files safe by encrypting your computer drives, but you can pause it temporarily when making major hardware changes or system updates. Always remember to turn protection back on as soon as your tasks are finished to keep your personal data secure, and keep your recovery key somewhere safe in case you ever need it.
Was this guide helpful?

About the Author
Richard
Tech Writer, IT Professional
Richard is a writer at Geek Rewind who turns complex IT tasks into clear, step-by-step guides. He draws on years of hands-on experience in system administration and enterprise IT operations, focusing on Windows, Linux and WordPress: the problems people actually run into, and the fixes that work. His server and WordPress guides come from systems he runs himself. Richard builds and maintains the platform behind Geek Rewind, from its Ubuntu servers and Nginx configuration to its custom WordPress plugins. Many new tutorials start with readers' questions, and he's always glad to answer them in the comments.




No comments yet — be the first to share your thoughts!