How to Clear Windows Security History in Windows 11
You clear Windows Security history in Windows 11 by manually deleting entries from the Protection history page within the Windows Security app.
Windows Security history is a log created by Microsoft Defender Antivirus, detailing threats detected, actions taken, and other critical security events on your PC. This allows you to review past protection activities.
Windows 11 automatically removes history entries after approximately 15 days. Manually clearing this log helps you manage past events, especially after resolving any detected issues and wanting a clean security dashboard.
Once completed, your Protection history list will be empty. This simply removes the visible log entries and does not impact your current security settings or protection status.
Disable Tamper Protection in Windows Security, then delete the Service folder located at 📁C:\ProgramData\Microsoft\Windows Defender\Scans\History\Service. Restart your computer to complete the process.
Prerequisites: Tamper Protection
You need to turn off Tamper Protection before you can clear Windows Security history, as this setting stops changes to your security options.
- Open the Windows Security app.
- Go to Virus & threat protection.
- Click Manage settings under Virus & threat protection settings.
- Toggle Tamper Protection to Off.
Method 1Manual File Path Deletion
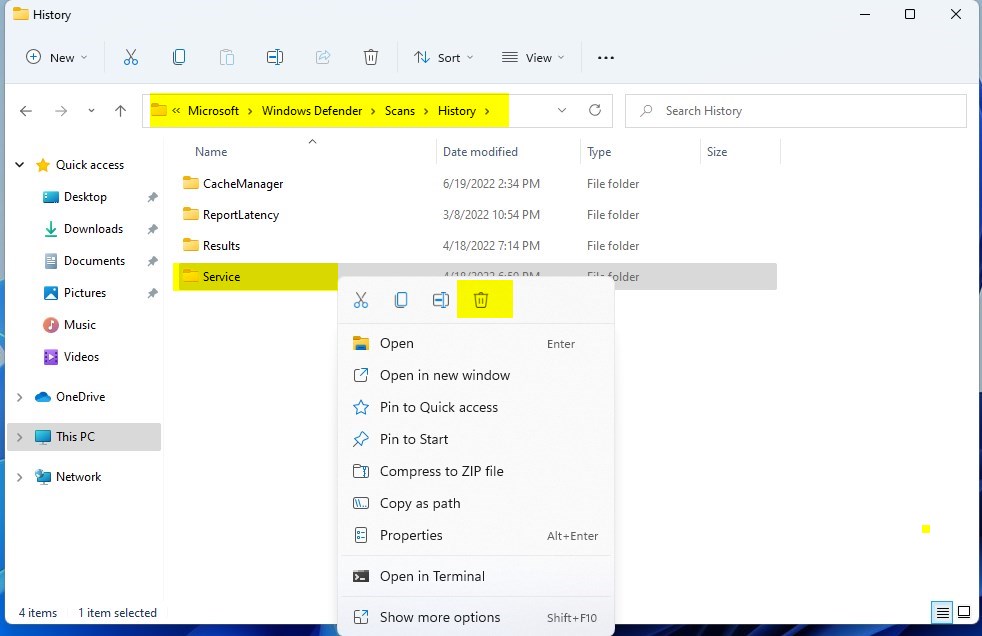
Clearing Windows Security history manually involves deleting a specific folder using File Explorer, which holds your scan records.
- Open File Explorer by pressing Windows key + E.
- Copy and paste this path into the address bar:
C:\ProgramData\Microsoft\Windows Defender\Scans\History - Locate the Service folder.
- Right-click the Service folder and select Delete.
- Restart your computer to finish the process.
Method 2PowerShell Automation
Using PowerShell to clear Windows Security history is a quick way to remove the history files automatically if you’re okay with using commands.
- Right-click the Start button and select Terminal (Admin) or PowerShell (Admin).
- Copy and paste the following command:
Remove-Item -Path "C:\ProgramData\Microsoft\Windows Defender\Scans\History\Service\*" -Recurse -Force - Press Enter.
Summary
Clearing your Windows Security history is simple: first, turn off Tamper Protection, then delete the files in the Service folder using either File Explorer or a PowerShell command. Doing this gives you a fresh look at your security dashboard without making your PC less safe.
Does clearing history affect actual security status?
No, clearing your protection history does not affect your computer’s security status. It only removes the visual logs of past events from the Windows Security app. Your active antivirus settings, real-time protection, and firewall rules remain fully functional and unchanged after you delete these log files.
Why does the history log reappear?
If your history logs reappear, it is likely because Microsoft Defender Antivirus is still actively monitoring your system. If a previous threat was not fully resolved or if the system detects a new event, it will generate a new log entry in the Service folder automatically.
Is it safe to delete the Service folder?
Yes, it is safe to delete the contents of the Service folder. Windows will automatically recreate the necessary directory structure once it needs to log a new security event. This is a standard maintenance task that does not harm your operating system or compromise your data protection.
Was this guide helpful?

About the Author
Richard
Tech Writer, IT Professional
Richard, a writer for Geek Rewind, is a tech enthusiast who loves breaking down complex IT topics into simple, easy-to-understand ideas. With years of hands-on experience in system administration and enterprise IT operations, he’s developed a knack for offering practical tips and solutions. Richard aims to make technology more accessible and actionable. He's deeply committed to the Geek Rewind community, always ready to answer questions and engage in discussions.

No comments yet — be the first to share your thoughts!