How to Change Windows 11 Security Event Retention
This guide shows you how to change how long Windows Security Protection history keeps records of your past security events in Windows 11.
Change Windows 11 security event retention by opening PowerShell as administrator. Use the command Set-MpPreference -ScanPurgeItemsAfterDelay , replacing with your desired retention period. This adjusts how long Windows Defender keeps a record of past security events.
Understanding 🪟 Windows 11 Protection History
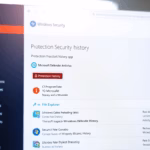
Windows 11 Protection history shows you what Microsoft Defender Antivirus has done to keep your computer safe, like blocking unwanted apps or quarantining suspicious files.
Why check your Protection History?
You check this history to see if your antivirus has caught any threats recently. This helps you understand if a program you downloaded was blocked or if a file was moved to quarantine because it looked dangerous.
What happens when you review it?
Reviewing this list helps you spot false positives. A false positive occurs when Windows Defender incorrectly flags a safe file as a virus. If you see something you know is safe, you can restore it from the quarantine list.
Quarantined vs. Blocked vs. Remediated
| Status | Meaning |
|---|---|
| Quarantined | The file is moved to a safe folder so it cannot run. |
| Blocked | The app or action was stopped before it could start. |
| Remediated | The threat was cleaned or deleted by the antivirus. |
How to Change 🪟 Windows 11 Security Event Retention
Windows 11 keeps your security event records for 15 days by default, but you can change this retention period using PowerShell.
Note: You’ll need administrator privileges to do this.
- Open the Start menu and search for PowerShell.
- Right-click it and select Run as administrator.
- To see your current setting, type the following command and press Enter:
Get-MpPreference | Select-Object -Property ScanPurgeItemsAfterDelay
The default value is 15. To change the number of days, use this command format:
Set-MpPreference -ScanPurgeItemsAfterDelay <days>
Replace <days> with your preferred number. For example, to keep records for 100 days, type:
Set-MpPreference -ScanPurgeItemsAfterDelay 100

How to Manually Clear Protection History
You can manually clear your Windows 11 protection history by deleting specific files, though this won’t remove any real threats that were found.
To clear the history manually, you need to delete the contents of the detection folder. You’ll need administrator privileges for this.
- Open File Explorer and navigate to:
C:\ProgramData\Microsoft\Windows Defender\Scans\History\Service\DetectionHistory - You may need to enable ‘Hidden items’ in the View menu to see the
ProgramDatafolder. - Delete all files inside the
DetectionHistoryfolder.
Summary
Windows 11 Protection history helps you monitor security events. You can change how long these logs are kept using the Set-MpPreference command in PowerShell. For more information on managing security, visit the official Microsoft Support website.”
}
Why does Windows keep showing old threats in Protection History?
Windows keeps these records to provide an audit trail of security events. By default, it clears them every 15 days. If you see old threats, it is because the retention period is set to a high number or the system has not yet reached the automatic purge date.
Is it safe to delete the Protection History folder?
Yes, it is safe to delete the contents of the DetectionHistory folder. This action only clears the visual log of past events in the Windows Security app. It does not affect your computer’s actual security status or remove any active threats that are currently being managed.
Does clearing history remove the actual virus?
No, clearing the Protection history does not remove the actual virus or malware. The history is just a list of past actions. If a file was already quarantined or remediated, the threat is already neutralized. Clearing the list simply hides the record of that event from your view.
Was this guide helpful?

About the Author
Richard
Tech Writer, IT Professional
Richard, a writer for Geek Rewind, is a tech enthusiast who loves breaking down complex IT topics into simple, easy-to-understand ideas. With years of hands-on experience in system administration and enterprise IT operations, he’s developed a knack for offering practical tips and solutions. Richard aims to make technology more accessible and actionable. He's deeply committed to the Geek Rewind community, always ready to answer questions and engage in discussions.

No comments yet — be the first to share your thoughts!