

Microsoft Edge has two ways to make text bigger, and they behave differently. Page zoom scales everything on the page: text, images and layout. The font size setting changes only the text. Setting a default page zoom between 125% and 500% makes every website open at your preferred size automatically. You can also zoom a single tab temporarily, or change the font size for all pages.
This tutorial covers the font size setting and the font options around it. It applies to the current Chromium-based Edge on Windows 11. Home and Pro editions behave the same. The settings sync with your Microsoft account if you have sync turned on.
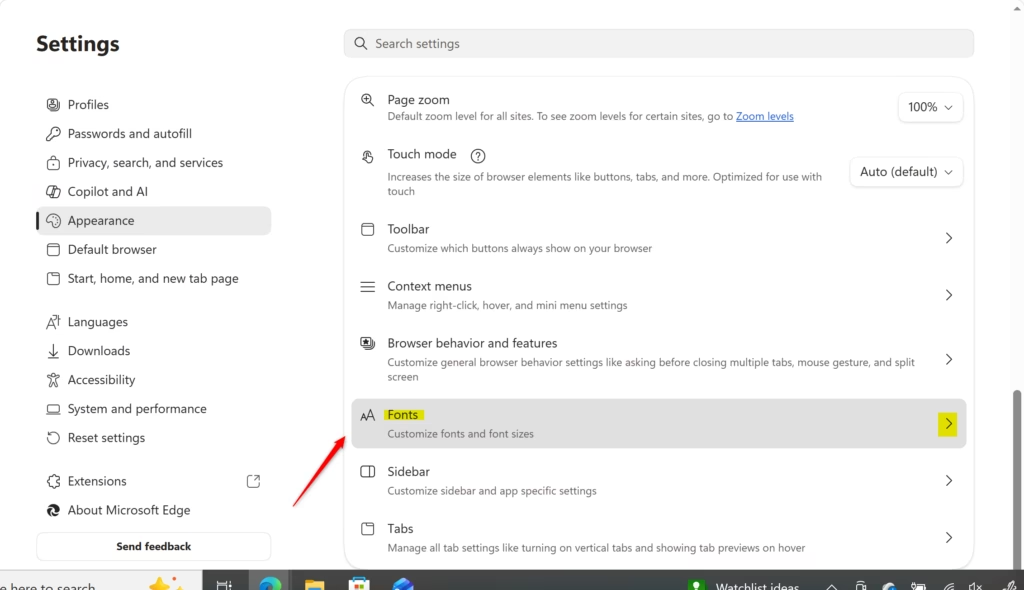
Open Edge Settings Appearance Fonts, click the Font size dropdown, and select Large or Very large. The text on web pages updates immediately without zooming the entire page.
Why Make Text Bigger?
Larger text makes browsing more comfortable if you have trouble reading small screens or fine print. It also helps on high-resolution laptops, where text can look tiny at the default scaling.
What Happens When You Make Text Bigger?
Raising the text size in Edge adjusts text on most websites automatically, so you don’t have to zoom every page by hand. A few sites use fixed-size text and may ignore the setting. For those, use page zoom for that tab.
Step 1Open Edge and Go to Settings
- Click the three dots in the top-right corner of the Edge window. The Settings and more menu opens.
- Select Settings. A Settings page opens in a new tab, with a list of categories on the left.

Step 2Find Appearance Settings
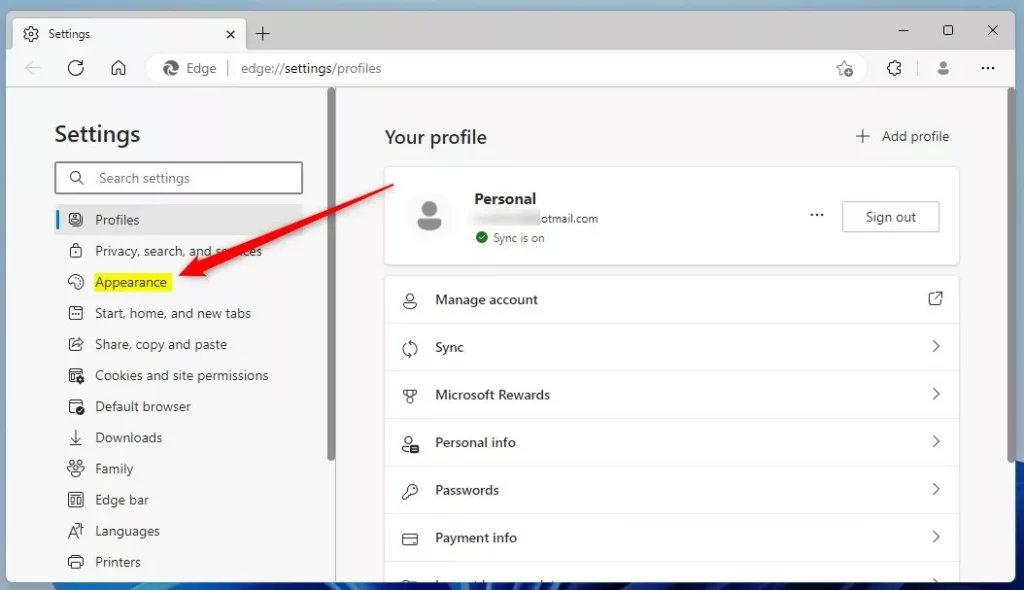
The Appearance settings let you change themes, toolbars and the text size, which makes the browser easier to read. To get there:
- With Settings open, click Appearance in the list on the left. If you don’t see the list, the window may be too narrow. Widen it, or click the menu icon at the top left of the Settings page.
- Look at the main panel on the right. It now shows the visual options: theme, toolbar buttons, zoom, and fonts.
If your PC is managed by an employer or school, some of these options may be locked by policy. In that case you will see a note saying your browser is managed.
Step 3Adjust Your Font Size
The text size is set in the Fonts section of the Appearance settings. This changes text on web pages without zooming the whole page.
- Scroll down the Appearance panel until you reach the Fonts section.
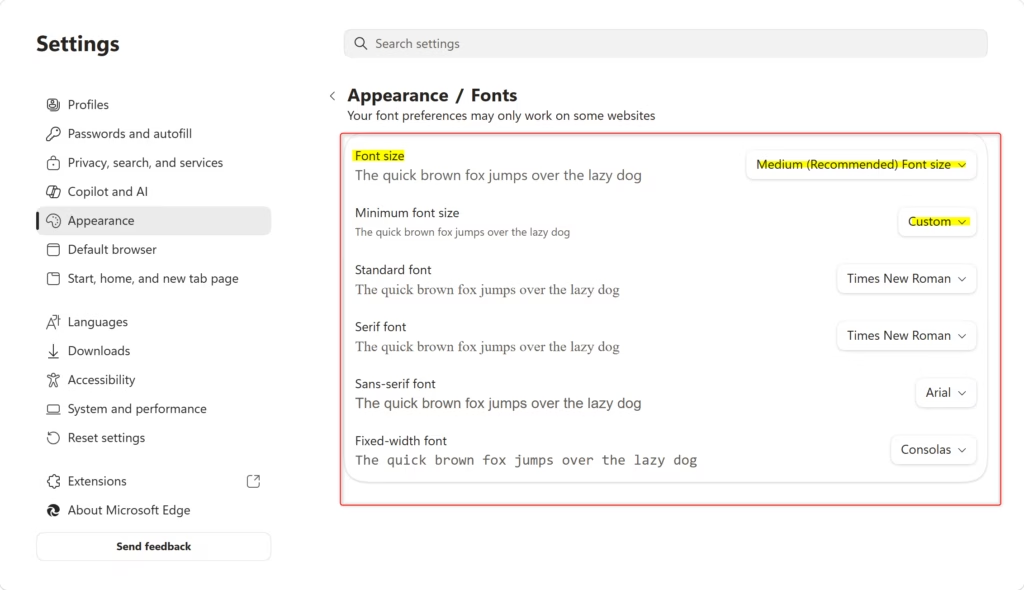
- Click the Font size dropdown menu. A list of sizes appears, such as Small, Medium, Large and Very large. Medium is the default and is marked as recommended. Some versions also offer Very small.
- Select a larger size, for example Large or Very large.
- Check the preview text in the Fonts section. It updates right away, so you can see the effect before you leave the page.
There is no Save button and no restart is needed. Open a few pages to confirm. To undo the change, return to the same dropdown and choose Medium.
Tip: Finding Your Perfect Size
The best size depends on your screen and eyesight, so test it. Try Medium or Large on websites you visit often, such as your email, news sites and any page with dense tables. If the text is comfortable but a page still looks cramped, go up one step instead of jumping to Very large. Very large text can break the layout of some sites.
Step 4Customize Fonts Further (Optional)
You can also change the typefaces Edge uses for different kinds of text. In the Fonts section, click Customize fonts to see the choices. This is useful if a particular typeface is easier for you to read.
You can assign separate fonts for different styles. A Serif font has small decorative strokes on the letters, like Times New Roman. A Sans-serif font lacks those strokes, like Arial. Choosing different fonts for each gives pages a clearer visual hierarchy, and you can match them to your reading preferences.
The same section lets you set a minimum font size. With a minimum in place, websites that try to display microscopic text still meet a readable standard. Use it with care. A high minimum can make some page elements, such as menus, look oversized.
Reference:
https://support.microsoft.com/en-us/edge/increase-default-text-size-in-microsoft-edge
Summary
In short, go to Settings Appearance Fonts and pick a larger Font size. This improves readability and reduces eye strain. If you want everything on the page bigger, not just the text, use the page zoom setting in the same Appearance panel instead.
Have a question about this guide?
Answered by AI from this guide. Good questions may be added to this page — please don't include personal details.
Did this guide fix your problem?

About the Author
Richard
Tech Writer, IT Professional
Richard is a writer at Geek Rewind who turns complex IT tasks into clear, step-by-step guides. He draws on years of hands-on experience in system administration and enterprise IT operations, focusing on Windows, Linux and WordPress: the problems people actually run into, and the fixes that work. His server and WordPress guides come from systems he runs himself. Richard builds and maintains the platform behind Geek Rewind, from its Ubuntu servers and Nginx configuration to its custom WordPress plugins. Many new tutorials start with readers' questions, and he's always glad to answer them in the comments.
No comments yet — be the first to share your thoughts!