How to Initialize New Disks in Windows 11

Disk initialization prepares a brand-new hard drive or solid-state drive (SSD) so Windows 11 can recognize it and store files. Until you do it, File Explorer will not show a newly installed drive, even though the hardware is connected and working.
Initializing a drive writes a fresh partition table, using either GPT (GUID Partition Table) or MBR (Master Boot Record). This process wipes the storage clean, so run it only on empty drives. If the disk already holds files you want, stop here and copy them elsewhere first. You also need to be signed in with an administrator account, on both Home and Pro editions.
Open Settings System Storage Advanced storage settings Disks & volumes, find your new disk marked “Not initialized”, click Initialize, choose GPT for modern computers or MBR for older systems, then click Create volume to partition the drive and format it.
How to Initialize a New Disk in 🪟 Windows 11
Step 1Open the Windows Settings App
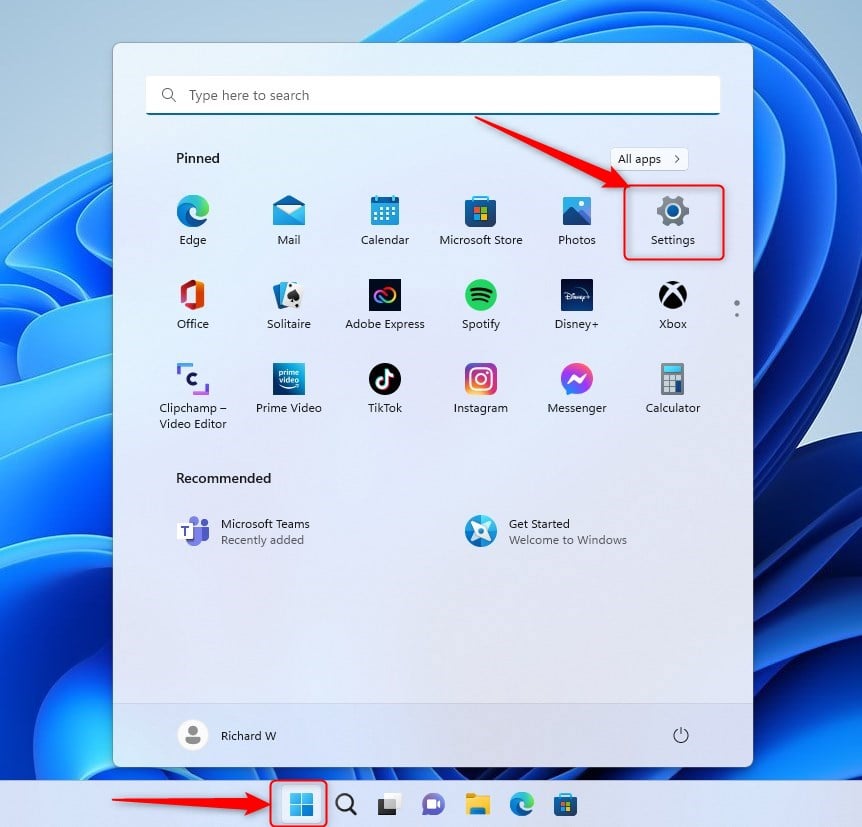
The first method uses the Settings app. Start by opening it:
- Click the Start menu (the Windows icon on the taskbar ) and select Settings. To get there faster, press Win+I instead.
The Settings window opens. If you can’t find the Settings icon, type “Settings” into the search box on the taskbar and press Enter.
Step 2Go to System > Storage
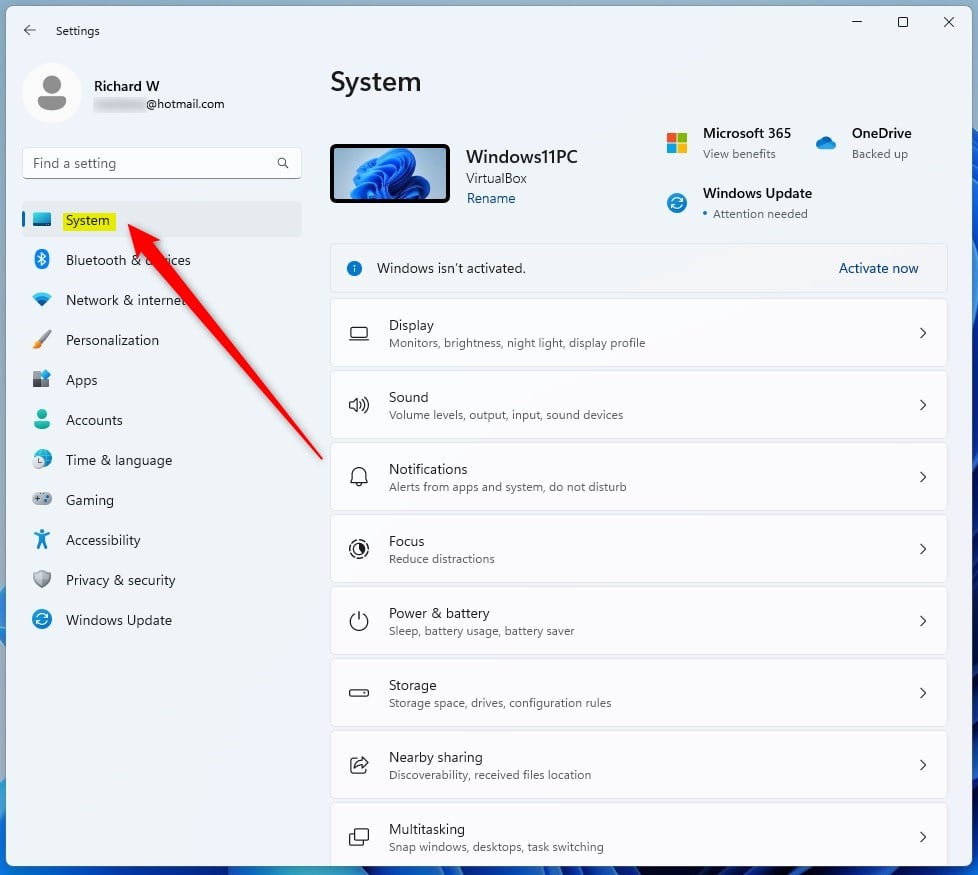
- Click System in the left-hand menu.
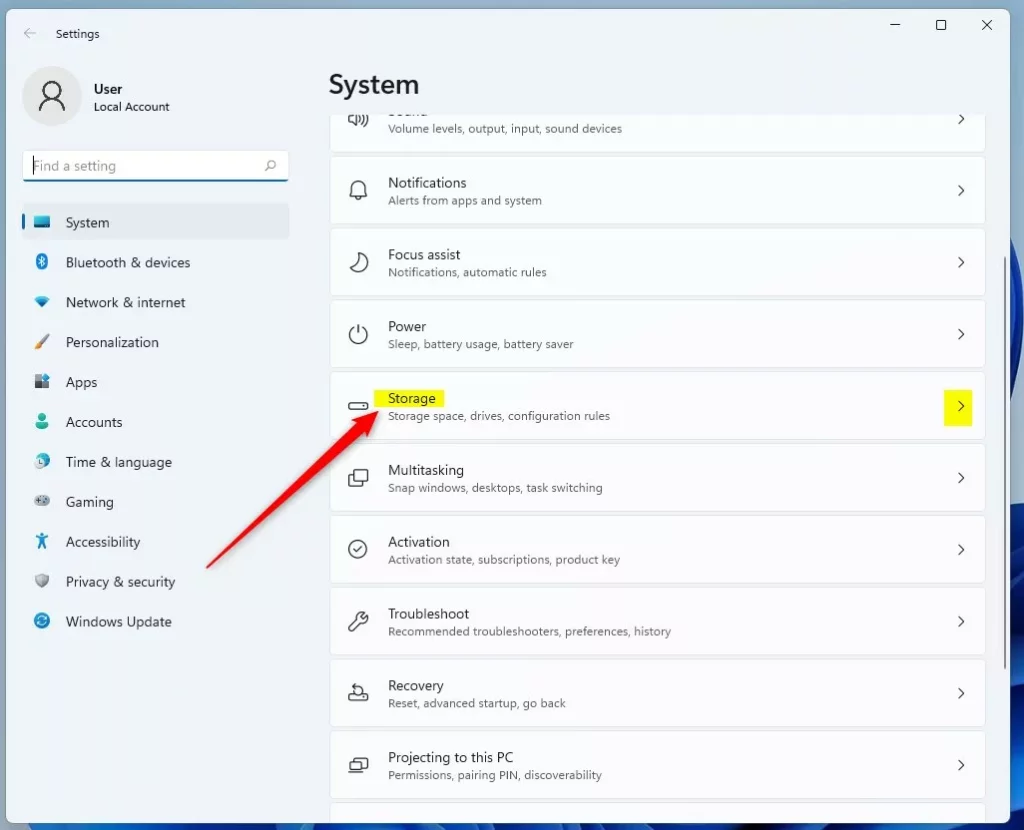
- Click Storage on the right.
You should now see the Storage page. It shows how much space your main drive is using, plus the Storage management options.
Step 3Open Advanced Storage Settings > Disks & Volumes
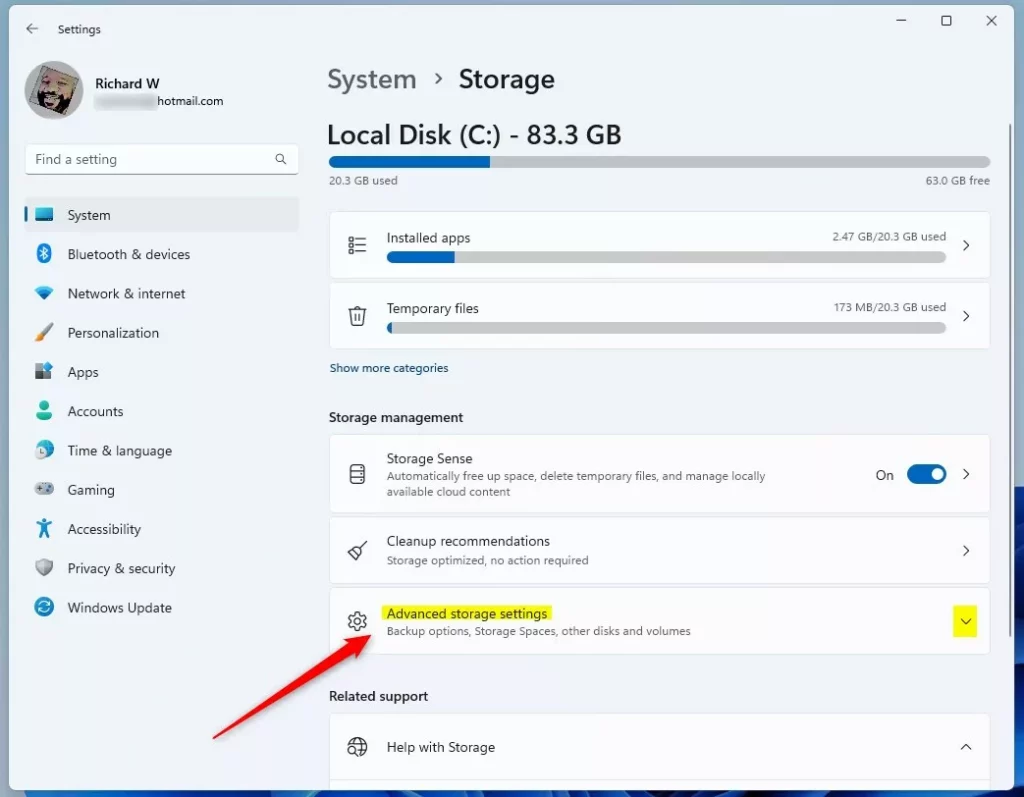
- Scroll down the Storage page.
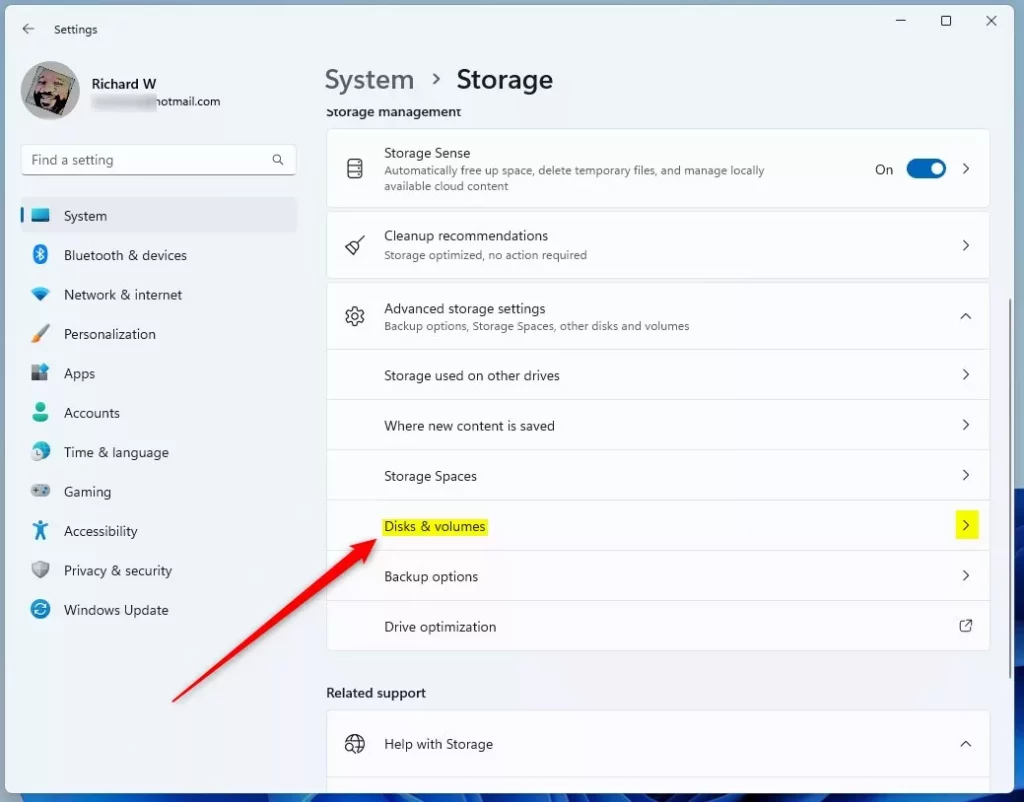
- Click Advanced storage settings. The section expands to show more options.
- Select Disks & volumes.
The Disks & volumes page is only in recent versions of Windows 11. If you don’t see it, skip to the Disk Management method further down. It does the same job.
Step 4Find Your New Disk and Click Initialize
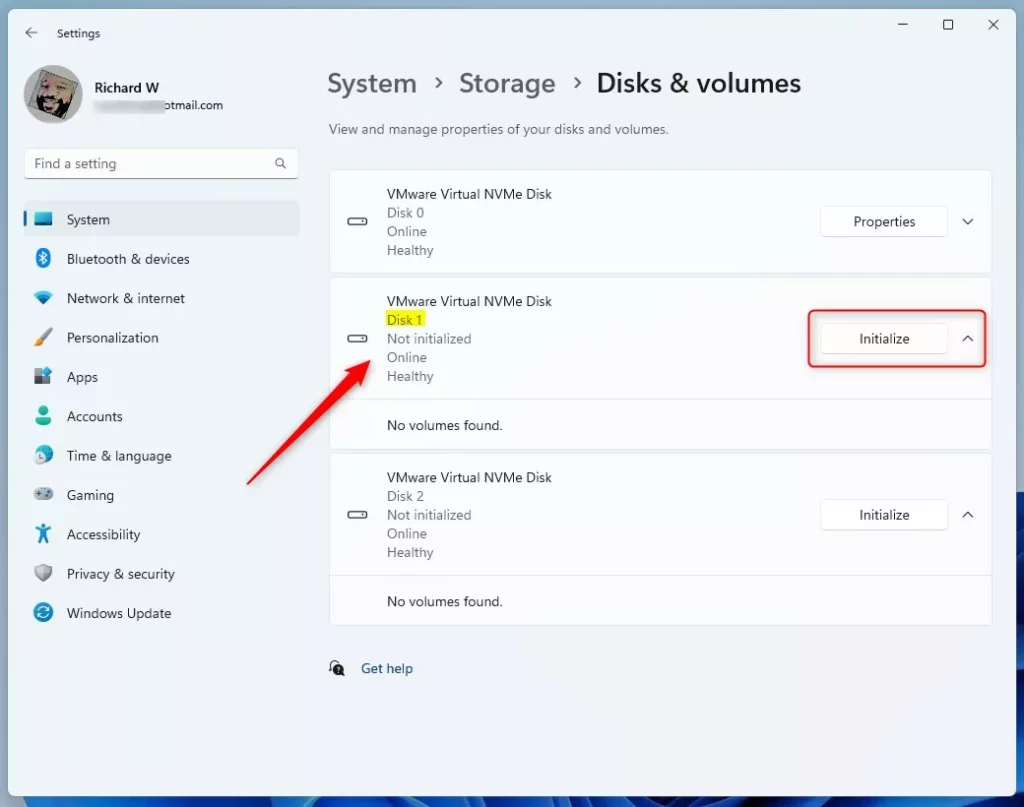
Look through the list for the new drive. It will be marked as "Not initialized", the same label Disk Management uses. That label means Windows can see the hardware but needs to prepare it before you can store files on it.
For an external drive, try a different USB port or cable. Make sure the disk shows up in your BIOS/UEFI as well.
- Click the Initialize button next to the uninitialized disk.
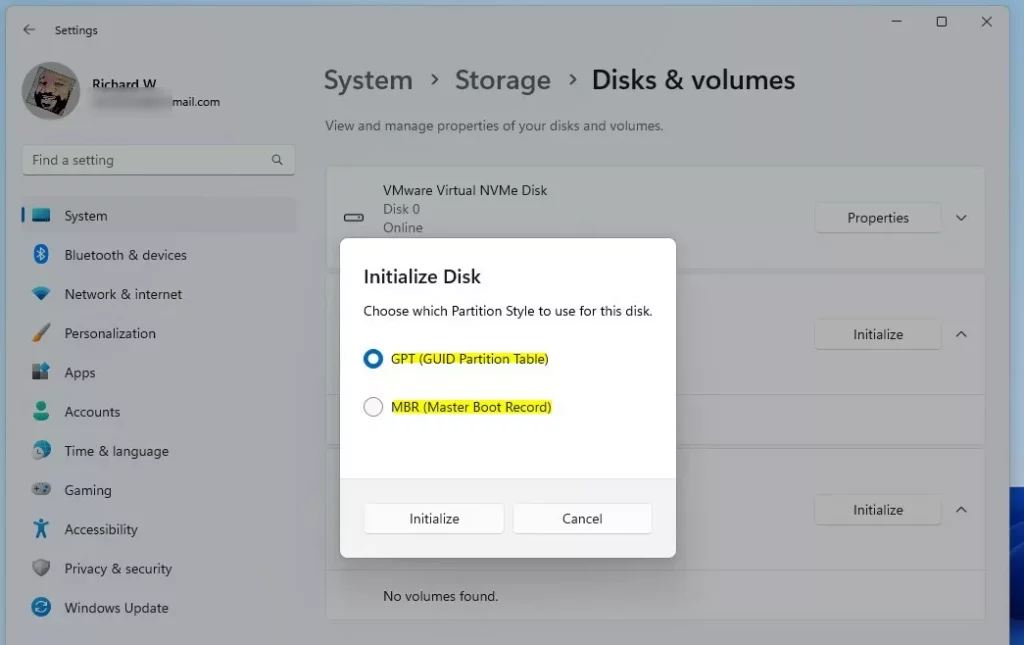
A pop-up asks you to choose a partition style.
Step 5Choose a Partition Style
In the pop-up, pick one of these options:
- GPT (GUID Partition Table): Best for modern computers and large drives (over 2 TB). We recommend this. It supports far larger disks than MBR and stores a backup copy of the partition table, which helps with recovery.
- MBR (Master Boot Record): Older style. Use this for older computers or removable drives. It can only use up to 2 TB of a disk, so don't pick it for a larger drive.
- Choose GPT or MBR.
- Click Initialize to continue.
This takes only a few seconds. No restart is needed. If you picked the wrong style, you can delete the volumes on the disk and initialize it again. This is harmless on an empty drive.
Step 6Create a Volume (A Usable Drive)
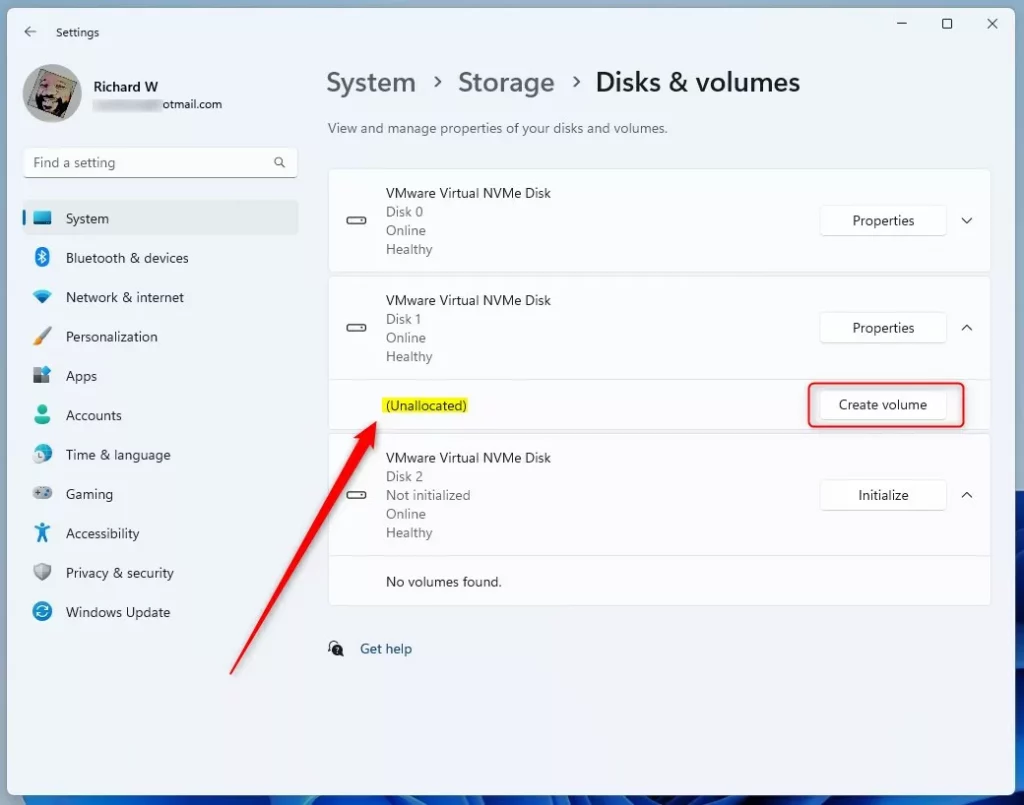
After initializing, the disk status changes to Unallocated. The drive is ready, but Windows hasn't created any usable drive space on it yet. Unallocated space is empty, unformatted storage, and it needs a partition (also called a volume) before it can hold files.
- Click Create volume to make a new partition.
A window opens with the volume settings.
Step 7Name and Format the New Drive
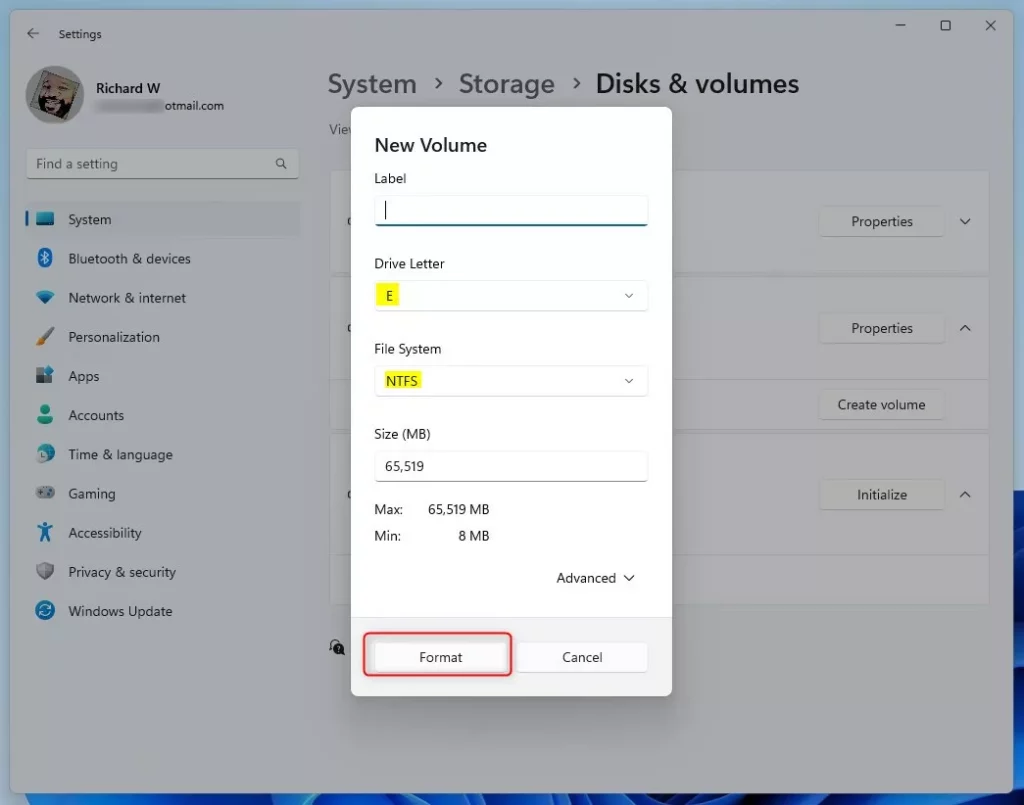
Configure these parameters:
- Give the drive a name name (label) you like (example: "My Storage"). You can change it later.
- Pick a drive letter drive letter (like D: or E:). Windows suggests the next free letter, which is fine for most people.
- Choose the file system (usually NTFS for Windows). If you plan to share the drive with a Mac or other devices, exFAT is the better choice.
- Check your settings once more. Leave the size at its default if you want one volume that uses the whole disk.
- Click Format to prepare the drive.
Formatting a new, empty drive normally finishes within a minute or so.
Step 8Your New Disk is Ready!
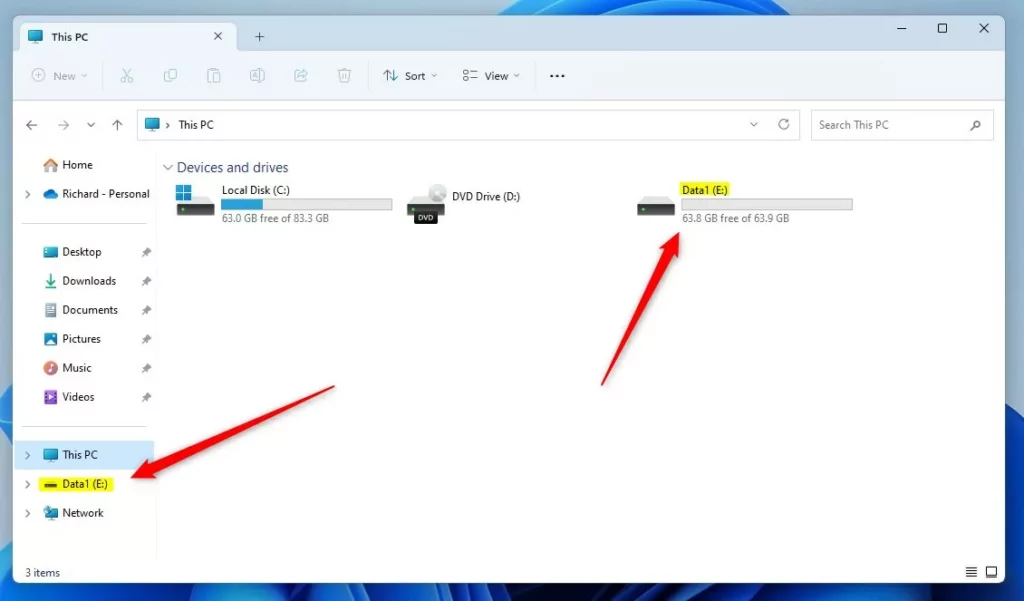
Once formatting finishes, your new drive shows up in File Explorer under This PC. You can now save files on it. If it doesn't appear straight away, close and reopen File Explorer.
Alternative Way: Use Disk Management Tool
The Disk Management tool offers an alternative way to initialize disk Windows 11 drives when the Settings page is missing or doesn't list your drive. This built-in utility lets you prepare brand-new storage hardware so the operating system can recognize, format, and assign drive letters to your newly installed internal or external hard drives. It works the same way on Home and Pro.
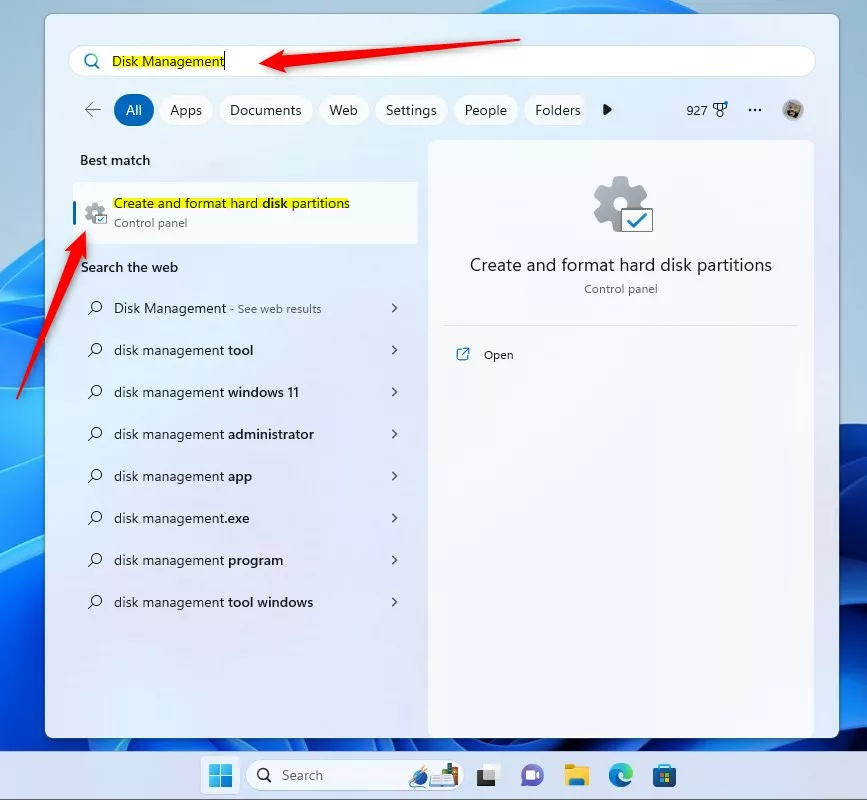
- Click the search box in the taskbar. Type
Disk Management. The matching result appears at the top of the list. - ⚙️ Admin Required: Right-click on Disk Management in the results. Choose Run as administrator. Click Yes if asked. If an Initialize Disk window pops up on its own when the tool opens, you can use it right away and skip ahead to choosing the partition style.
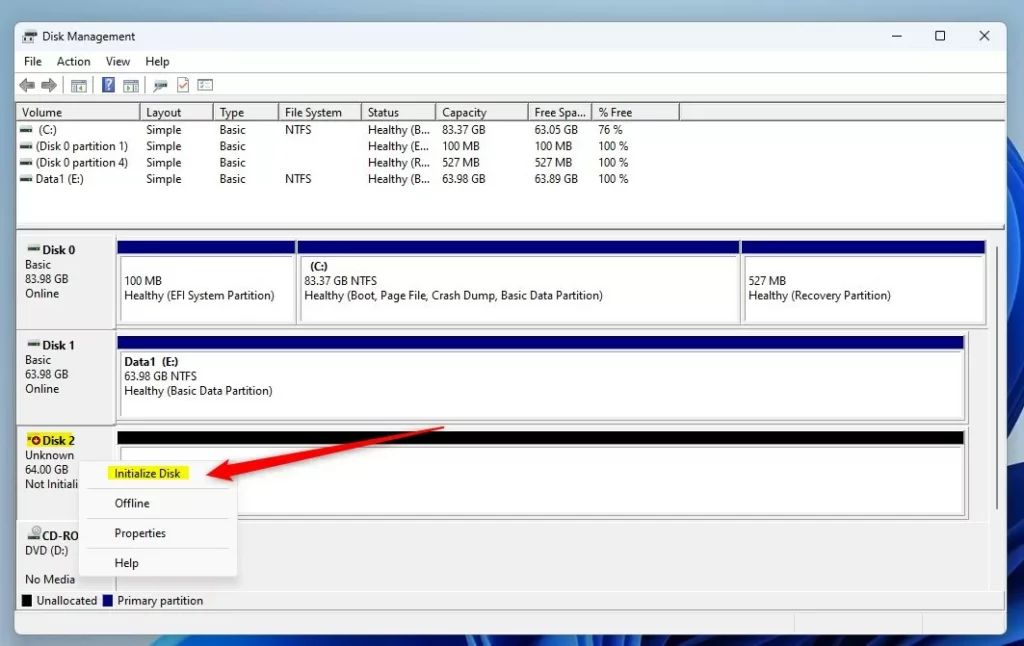
- Find your new disk in the list (marked as Offline or Not initialized). Disks are listed as Disk 0, Disk 1 and so on in the lower pane. Check the size to make sure you pick the right one. If the disk says Offline, right-click its label on the left and choose Online first.
- Right-click the disk. Choose Initialize Disk. If this option is greyed out, the disk is probably still offline or already initialized.
- Select the partition style (GPT or MBR). Click OK. The disk now shows as Online with a black bar marked Unallocated.
- Right-click the unallocated space on the disk. Choose New Simple Volume. The New Simple Volume Wizard opens.
- Follow the wizard to create and format the partition. Accept the default size to use the whole disk, assign a drive letter, and choose a file system (NTFS is usually right). Then click Finish.
Now your disk shows up in File Explorer and is ready to use. Open This PC to confirm the new drive letter is there. No restart is needed.
Summary
- Why initialize a disk? Because new disks need to be set up before Windows can use them. Initializing writes the partition table that Windows reads to find the disk's contents.
- What happens when you initialize? Windows erases the disk's partition table and prepares it for storing files.
- You can initialize through Settings (System Storage) or use the Disk Management tool.
- Choose GPT for modern computers and large drives. Choose MBR for older setups, or for disks of 2 TB or less that older systems need to read.
- After initializing, you must create a volume and format the disk so Windows can use it.
- Be careful: Initializing erases all data. Never do this on disks with important files, and always double-check the disk number and size before you click.
- For more help, check Microsoft’s official guide.
Learning how to initialize disk Windows 11 drives ensures your computer can properly recognize and use new storage hardware. The process comes down to three things: choosing a partition style like GPT or MBR, creating a volume, and formatting it. After that, the operating system can safely store files, games, and applications on your newly installed hard drive or SSD.
Was this guide helpful?
100% of readers found this helpful (1 votes)

About the Author
Richard
Tech Writer, IT Professional
Richard is a writer at Geek Rewind who turns complex IT tasks into clear, step-by-step guides. He draws on years of hands-on experience in system administration and enterprise IT operations, focusing on Windows, Linux and WordPress: the problems people actually run into, and the fixes that work. His server and WordPress guides come from systems he runs himself. Richard builds and maintains the platform behind Geek Rewind, from its Ubuntu servers and Nginx configuration to its custom WordPress plugins. Many new tutorials start with readers' questions, and he's always glad to answer them in the comments.
No comments yet — be the first to share your thoughts!