How to Help Someone You Know with Quick Assist in Windows 11


Quick Assist is a built-in tool in Windows 11 and Windows 10. It lets you connect to another computer over the internet and fix problems without driving to their house.
The person you are helping reads you a 6-digit security code. Once they approve the connection, you can see their screen and, if they allow it, take control of their mouse and keyboard. That is much easier than trying to explain tricky steps over the phone.
Open Quick Assist on your computer using Ctrl+Win+Q, click Help someone, sign in with your Microsoft account, and share the 6-digit security code that appears with the person you’re helping. They enter it in their Quick Assist window under Get help, click Allow on the connection prompt, and you can then see and control their screen.
Helping Someone With Quick Assist
Quick Assist is a Windows utility for troubleshooting someone’s computer from afar. One person is the helper (you) and the other is the sharer (the person with the problem). Both of you need an internet connection and Quick Assist open.
The helper signs in with a Microsoft account. The sharer does not need to sign in to anything. They only type in the code. It is free, and it is already part of Windows 11, so there is nothing to buy.
Step 1Open Quick Assist on Your Computer
Both people need to open Quick Assist first. You can find it in the Start menu under All apps, or press the Ctrl+Win+Q shortcut to launch it without searching through menus.
If the app is missing or won’t open, it may have been removed or be out of date. Search for “Quick Assist” in the Microsoft Store and install or update it from there. That fixes most launch problems.
- Using the Start Menu: Click the Windows button (the little Windows flag icon on the taskbar). Then click All apps in the top-right corner of the Start menu. Scroll down the alphabetical list until you find Quick Assist, then click it. The Quick Assist window opens with options to get help or help someone. You can also type "Quick Assist" into the Start menu search box and press Enter.
- Using a Keyboard Shortcut: For a quicker way, press the
Ctrlkey, theWindows logo keykey, and theQkey all at the same time. Quick Assist should open right away. If nothing happens, the app may not be installed, or another program may be using the same shortcut. In that case, use the Start menu instead.
Step 2Choose "Help someone"
The helper starts the session. Here is what to do on your side:
- Open Quick Assist using one of the methods above.
- Click Help someone on the main screen.
- If asked, sign in with your Microsoft account. You need to be signed in so the other person can see who is connecting.
Keep the window open, because closing it cancels the code.
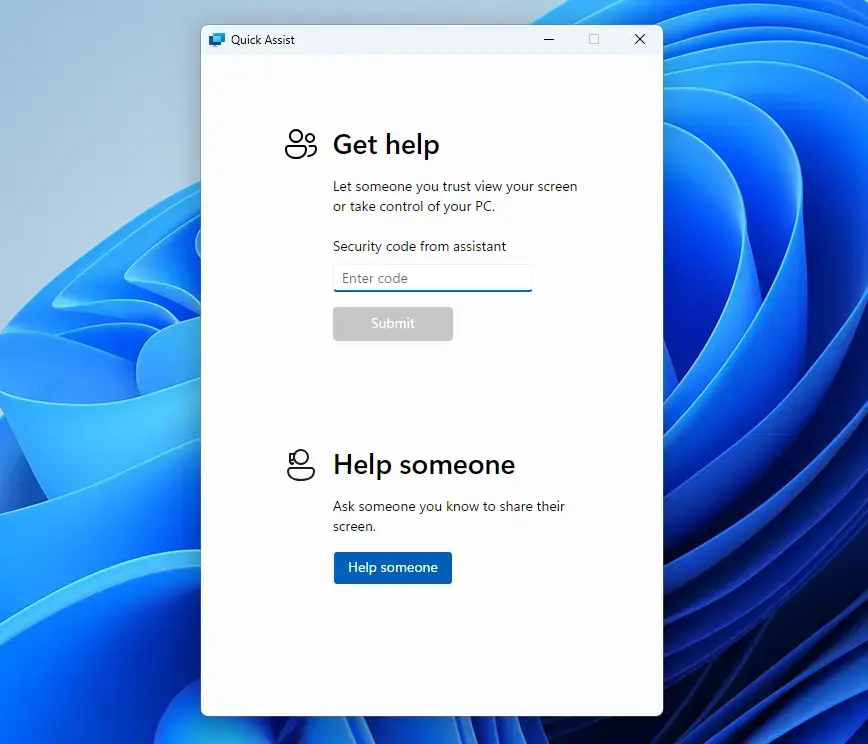
Step 3Share the 6-Digit Security Code
Quick Assist generates a 6-digit security code. It works as a temporary key for establishing the connection. The code expires after a short time (about 10 minutes), so share it as soon as it appears.
- Read the 6-digit code to the other person. A phone call, text or message all work.
- Ask them to open Quick Assist on their computer.
- Tell them to type the code into the Code from assistant box under Get help.
If the code runs out before they enter it, close the code window and click Help someone again to get a new one.
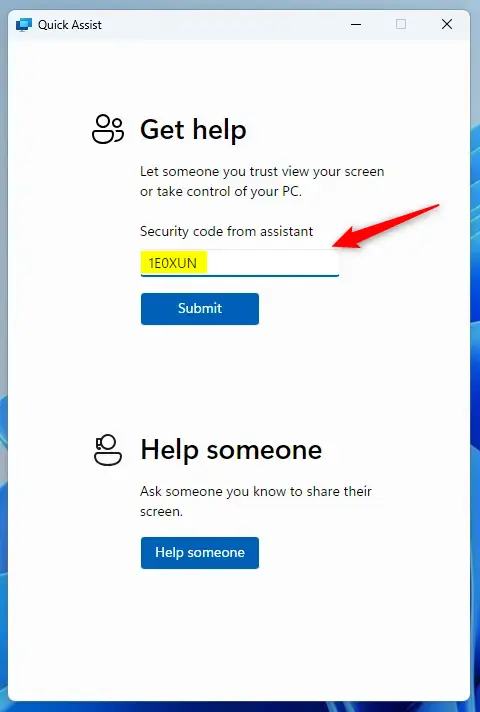
Step 4Wait for Them to Allow the Connection
Once the code is entered, the remote user has to approve the connection. Their screen shows a prompt with your Microsoft account name. They should check that it is really you before going on.
- Ask the other person to read the name on the prompt and confirm they know you.
- Have them click Allow.
- Wait a few seconds for the connection to start.
Only ever ask someone to click Allow if they trust the person on the other end. Scammers use the same tool, so never accept a code from someone who contacted you unprompted.

Step 5Use Quick Assist Tools to Help
During a session, use the built-in tools to guide the other person step by step. You can watch the screen in View Only mode, or use the drawing tools and laser pointer to highlight specific items. The toolbar at the top of the Quick Assist window holds these controls. Hover over an icon to see what it does.
- View Only: By default, you can only see their screen. This is a good mode when the person wants to learn, because you tell them what to click and they do it themselves. They stay in control, which many people find less stressful.
- Drawing Tools: Quick Assist has tools like a laser pointer and drawing (annotation). Use them to point to buttons or areas on their screen, which makes your instructions clearer than "the icon on the right". Look for them in the Quick Assist toolbar. Marks and drawings fade or can be cleared, so you can start fresh at any time.
- Chat: Depending on your version of Quick Assist, there may be a chat feature. You can type instructions there, and the other person can ask questions without interrupting you. If you don't see it, keep a phone call or messaging app open alongside the session.
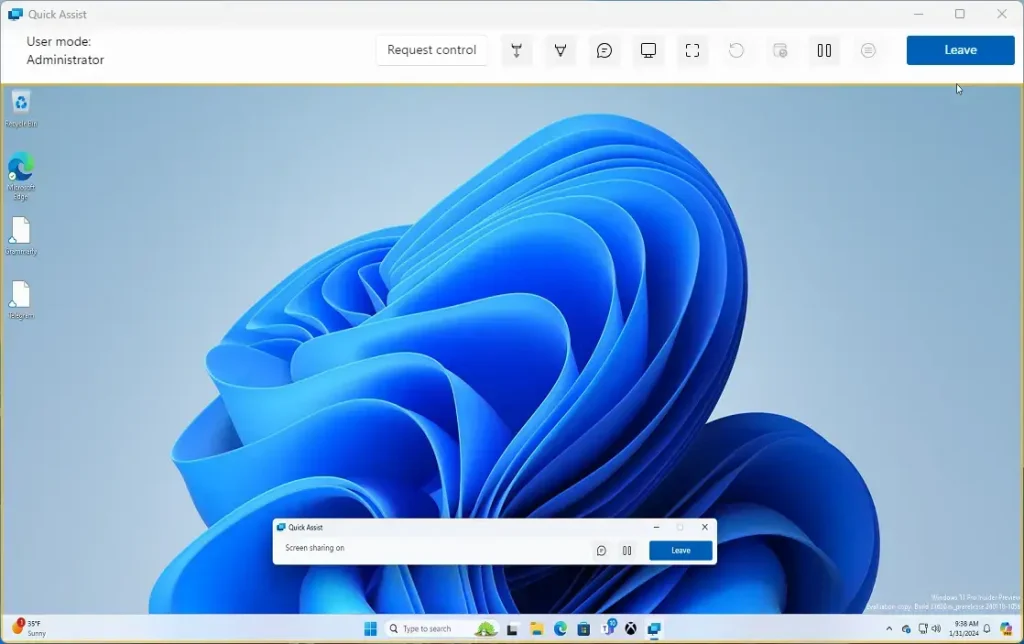
Step 6Ask to Control Their Screen (If Needed)
If you need to change settings or run a fix yourself, take over the remote computer directly.
- Click Request control in the toolbar.
- Ask the other person to click Allow on their screen when the prompt appears.
- Once they approve, move your mouse and type as if you were sitting at their computer.
The other person can stop sharing control at any time. If a Windows administrator prompt (User Account Control) pops up, you may not be able to answer it remotely. In that case, ask them to approve it on their end.
Step 7End the Session When Finished
When the problem is fixed, end the session so the connection is closed properly.
- Click Leave or End session in the Quick Assist toolbar, depending on what your version shows.
- Confirm that the Quick Assist window closes or returns to the main screen.
Either person can end the session at any time. After it ends, you can no longer see or control the other computer. To help again later, you need a new code.
Reference:
Summary
Quick Assist is a built-in Windows tool for remote troubleshooting. Friends and family share a 6-digit code, and you can either view their screen or take control to fix the problem. Use it only with people you know, and end the session when you're done.
Have a question about this guide?
Answered by AI from this guide. Good questions may be added to this page — please don't include personal details.
Did this guide fix your problem?

About the Author
Richard
Tech Writer, IT Professional
Richard is a writer at Geek Rewind who turns complex IT tasks into clear, step-by-step guides. He draws on years of hands-on experience in system administration and enterprise IT operations, focusing on Windows, Linux and WordPress: the problems people actually run into, and the fixes that work. His server and WordPress guides come from systems he runs himself. Richard builds and maintains the platform behind Geek Rewind, from its Ubuntu servers and Nginx configuration to its custom WordPress plugins. Many new tutorials start with readers' questions, and he's always glad to answer them in the comments.
No comments yet — be the first to share your thoughts!