How to Find Other Computers on Your Windows 11 Network

Network discovery in Windows 11 is a built-in feature that lets your computer find other PCs, printers, and devices on your local network. You need Windows 11 version 22H2 or newer and a network set to “Private” for this feature to work properly.
Turning on network discovery makes your PC visible to others. It also lists nearby devices in File Explorer under the Network entry in the left pane. You have to change a few settings on each PC, and the steps below go through them in the order that works best. If a device still doesn’t show up afterwards, the last section covers what to check.
Enable Network Discovery and File Sharing in Advanced sharing settings. Ensure your network profile is set to Private in Network & internet settings. Devices will then appear in File Explorer under the Network section.
How to See Other Devices on Your Network in 🪟 Windows 11
Four settings decide whether PCs on the same network can see each other. Check them on every computer you want to find, not just the one you are sitting at. Work through them in this order:
Step 1Make Sure All Devices Are in the Same Workgroup
Windows 11 network computers need to share the exact same workgroup name to see each other. By default, most PCs use WORKGROUP, but you must check this setting on every device to make sure they match. Open Settings , go to System, click About, and choose Advanced system settings to change your workgroup name. This works on both Home and Pro. You need an administrator account to change it.
Follow these steps on each PC to check or change the workgroup:
- Click Start and open Settings. The Settings window opens on the System page.
- Go to System About You will see the device name and specifications for this PC.
- Under Related links, click Advanced system settings. The System Properties window opens.
- On the Computer Name tab, click the Change button. The Computer Name/Domain Changes box appears. The current workgroup is shown at the bottom.
- Make sure the Workgroup option is selected, then type the name you want in the box (for example, WORKGROUP). Use the same spelling on every PC. The name is not case-sensitive.
- Click OK. If you changed the name, Windows welcomes you to the new workgroup and asks you to restart. Restart the PC so the change takes effect. If the name was already correct, nothing else is needed.
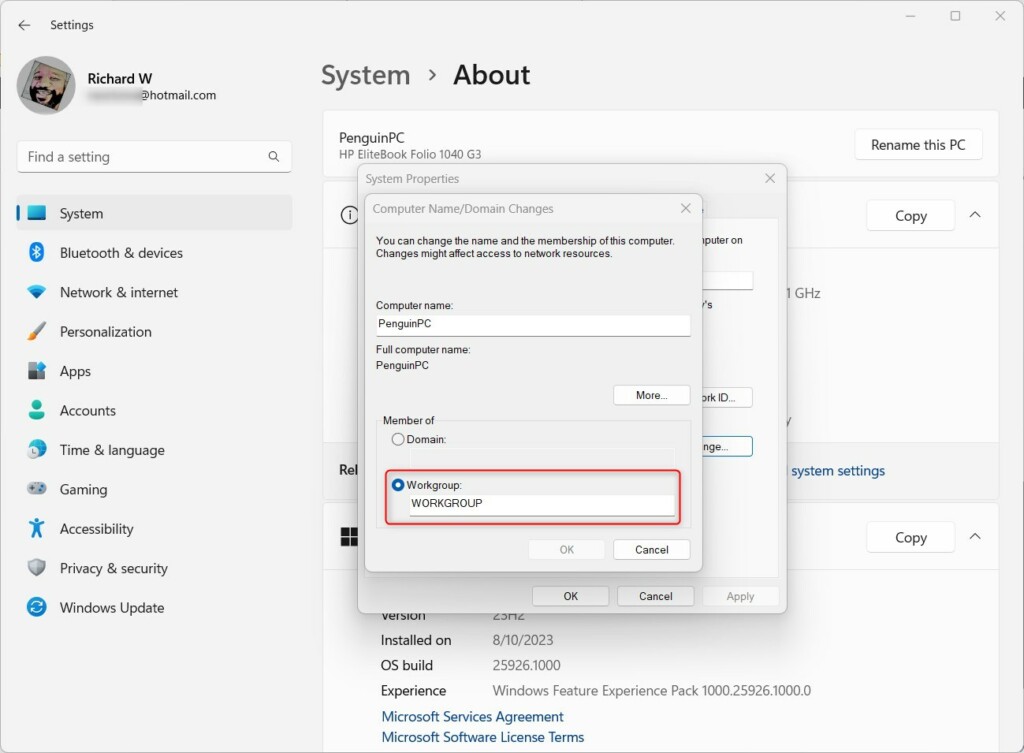
To undo the change, repeat the steps and enter the old workgroup name. If you aren’t sure what the other PCs use, check one of them first, then match the rest to it.
Learn more about changing the workgroup:
How to change workgroup in Windows 11
Step 2Set Your Network to Private
Windows 11 network computers cannot see each other if your connection is set to Public. Windows applies strict rules to Public networks, so your PC hides itself. Switching your network profile to Private tells Windows that you trust the local router and allows other devices to spot your PC. Open Settings, select Network & internet, click your active connection, and choose Private.
What this achieves: Mutual visibility opens up between the PC and surrounding network devices.
Only use Private on networks you trust, such as your home or office network. Leave coffee shop, hotel, and other shared Wi-Fi on Public. Here is how to switch the profile:
- Click Start and open Settings.
- Go to Network & internet. The page shows your current connections, such as Wi-Fi or Ethernet.
- Click your active connection. For Wi-Fi, open Wi-Fi and then the properties of the network you are connected to. For a cable connection, click Ethernet. The properties page for that connection opens.
- Find Network profile type and select Private. The selection is saved right away, and you do not need to restart.
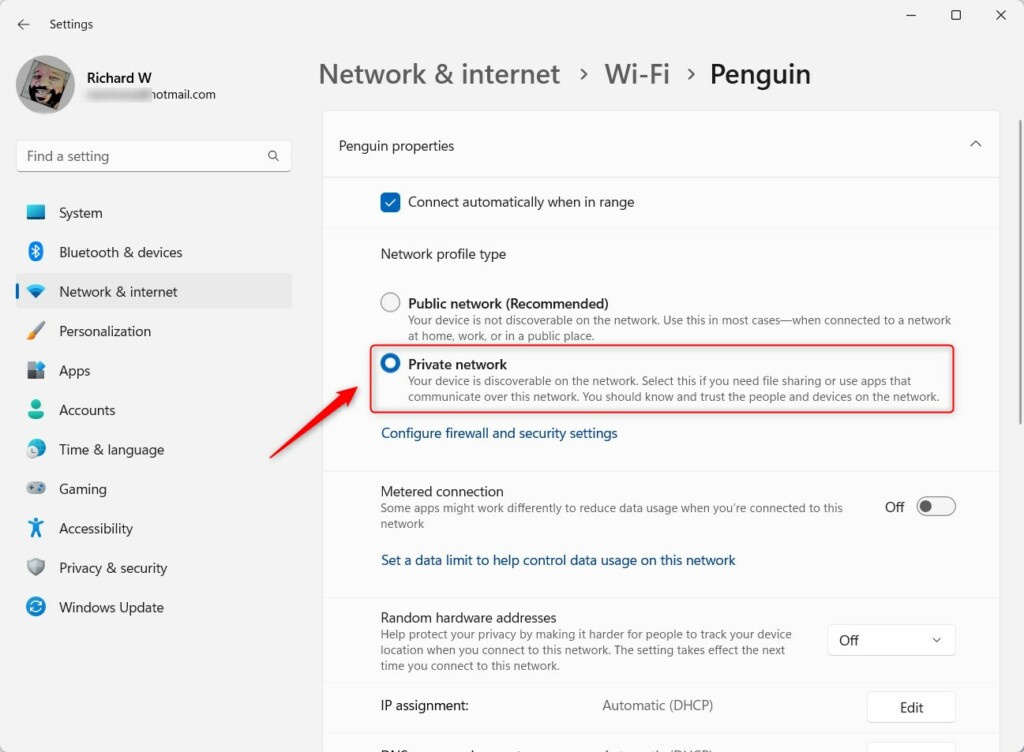
To undo this, return to the same page and select Public. Windows keeps a separate profile for each network, so you have to do this once per network. Do it on every PC you want to find.
More details here:
Change network profile in Windows 11
Step 3Turn On Network Discovery
Windows 11 network computers stay hidden until you turn on Network Discovery. This feature lets your PC see surrounding hardware and tells other devices that your computer is online. Open Settings, go to Network & internet, choose Advanced network settings, and turn on Network Discovery. The switch sits in the Advanced sharing settings page and is set separately for each profile, so make sure you change it under the profile your network uses (Private networks, if you followed the previous section).
What this achieves: The computer and other devices become mutually visible across the local environment.
Follow these steps to turn it on:
- Open Settings.
- Go to Network & internet Advanced network settings Advanced sharing settings You will see sections for Private networks, Public networks, and All networks. Click Private networks to expand it.
- Find Network discovery and turn it On. A checkbox named Set up network connected devices automatically may appear under the switch. Leave it ticked unless you have a reason not to.
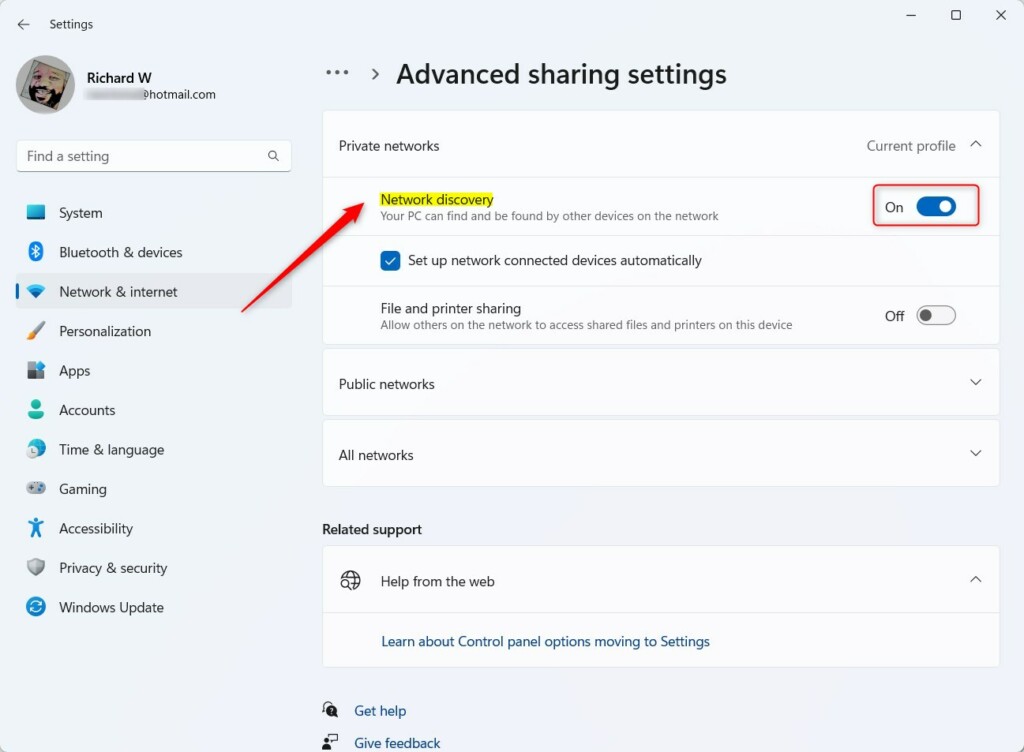
If the switch turns itself off again or the section is missing, check that the connection is set to Private. To undo the change, turn the switch Off in the same place. Avoid turning it on under Public networks unless you really need it.
Learn how to do this here:
Turn Network discovery On or Off in Windows 11
Step 4Turn On File and Printer Sharing
Windows 11 network computers need File and Printer Sharing turned on before you can browse shared folders or use networked printers. This setting gives other trusted devices permission to access your shared storage and hardware. Open Settings, go to Network & internet, select Advanced network settings, and turn on File and Printer Sharing. It lives on the same Advanced sharing settings page as Network discovery, again under each network profile.
What this achieves: Local network hardware gains permission to access shared storage and peripherals.
Follow these steps to turn it on:
- Go to Settings Network & internet Advanced network settings Advanced sharing settings, and expand Private networks. The page lists the sharing options for that profile.
- Turn File and printer sharing On. The switch changes to On right away. You do not need to restart.
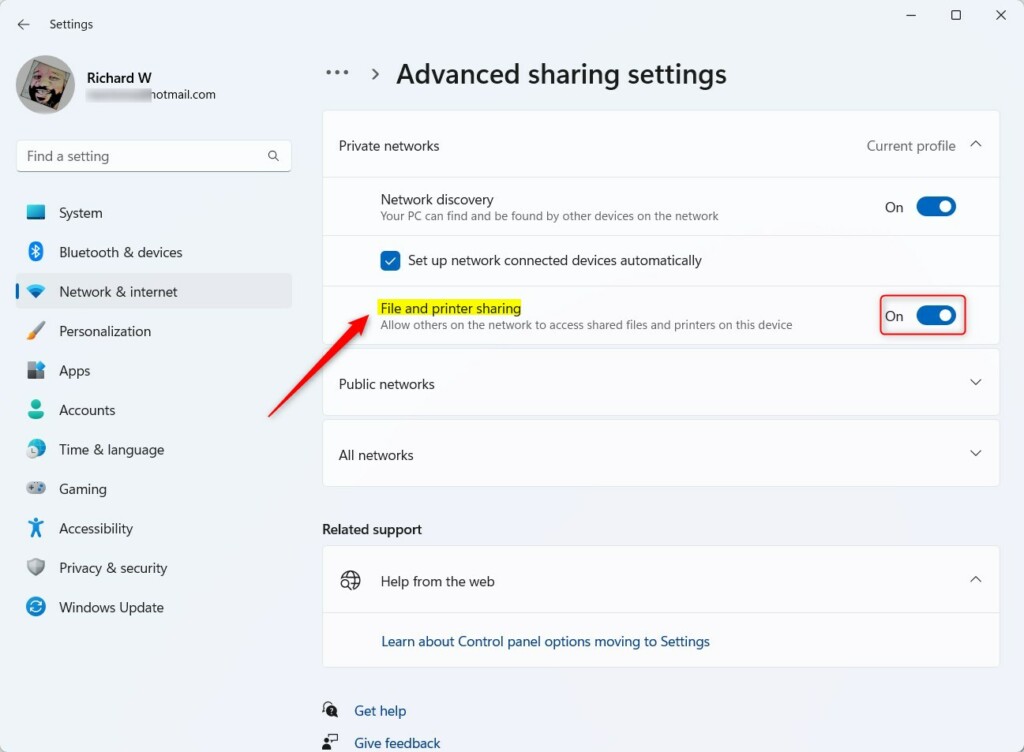
Turning this on only makes sharing possible. A PC will not list any folders until you share them. To stop sharing everything, turn the switch back to Off.
More info:
How to turn File and printer sharing On or Off in Windows 11
Find Devices in File Explorer
Once these settings are in place, open File Explorer and click Network in the left pane. The other PCs, printers, and devices on the network should be listed there. Give it a few seconds, then press F5 to refresh if the list is empty.
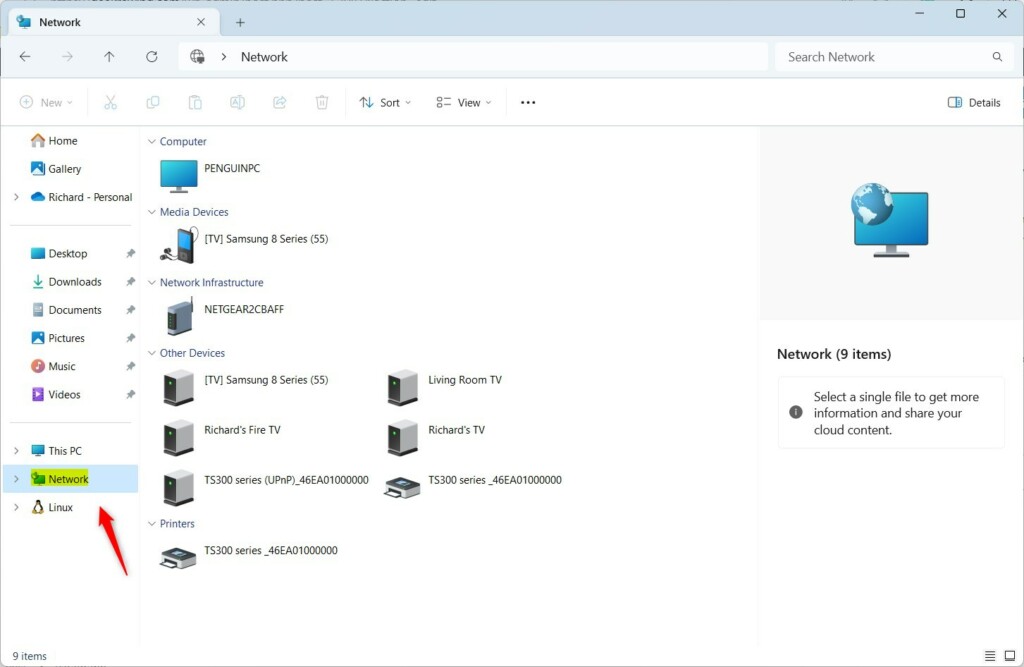
If a device is still missing, go back through the four settings on that device. A wrong workgroup name or a Public profile on the other PC is the most common cause. Restarting the PC that is not showing up often fixes the rest.
Summary
- Make sure all devices are in the same workgroup.
- Set your network to Private so devices can be found.
- Turn on Network Discovery so devices can see each other.
- Turn on File and Printer Sharing to share files and printers.
- Look in File Explorer under Network to find other devices.
Finding other Windows 11 network computers requires four quick checks. Make sure all devices use the same workgroup, set your connection to Private, turn on Network Discovery, and enable File and Printer Sharing. Do this on every PC involved, not just one. Once these steps are done, open File Explorer and click on Network to see all connected devices.
Was this guide helpful?

About the Author
Richard
Tech Writer, IT Professional
Richard is a writer at Geek Rewind who turns complex IT tasks into clear, step-by-step guides. He draws on years of hands-on experience in system administration and enterprise IT operations, focusing on Windows, Linux and WordPress: the problems people actually run into, and the fixes that work. His server and WordPress guides come from systems he runs himself. Richard builds and maintains the platform behind Geek Rewind, from its Ubuntu servers and Nginx configuration to its custom WordPress plugins. Many new tutorials start with readers' questions, and he's always glad to answer them in the comments.


No comments yet — be the first to share your thoughts!