How to Toggle Copilot Vision in Microsoft Edge

Copilot Vision in Microsoft Edge is a built-in AI tool that reads and understands your screen so you can ask questions about anything on a webpage. You circle or highlight parts of a page, and the browser gives you instant answers or simple summaries.
Microsoft includes this feature in Edge version 128 and newer. You control the feature inside your Edge privacy settings, where you turn the screen-reading tool on or off whenever you want.
To toggle Copilot Vision in Microsoft Edge, go to Settings , then Copilot and AI services, and adjust the “Enable Copilot Vision” switches. This allows you to control whether Edge analyzes on-screen content for AI assistance.
Turn Copilot Vision on or off in Microsoft Edge
You can turn Copilot Vision Microsoft Edge on or off by opening your browser settings and changing your AI preferences. Head to the three dots in the top right corner, open Settings , and find the Copilot and AI services menu to control when the assistant can see your browsing sessions.
- Open the Microsoft Edge browser.
- Click on Settings and more (the three horizontal dots in the top right corner).
- Select Settings from the menu.
- Open Microsoft Edge.
- Click the three horizontal dots (Settings and more) in the top right.
- Select ‘Settings’ from the menu.
- In the left-hand menu, click ‘Copilot and AI services’.
- Find the ‘Copilot Vision’ section.
- Toggle the switches for these options: ‘Enable Copilot Vision for anything on screen’ and ‘Enable Copilot Vision on webpages in Edge’.

- On the left-hand menu, click on Copilot and AI services.
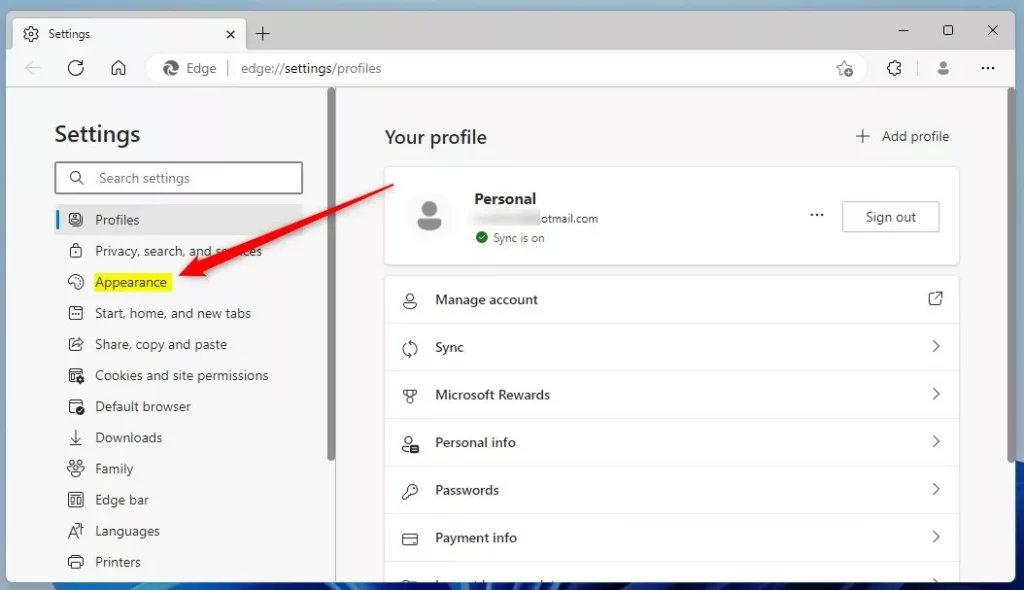
- Look for the Copilot Vision section.
- Toggle the switches to On or Off for the following options:
- Enable Copilot Vision for anything on screen
- Enable Copilot Vision on webpages in Edge
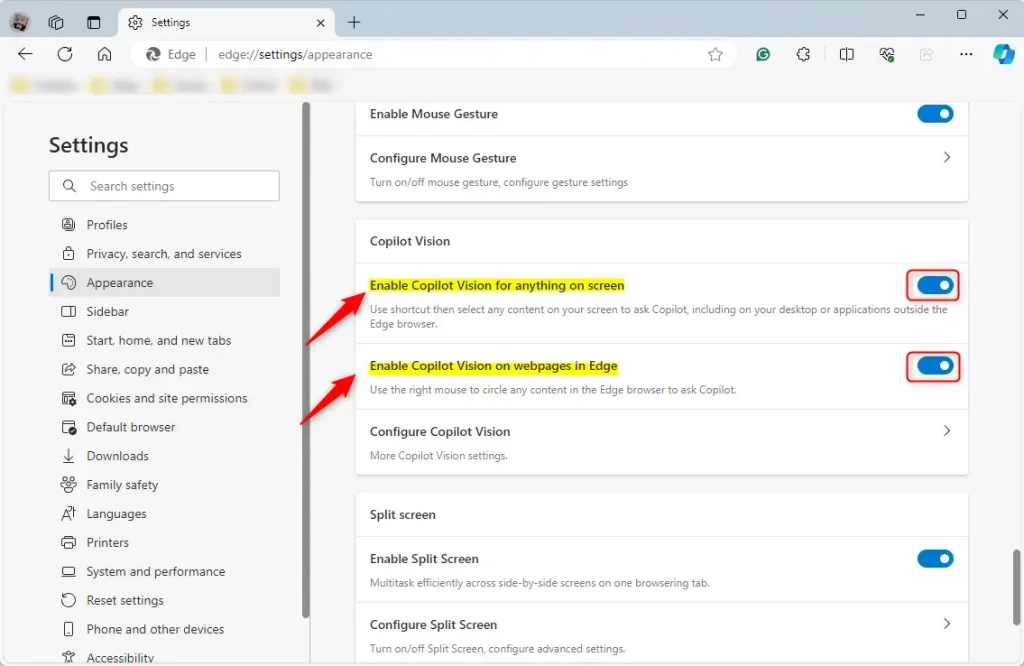
Close the Settings tab when finished. Changes take effect immediately.
Conclusion
Controlling Copilot Vision in Microsoft Edge determines whether the AI assistant can see your screen.
Was this guide helpful?

About the Author
Richard
Tech Writer, IT Professional
Richard is a writer at Geek Rewind who turns complex IT tasks into clear, step-by-step guides. He draws on years of hands-on experience in system administration and enterprise IT operations, focusing on Windows, Linux and WordPress: the problems people actually run into, and the fixes that work. His server and WordPress guides come from systems he runs himself. Richard builds and maintains the platform behind Geek Rewind, from its Ubuntu servers and Nginx configuration to its custom WordPress plugins. Many new tutorials start with readers' questions, and he's always glad to answer them in the comments.



No comments yet — be the first to share your thoughts!