How to Enable or Disable Pen Cursor in Windows 11

The pen cursor in Windows 11 is a small dot that appears on screen when you hold a stylus close to the display. Turn it off if the dot distracts you while you draw or take notes on a touch screen. Turn it on if you want to see exactly where the pen will land before it touches the screen.
The easiest way to change this is the Settings app. You don’t need extra software, and the change applies right away. If Settings isn’t an option, a registry method is covered further down.
Go to Settings Bluetooth & devices Pen & Windows Ink Expand Additional pen settings and check or uncheck the box next to Show cursor to enable or disable it. This setting controls the visual indicator that appears when your stylus is near the screen.
Enable or Disable Show Pen Cursor in Settings
These steps work on both Windows 11 Home and Pro. The Pen & Windows Ink page only shows up on devices that have pen or touch hardware. If you don’t see it, check that your pen or digitizer is connected and recognized.
- Open Settings by pressing
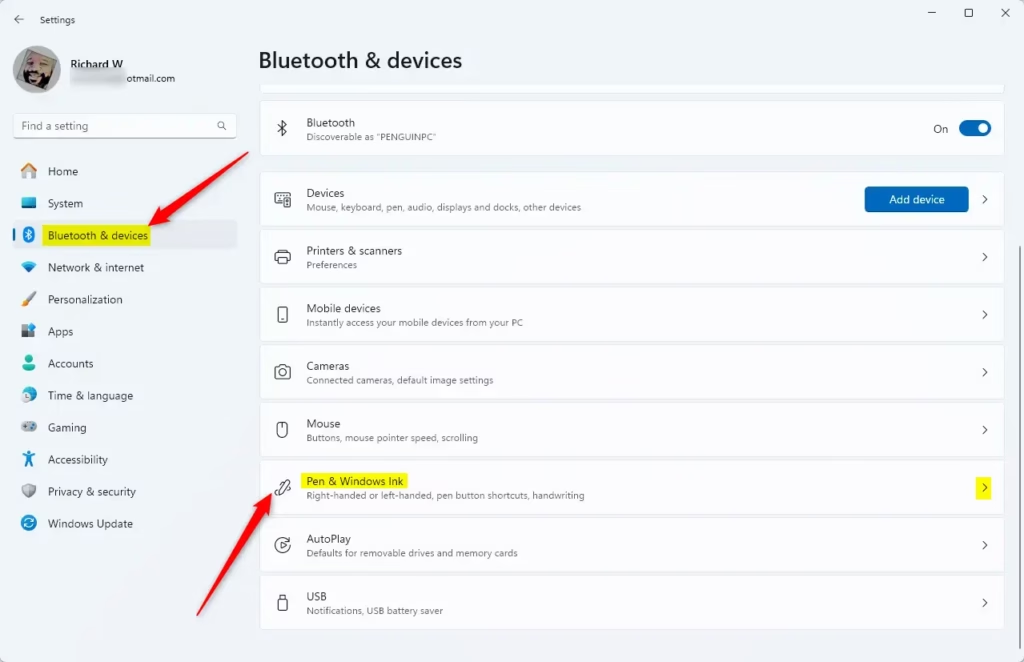
Win+I. The Settings window should open. - Click Bluetooth & devices on the left side. Then click Pen & Windows Ink on the right side. You should now see the pen options, including the pen shortcuts and handwriting settings (see screenshot below).
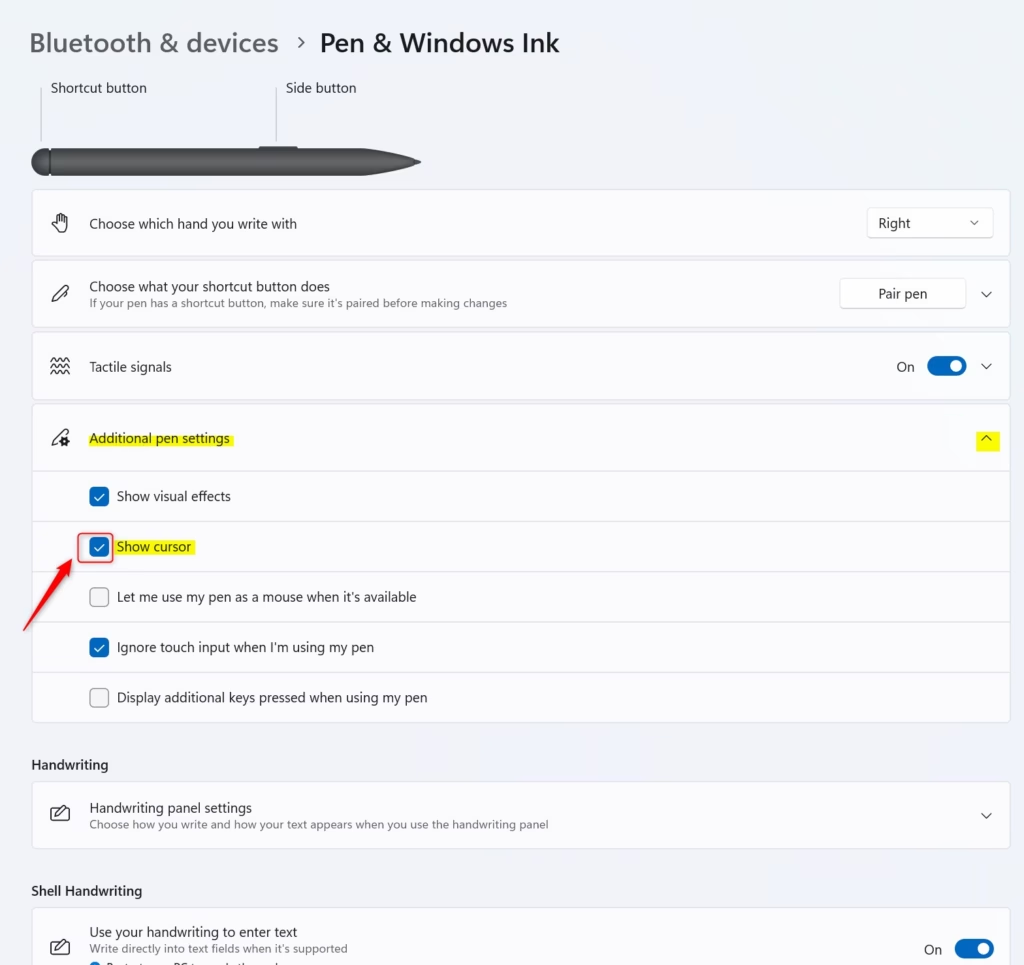
- Click Additional pen settings to expand it. Two checkboxes appear: Show visual effects and Show cursor.
- Check the box next to Show cursor to turn the pen cursor on, or uncheck it to turn it off. The dot will appear or disappear the next time you hover your pen over the screen.
- Close Settings. No restart is needed.
To undo the change, come back to the same page and flip the checkbox the other way. Show visual effects is a separate option, so turning off the cursor leaves the touch ripple effects as they were.
Option Two
Enable or Disable Show Pen Cursor Using Registry
Use this method if the Settings page is missing or the checkbox doesn’t work for you. The Registry Editor is the built-in database where Windows stores its settings. The commands below change the pen cursor values in your user account, so they only affect you and not other users on the PC.
Back up the registry before you change anything, because a wrong value can cause problems. In Registry Editor, you can do this with File Export. Save the file somewhere you can find it.
Open Windows Terminal, paste one of the commands below, and press Enter. Each command sets the same value to a different number. If a change doesn't show up right away, sign out and sign back in.
To enable both 'Show visual effects' and 'Show cursor' (default):
This is the standard Windows configuration. Run it if you want to go back to the defaults after trying the other options.
reg add "HKEY_CURRENT_USER\Control Panel\Cursors" /v PenVisualization /t REG_DWORD /d 35 /f
To disable both 'Show visual effects' and 'Show cursor':
reg add "HKEY_CURRENT_USER\Control Panel\Cursors" /v PenVisualization /t REG_DWORD /d 0 /f
To disable 'Show visual effects' but keep 'Show cursor' on:
reg add "HKEY_CURRENT_USER\Control Panel\Cursors" /v PenVisualization /t REG_DWORD /d 32 /f
To enable 'Show visual effects' but turn off 'Show cursor':
Summary
In short, you can manage the pen cursor in Windows 11 through the Settings app or through the registry. Settings is safer and easier to undo. Use the registry commands only when Settings isn't available. You can always restore the default with the first command.
Have a question about this guide?
Answered by AI from this guide. Good questions may be added to this page — please don't include personal details.
Did this guide fix your problem?

About the Author
Richard
Tech Writer, IT Professional
Richard is a writer at Geek Rewind who turns complex IT tasks into clear, step-by-step guides. He draws on years of hands-on experience in system administration and enterprise IT operations, focusing on Windows, Linux and WordPress: the problems people actually run into, and the fixes that work. His server and WordPress guides come from systems he runs himself. Richard builds and maintains the platform behind Geek Rewind, from its Ubuntu servers and Nginx configuration to its custom WordPress plugins. Many new tutorials start with readers' questions, and he's always glad to answer them in the comments.
No comments yet — be the first to share your thoughts!