How to Enable or Disable Mouse Haptic Feedback in Windows 11

Mouse haptic feedback in Windows 11 adds physical vibrations to your clicks and window snaps, so you can feel what happens on screen. It only works on compatible hardware, and it needs Windows 11 build 26300.8142 (Dev 25H2) or build 26220.8148 (Beta 25H2) or later in those channels. On a regular stable build the setting may not appear at all.
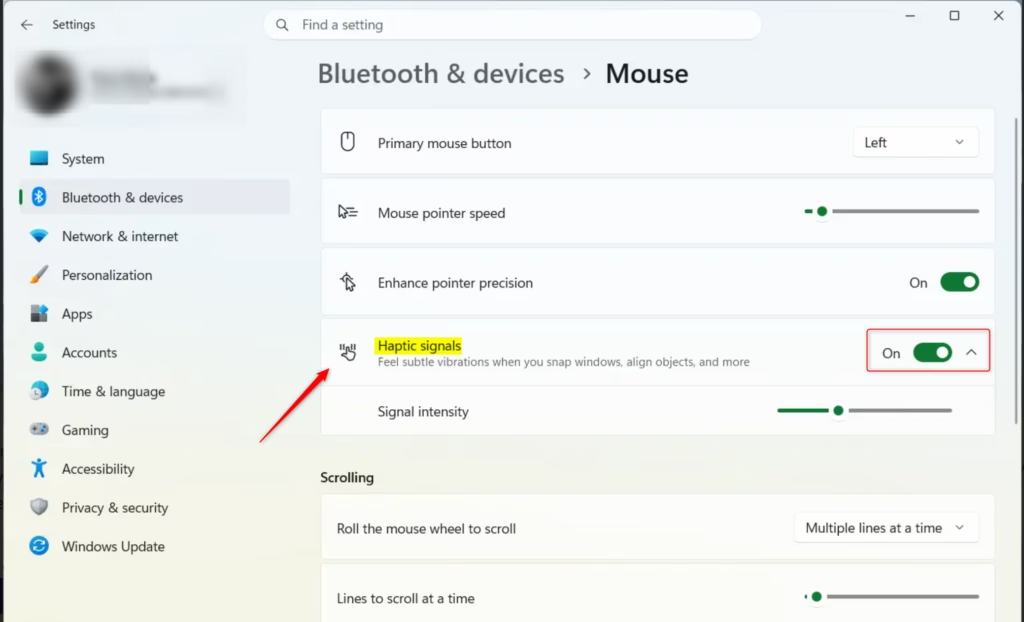
You can turn the vibration on or off, and adjust its strength, in Settings Bluetooth & devices Mouse Haptic signals This guide covers three ways to control it: the Settings app , the Registry Editor through a command, and the Logi Options+ app for Logitech mice. The default is on.
Open Settings with Win+I, then go to Bluetooth & devices Mouse and switch Haptic signals on or off. The default is on, and the change applies immediately with no restart. The setting only appears on compatible mice and Windows 11 Dev 25H2 build 26300.8142 or Beta 25H2 build 26220.8148 or later.
Option One
Turn Mouse Haptic Feedback On or Off in Settings
It works the same on Home and Pro, and you don’t need administrator rights for it. Your mouse must be connected and must support haptics. If it doesn’t, Windows will not show the Haptic signals setting.
- Press
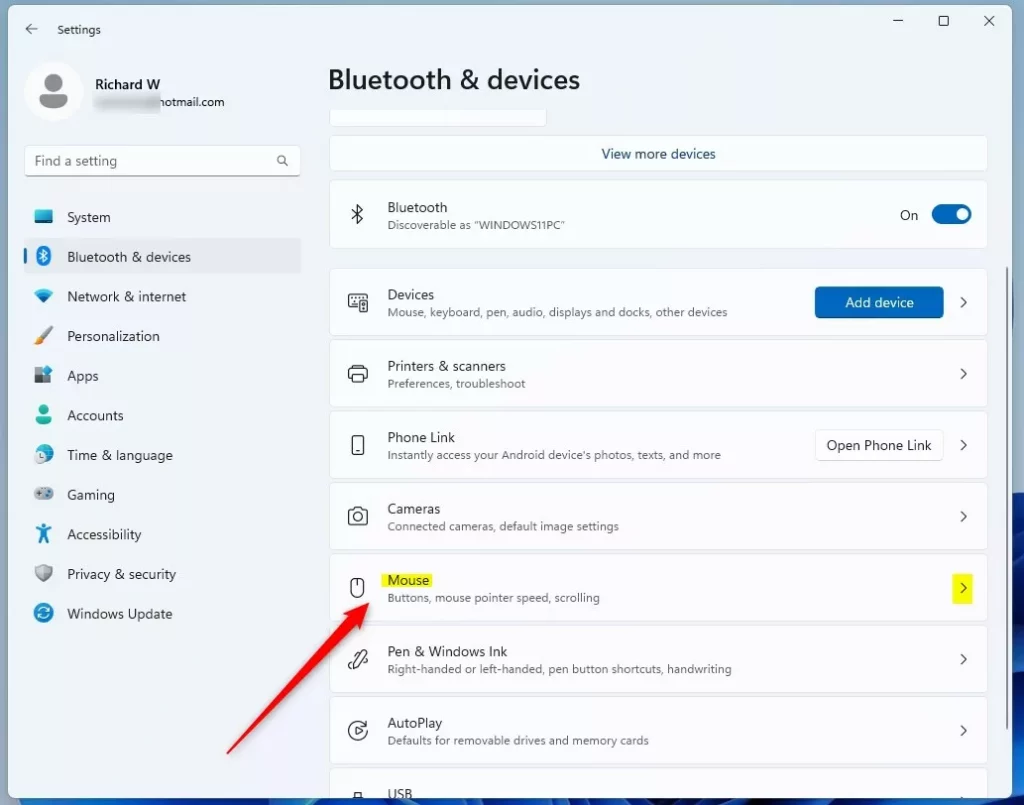
Win+Ito open Settings . The Settings window opens on the Home or System page. - Click Bluetooth & devices on the left side. Then click Mouse on the right side. You should now see the mouse options, such as the primary button and cursor speed. (See screenshot below)
- Turn Haptic signals on or off. The default is on. When it is on, you can also adjust the strength of the vibration.
- Close Settings. The change applies right away, and you don’t need to restart.
If you can’t find Haptic signals, check two things. First, make sure your PC runs one of the builds named above or a newer one. Second, make sure your mouse supports haptic feedback. To undo the change, come back to the same page and flip the switch again.
Option Two
Turn Mouse Haptic Feedback On or Off Using Registry
The Registry Editor method lets you change the vibration setting from the command line, with no third-party software. It requires administrator privileges. It is useful if you want to script the change or if you prefer typing a command to clicking through Settings. It affects how compatible mice vibrate during normal use.
- Right-click the Start button and choose Terminal (Admin). If User Account Control asks for permission, click Yes. A Windows Terminal window opens with administrator rights.
- Copy the command for the state you want from the sections below, paste it into the window, and press Enter.
- Check that the command finishes without an error message. Then close the terminal.
If the change doesn’t show up in Settings right away, close and reopen Settings. You can also sign out and back in. To undo the change, run the other command.
Turn On Mouse Haptic Feedback
This is the default setting.
reg add "HKEY_CURRENT_USER\Software\Microsoft\Windows NT\CurrentVersion\Windows\EnhancedPenSupport" /v MouseFeedbackEnabled /t REG_DWORD /d 1 /f
Turn Off Mouse Haptic Feedback
reg add "HKEY_CURRENT_USER\Software\Microsoft\Windows NT\CurrentVersion\Windows\EnhancedPenSupport" /v MouseFeedbackEnabled /t REG_DWORD /d 0 /f
Option Three
Turn Mouse Haptic Feedback On or Off in Logi Options+
If you own a compatible Logitech device, such as the MX Master 4, you can manage haptic feedback in the Logi Options+ app. You pick your mouse in the app and change the haptic feedback details there. This setting overrides any changes made in Windows Settings or the Registry. You need Logi Options+ installed, and the mouse must be connected.
- Open Logi Options+.
- Click your supported mouse on the home screen. The page for that device opens.
- Click HAPTIC FEEDBACK.
- Click the haptic feedback details. The options for the vibration appear.
- Turn Haptic feedback on or off. The default is on.
To undo the change, open the same page and flip the switch back.
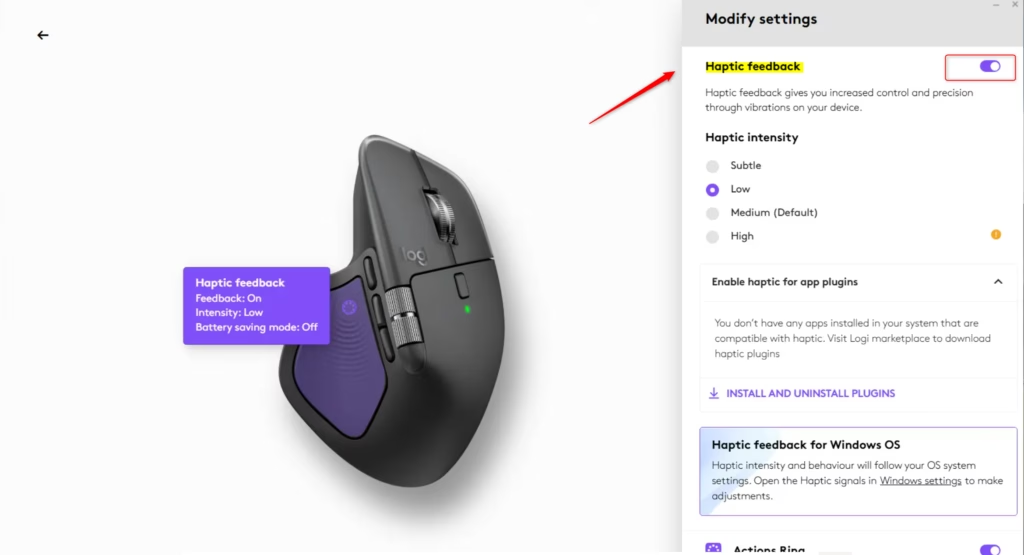
If you turned haptics on in Settings or the Registry and your mouse still doesn't vibrate, check Logi Options+ first.
Summary
Mouse haptic feedback creates physical vibrations during Windows 11 tasks. You can configure it through Settings, the Windows Registry, or Logi Options+ for compatible hardware. The default configuration keeps the feature on. Disabling haptic feedback within Logi Options+ overrides any configuration applied through the other methods, so keep that in mind when the results don't match what you set.
How do I turn mouse acceleration on?
Open Settings with Win+I, go to Bluetooth & devices Mouse, then toggle on Pointer speed. This makes your cursor move faster when you move your mouse quickly. You can adjust the speed slider to find what feels comfortable for you.
How to disable haptic feedback?
Open Settings, go to Bluetooth & devices Mouse, then turn off Haptic signals. This stops your compatible mouse from vibrating when you click or snap windows. The setting is on by default in Windows 11 build 26300 and later.
How do I adjust the mouse sensitivity in 🪟 Windows 11?
Open Settings with Win+I, navigate to Bluetooth & devices Mouse, then adjust the Pointer speed slider under Motion. Move it left for slower tracking or right for faster tracking. Test different positions to find your preferred sensitivity.
How to disable double click on mouse 🪟 Windows 11?
Open Settings, go to Bluetooth & devices Mouse, then turn off Double-click speed or increase the slider to require slower clicks. You can also adjust the double-click time window to make accidental double-clicks less likely.
Have a question about this guide?
Answered by AI from this guide. Good questions may be added to this page — please don't include personal details.
Did this guide fix your problem?

About the Author
Richard
Tech Writer, IT Professional
Richard is a writer at Geek Rewind who turns complex IT tasks into clear, step-by-step guides. He draws on years of hands-on experience in system administration and enterprise IT operations, focusing on Windows, Linux and WordPress: the problems people actually run into, and the fixes that work. His server and WordPress guides come from systems he runs himself. Richard builds and maintains the platform behind Geek Rewind, from its Ubuntu servers and Nginx configuration to its custom WordPress plugins. Many new tutorials start with readers' questions, and he's always glad to answer them in the comments.
No comments yet — be the first to share your thoughts!