How to Change Mouse Haptic Feedback Intensity in Windows 11

Mouse haptic feedback intensity in Windows 11 controls the physical vibration strength you feel when you click buttons, drag windows, or resize items on your screen. You need a supported mouse with built-in vibration hardware to use this feature.
Open the Settings app and go to Bluetooth & devices to adjust these vibration levels from strong to subtle in under a minute. If you don’t see the options, your mouse or your Windows build probably doesn’t support the feature yet. The sections below explain what to check first.
Open Settings with Win+I, select Bluetooth & devices, then click Mouse and expand Haptic signals. Turn the toggle on, then move the Signal intensity slider from level 1 (least vibration) to level 4 (most). Level 2 is the default, and changes apply immediately without a restart.
What Is Haptic Feedback?
Mouse haptic feedback gives you a small physical pulse when you do things like snap a window into place or resize an item. The mouse vibrates for a moment, so you know the action registered without looking at the screen.
That tactile cue gives you better control and precision. It can also reduce hand fatigue during long computer sessions, because you rely less on watching the pointer and re-checking each click.
Not every mouse can do this. A standard mouse has no vibration motor, so Windows has nothing to control. The feature only applies to mice with built-in haptic hardware.
When Can You Use This?
You can use mouse haptic feedback in Windows 11 when your computer has a supported mouse and runs a recent version of the operating system. This built-in function lets you feel physical vibrations when you snap windows into place on your screen. You must turn on the feature in your settings before you can adjust how strong those vibrations feel.
Before you start, check these things:
- Your mouse has haptic hardware and is connected, by Bluetooth, wireless receiver or cable.
- Windows 11 is fully updated. Go to Settings Windows Update and install anything pending. Newer builds are more likely to include the haptic options.
- Your mouse maker's software is installed if the mouse needs it. Some mice also have their own app with separate haptic settings.
Then turn the feature on and set the strength:
- Open Settings from the Start menu, or press the Windows key plus I.
- Select Bluetooth & devices in the left pane. The list of connected devices and device settings opens on the right.
- Look for the mouse or haptic options on that page. The exact page name can differ between Windows 11 builds, so check the Mouse page too if you don't see a haptic section at first.
- Turn on the haptic signals toggle for your mouse. The intensity control is usually unavailable until this is on.
- Move the intensity control to the level you want, from strong to subtle. Try a window snap or a resize and feel the result.
- Adjust again until it feels right. Changes normally apply straight away, so you shouldn't need to restart.
If the haptic options are missing, the usual causes are a mouse without haptic hardware, an older Windows build, or a mouse that is paired but not fully recognized. Update Windows, reconnect the mouse, and check the maker's software. If you want to undo your changes, return to the same page and turn the haptic signals toggle off.
Users can choose how strong the vibrations should feel once haptic signals are turned on for the mouse.
Option One
Change Mouse Haptic Feedback Intensity in Settings
You can change mouse haptic feedback intensity Windows 11 options directly through the main Settings app on your computer. This lets you make the physical vibrations from your mouse stronger or weaker to match your personal preference. You just need to open your device settings, find your mouse properties, and move the vibration slider to your preferred level.- Open Settings by pressing
Win+I. - Click Bluetooth & devices on the left side. Then click Mouse on the right side.
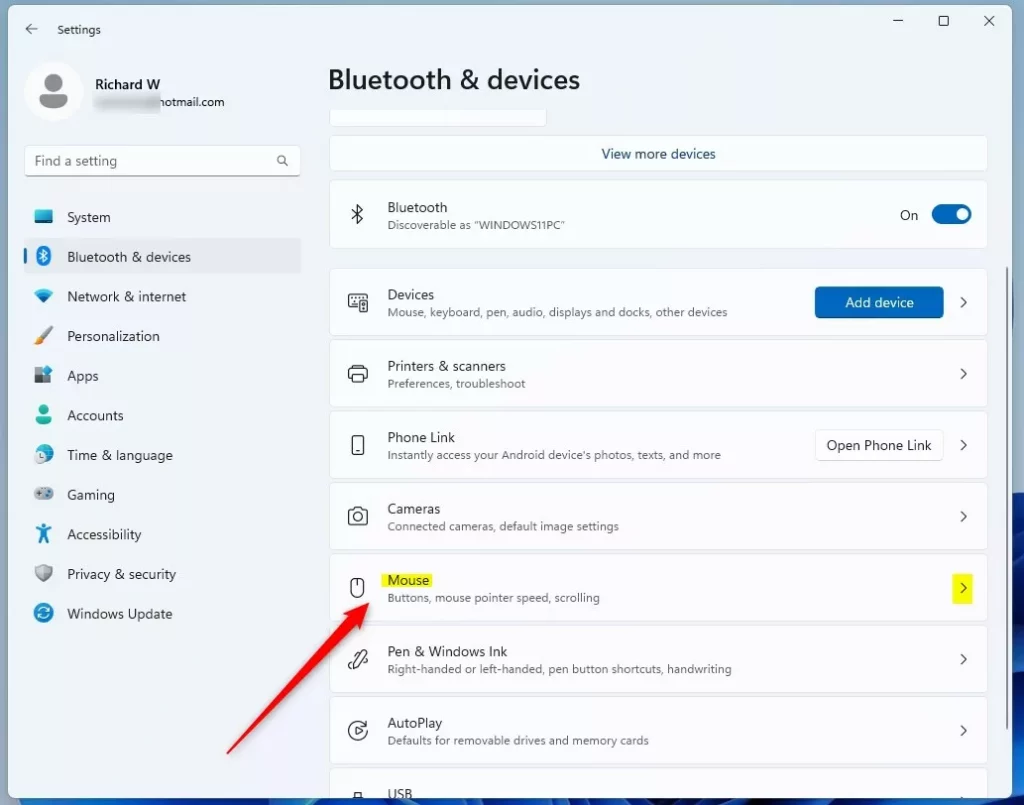
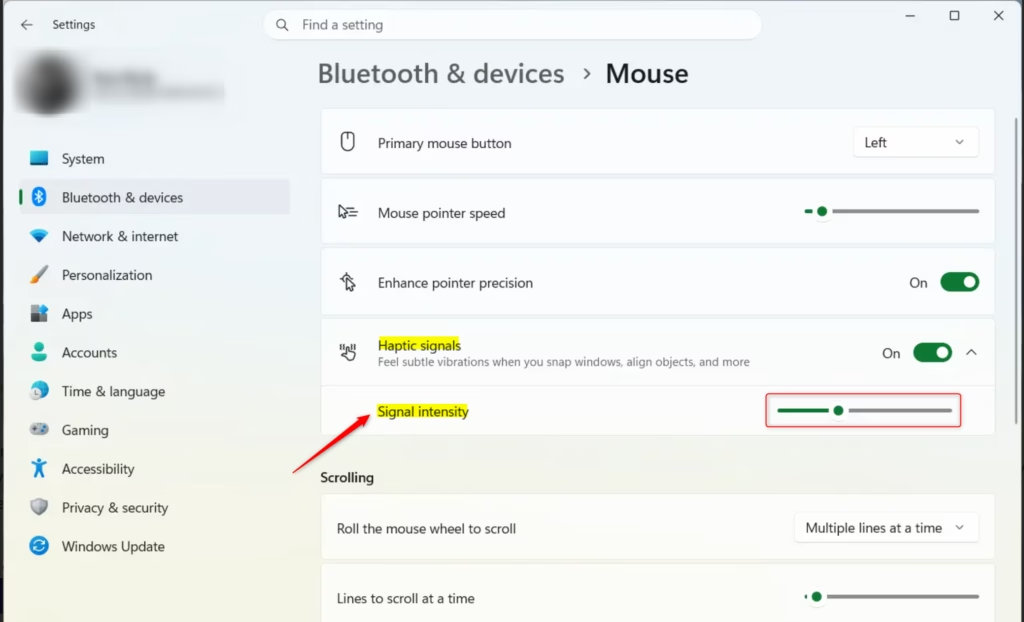
- Click Haptic signals to expand it open.
- Move the Signal intensity slider left (less vibration) or right (more vibration). You can choose intensity levels 1 to 4. Level 2 is the default. Hover your pointer over the slider to see the current level number.
- You can now close Settings if you like.
Option Two
Change Mouse Haptic Feedback Intensity Using Registry Editor
This method lets you set your exact vibration strength using a command prompt instead of clicking through the normal settings menus. You just open your terminal with admin rights and run a quick command to update the value on your computer.
Open Windows Terminal with administrative privileges and run the commands below to select the required intensity level:
Intensity Level 1:
reg add "HKEY_CURRENT_USER\Software\Microsoft\Windows NT\CurrentVersion\Windows\EnhancedPenSupport" /v MouseFeedbackIntensity /t REG_BINARY /d 000000000000D03F /f
Intensity Level 2 (Default):
reg add "HKEY_CURRENT_USER\Software\Microsoft\Windows NT\CurrentVersion\Windows\EnhancedPenSupport" /v MouseFeedbackIntensity /t REG_BINARY /d 000000000000E03F /f
Intensity Level 3:
reg add "HKEY_CURRENT_USER\Software\Microsoft\Windows NT\CurrentVersion\Windows\EnhancedPenSupport" /v MouseFeedbackIntensity /t REG_BINARY /d 000000000000E83F /f
Intensity Level 4:
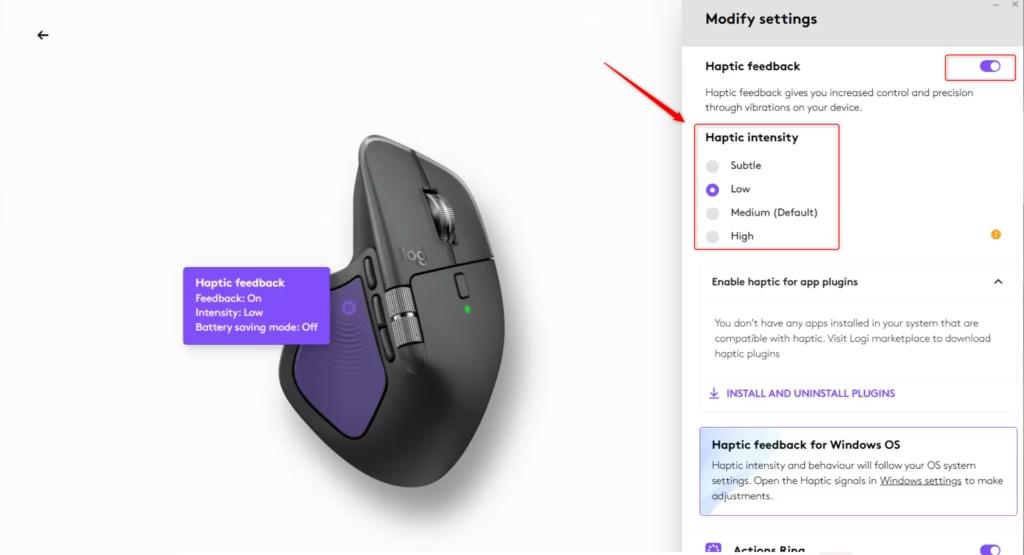
Logitech mouse haptic feedback intensity uses adjustable settings within the Logi Options+ software. This software allows users to select feedback levels like Subtle, Low, Medium, or High. Selectable feedback levels provide different physical sensations through the Logitech mouse. This feature helps match personal preferences for tactile response on compatible Logitech hardware.
- Open Logi Options+.
- Click on your supported Logitech mouse.
- Click HAPTIC FEEDBACK.
- Click on the Haptic feedback details.
- Select Subtle, Low, Medium (default), or High for the haptic intensity you want. (see screenshot below)
Summary
Three main methods exist to adjust mouse haptic feedback intensity in Windows 11: the Settings app for convenience, the Registry Editor for advanced configurations, or Logi Options+ for compatible Logitech mice.
Have a question about this guide?
Answered by AI from this guide. Good questions may be added to this page — please don't include personal details.
Did this guide fix your problem?

About the Author
Richard
Tech Writer, IT Professional
Richard is a writer at Geek Rewind who turns complex IT tasks into clear, step-by-step guides. He draws on years of hands-on experience in system administration and enterprise IT operations, focusing on Windows, Linux and WordPress: the problems people actually run into, and the fixes that work. His server and WordPress guides come from systems he runs himself. Richard builds and maintains the platform behind Geek Rewind, from its Ubuntu servers and Nginx configuration to its custom WordPress plugins. Many new tutorials start with readers' questions, and he's always glad to answer them in the comments.
No comments yet — be the first to share your thoughts!