How to Enable or Disable Keep Mouse Indicator Visible Until Dismissed in Windows 11

Keep mouse indicator visible until dismissed is a Windows 11 setting that places a steady marker on your screen and keeps it there until you dismiss it. It first appeared in Windows 11 build 26340.9233. It replaces the quick flash effect with a persistent pointer locator, which is easier to spot on large monitors, on multi-monitor desks and during presentations.
The standard mouse pointer locator has to be turned on first, or this persistent mode will not work. Once both are on, pressing the Ctrl key no longer triggers a brief flash. The indicator stays until you dismiss it.
The guide has two parts. The first uses the Settings app. The second uses the Registry Editor, for PCs where the switch is missing from Settings. The setting is per user, so it applies to your account.
Open Settings Accessibility Mouse pointer and touch, select Mouse indicator, and turn on Keep indicator visible until dismissed. You can also open Registry Editor, go to 🗝️HKEY_CURRENT_USER\
Step 1Open Your 🪟 Windows 11 Settings Menu
Start by opening the Settings app and going to the accessibility options.
- Press Win+I to open Settings . You can also click the Start button and choose the gear-shaped Settings icon. You should see the Settings window with a list of categories on the left.
- Click Accessibility on the left side of the window. The accessibility options now appear on the right.
- Scroll down to the “Vision” section and click Mouse pointer and touch.
The same path is Settings Accessibility Mouse pointer and touch.
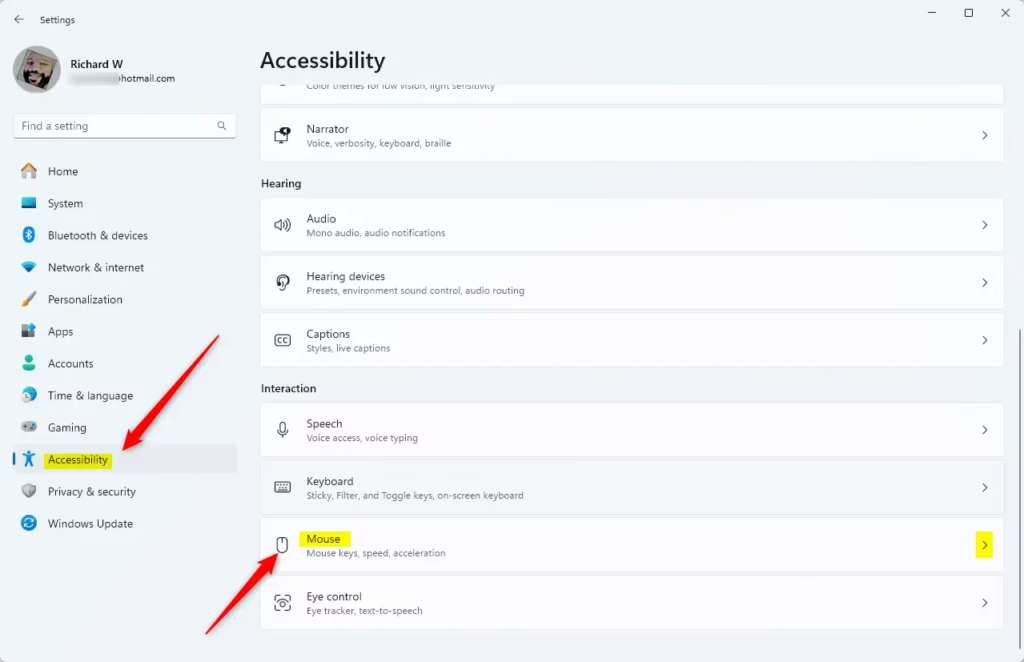
Step 2Expand the Mouse Indicator Settings
Now find the mouse indicator controls. They hold the tools that decide how your cursor stands out on busy screens.
- Look through the list of options for Mouse indicator.
- Click that item to open a menu with more detailed controls. You should now see the indicator settings.
If you do not see this option, your Windows build is probably too old. The feature needs build 26340.9233 or later. Open Settings Windows Update, install any available updates, restart if asked, and check again. If it is still missing after you update, use the registry method further down.
Step 3Turn On the Persistent Mouse Indicator
This is the step that makes the indicator persistent.
- In the Mouse indicator menu, check that the regular mouse indicator toggle is set to On. It sits right above the new setting. If it is off, the persistent mode will not work.
- Find Keep indicator visible until dismissed and switch it to On.
With the setting on, the old Ctrl key flash temporarily stops working. The indicator stays on screen until you dismiss it. To go back to the quick flash, set Keep indicator visible until dismissed to Off. No restart is needed for the Settings method.
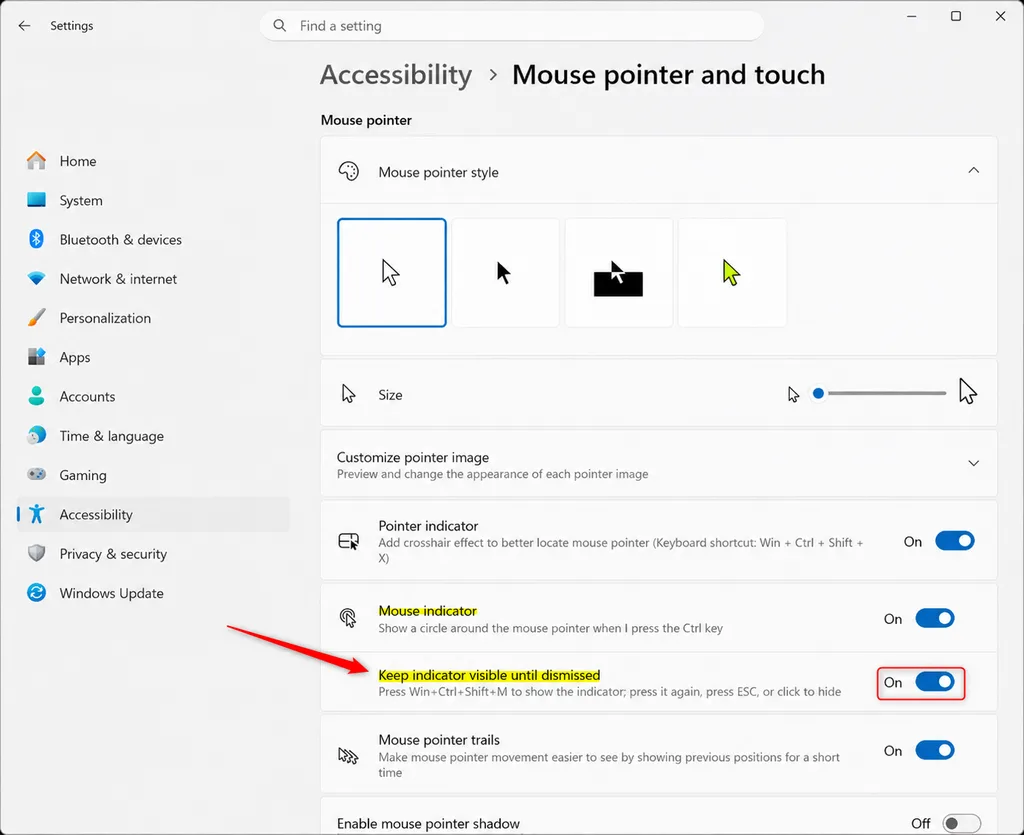
Here is how to use the persistent indicator in Windows 11 version 24H2.
- Press Win + Ctrl + Shift + M at the same time. A circle appears around your mouse pointer and stays there.
- To make the circle disappear, do any one of these: press Win + Ctrl + Shift + M again, press the Esc key, or click anywhere on the screen.
The circle stays until you do one of these, so you can move the mouse freely and still see where the pointer is.
Step 4Enable the Feature Using the Registry Editor
Use this method if the switch is missing from Settings, or if you manage the setting by hand. The Registry Editor is a built-in database of Windows settings. It works on Home, Pro, Enterprise and Education. Sign in with an account that can approve administrator prompts.
- Press Win + R to open the Run box.
- Type
regeditinto the field and press Enter. - Click Yes if a User Account Control prompt asks for permission to make changes to your device. The Registry Editor opens.
- In the left pane, click the arrows next to each folder to follow this exact path:
HKEY_CURRENT_USER\Control Panel\Mouse. - Select the
Cursorsfolder. The pane on the right shows its current values, and it may be empty. - Right-click any empty area in the right pane, hover over New, and select DWORD (32-bit) Value.
- Name the new value exactly
FindMyMousePersistentand press Enter. - Double-click the new
FindMyMousePersistentvalue to open its properties window. - Change the value data from
0to1to turn the feature on, then click OK.
Check that you type value names and paths exactly as written. If you want a safety net, click the key you are about to change and use File Export to save a copy first.
To turn the feature off later, return to this key and change the value data back to 0, or delete the FindMyMousePersistent entry.
Step 5Restart Your Computer to Apply Changes
Registry changes are often not picked up until you sign in again, so restart to be sure.
- Close all open applications and save your work.
- Open the Start menu, click the power icon, and select Restart.
You can also sign out of your user account and sign back in. When your desktop loads again, the persistent mouse indicator is ready to use. If it still behaves like the old flash, go back to Settings Accessibility Mouse pointer and touch and make sure the regular mouse indicator toggle is on.
Summary
A persistent mouse indicator helps you track your pointer across large screens or multiple monitors without shaking the mouse. You can turn it on through Settings or the Registry Editor, and you can switch it off the same way if you prefer the quick flash.
Have a question about this guide?
Answered by AI from this guide. Good questions may be added to this page — please don't include personal details.
Did this guide fix your problem?

About the Author
Richard
Tech Writer, IT Professional
Richard is a writer at Geek Rewind who turns complex IT tasks into clear, step-by-step guides. He draws on years of hands-on experience in system administration and enterprise IT operations, focusing on Windows, Linux and WordPress: the problems people actually run into, and the fixes that work. His server and WordPress guides come from systems he runs himself. Richard builds and maintains the platform behind Geek Rewind, from its Ubuntu servers and Nginx configuration to its custom WordPress plugins. Many new tutorials start with readers' questions, and he's always glad to answer them in the comments.
No comments yet — be the first to share your thoughts!