How to Enable or Disable InPrivate Browsing in Edge


InPrivate Browsing in Microsoft Edge (the default web browser built into Windows 11) is a mode that stops the browser from saving your web history, cookies, and temporary site data. You can turn off this private browsing mode entirely, or force every Edge window to open in it, by changing a setting in the Registry Editor. The Registry Editor is a tool for viewing and changing system settings on Windows.
Locking down InPrivate mode helps on shared family computers where you want all web activity to stay visible in the normal history logs. You need an administrator account for these changes. The steps work the same on Windows 11 Home and Pro, because they use the Registry Editor and not Group Policy, which Home does not include.
Open Registry Editor as administrator, navigate to Computer\🗝️HKEY_LOCAL_MACHINE\
How to Enable or Disable InPrivate Browsing
The setting controls whether you or other users on the computer can open private windows that do not save browsing history, cookies, or temporary files. It is a single registry value, but a wrong change in the registry can cause problems, so follow the steps carefully. Before you start, consider backing up the registry. In Registry Editor, choose File Export, pick All as the export range, and save the file somewhere safe.
- Open the Windows Registry editor as an administrator. Search for Registry Editor in the Start menu , right-click the result, and choose Run as administrator. When User Account Control asks for permission, click Yes. The Registry Editor window opens, with a folder tree on the left and values on the right.
- Go to the following location in the registry. You can expand the folders in the left pane one by one, or paste the path into the address bar at the top of the window:
If the last folder in that path (the Edge key) does not exist, create it. Right-click the folder above it, choose New Key, and name it exactly as it appears in the path. A new Windows 11 install often has no Edge policy key yet, so this is normal.
Computer\HKEY_LOCAL_MACHINE\SOFTWARE\Policies\Microsoft\Edge
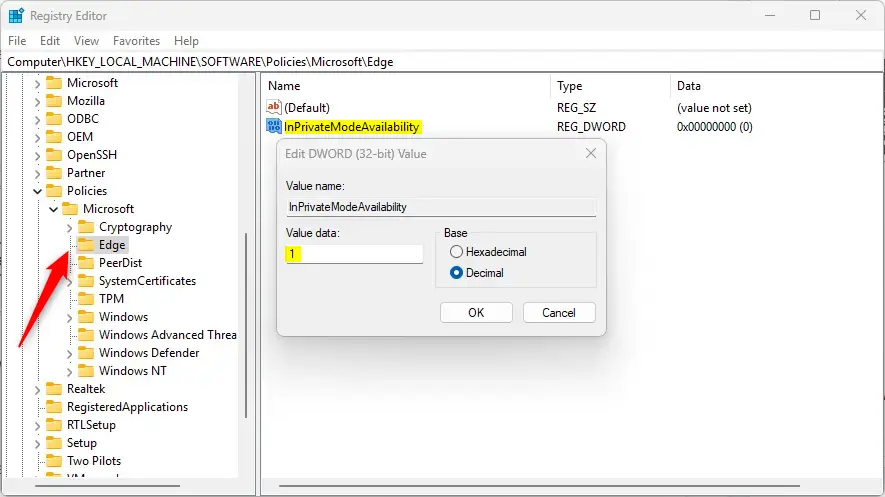
With the Edge key selected, look at the right pane and choose one of the options below. Only one value is needed, and the number you type decides how Edge behaves.
- Find InPrivateModeAvailability on the right side and double-click it. An Edit DWORD (32-bit) Value box opens, showing the current Value data.
- Type
1in the Value data box to turn off InPrivate browsing completely. Click OK. The InPrivate option then no longer appears in Edge. - Type
2in the Value data box to force the browser to always open in InPrivate mode. Click OK. Regular windows can no longer be opened.
If you don’t see InPrivateModeAvailability, you need to create it:
- Right-click an empty space in the right pane.
- Choose New, then DWORD (32-bit) Value.
- Name the new entry InPrivateModeAvailability. Check the spelling, because Windows ignores a misspelled name.
- Double-click the new entry and set the Value data to
1or2, depending on your preference. Click OK.
Right-click it, choose Delete, and confirm with Yes. Edge then goes back to allowing InPrivate windows as usual.
A restart of your computer may be needed for these changes to take effect. At the very least, close all Edge windows first, including any still running in the background, and then reopen the browser. If the change still doesn't show, restart Windows.
Summary
InPrivate Browsing is a privacy tool. By editing the Windows Registry, you can enable it, disable it, or force it to match your needs. These steps require administrator access, and a quick restart of Edge or Windows finishes the process. If you ever want to undo the change, delete the InPrivateModeAvailability value and restart Edge.
Have a question about this guide?
Answered by AI from this guide. Good questions may be added to this page — please don't include personal details.
Did this guide fix your problem?

About the Author
Richard
Tech Writer, IT Professional
Richard is a writer at Geek Rewind who turns complex IT tasks into clear, step-by-step guides. He draws on years of hands-on experience in system administration and enterprise IT operations, focusing on Windows, Linux and WordPress: the problems people actually run into, and the fixes that work. His server and WordPress guides come from systems he runs himself. Richard builds and maintains the platform behind Geek Rewind, from its Ubuntu servers and Nginx configuration to its custom WordPress plugins. Many new tutorials start with readers' questions, and he's always glad to answer them in the comments.
[…] article explains how to open an InPrivate browsing window in Microsoft […]