How to Manage Addresses in Google Chrome

Autofill in Google Chrome is a built-in browser tool that saves your home and work addresses to fill out online forms automatically in seconds. Managing these saved places takes just a few clicks in your browser settings, so you can add new details, update old ones, or delete outdated information whenever you want.
The steps below are written for the current version of Chrome on Windows 11. The same screens work on Windows 10 and on Home and Pro editions, because Chrome handles this itself and Windows is not involved. No restart is needed after any change.
Access Chrome’s Autofill settings by clicking the three vertical dots, selecting Settings, then Autofill and passwords, and finally Addresses and more. From there, you can add, edit, or delete saved addresses. You can also type chrome://settings/addresses directly into the address bar.
Managing Addresses in Chrome
You can manage addresses Chrome saves for online forms by opening your browser settings and editing your personal information. Keeping your saved locations up to date makes online shopping and filling out checkout pages much faster, because you do not have to type your street and postal code every time.
It also helps with accuracy. If you moved last year and Chrome still offers your old street, a package can go to the wrong place. A quick check of this list every so often prevents that.
Browser settings handle all stored locations, allowing Chrome to fill out online forms automatically. Chrome may also offer to save a new address when you submit a form. If you accept, it shows up in the same list you are about to open.
If you are signed in to Chrome with your Google Account and sync is on, your saved addresses can follow you to Chrome on your other devices. A change you make here may therefore show up elsewhere too.
- Open the Google Chrome browser on your computer. A normal Chrome window should appear.
- Click the Customize and Control button (three vertical dots) in the top right corner. A drop-down menu opens below it.
- Select Settings. The Settings page opens in a new tab.
- On the left side of the screen, click Autofill and passwords. The right side now lists the Autofill options, such as passwords and payment methods.
- Click the Addresses and more tile on the right side. You should now see the list of your saved addresses, or an empty list if you have none yet. Near the top there is also a switch for saving and filling addresses. If you do not want Chrome to offer addresses at all, turn it off here. Turn it back on to undo.
- You can also go directly to this page by typing the following into your address bar:
chrome://settings/addresses. Press Enter and the same list opens.
You do not need administrator access to change these settings. These address settings apply only to your specific Chrome user profile. If several people share one Windows account, each should use their own Chrome profile so their addresses stay separate.
If the list looks different from what you expected, check the profile picture at the top right of the Chrome window. You may be in a different profile from the one you normally use.
Adding, Editing, or Deleting
- To add an address: Click the Add button in the top right corner and fill in your details. Check the street, city, and postal code before you save. A form opens, and when you save it, the new address appears in the list.
- To edit an address: Click the three dots next to an existing address and select Edit. Change the fields you need, then save. The list shows the updated entry. Use this when you move or fix a typo.
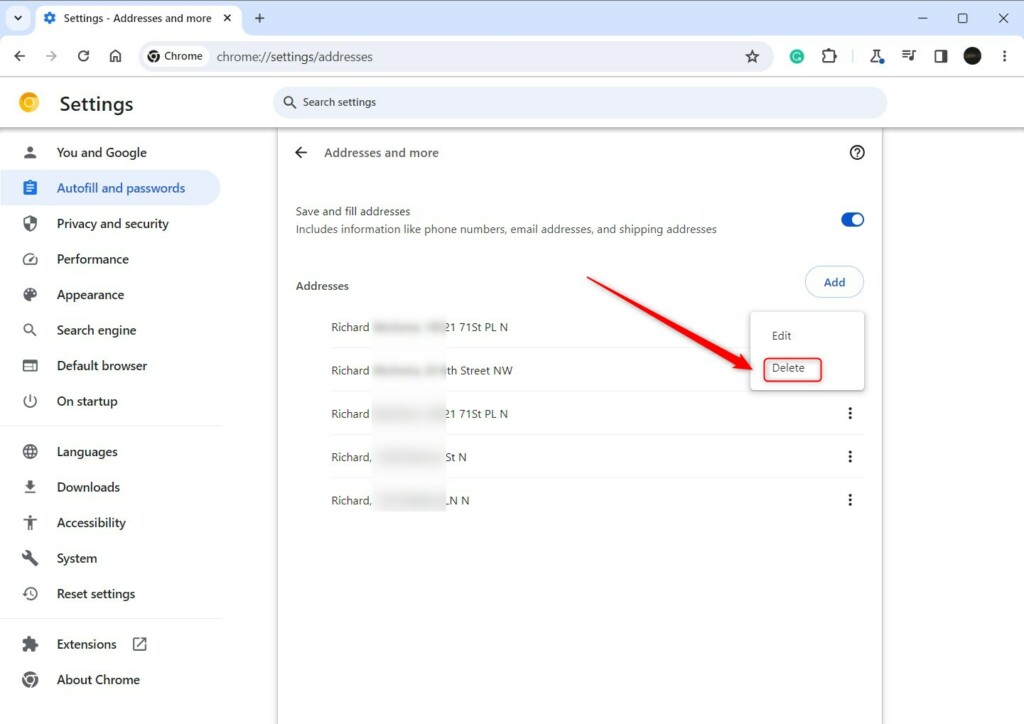
- To delete an address: Click the three dots next to the address and select Delete. The entry is removed from the list. Chrome does not offer an undo, so if you delete one by mistake, add it again with Add. If sync is on, the deletion may also apply to your other signed-in devices.
Summary
Chrome's saved addresses help keep personal information secure and accurate. Following these steps lets you quickly add new locations, fix errors, or remove old entries to keep the browser organized and efficient. Chrome supports up to 50 entries managed per profile.
A good habit is to open this list whenever you move house or change jobs, and delete anything you no longer use.
Have a question about this guide?
Answered by AI from this guide. Good questions may be added to this page — please don't include personal details.
Did this guide fix your problem?

About the Author
Richard
Tech Writer, IT Professional
Richard is a writer at Geek Rewind who turns complex IT tasks into clear, step-by-step guides. He draws on years of hands-on experience in system administration and enterprise IT operations, focusing on Windows, Linux and WordPress: the problems people actually run into, and the fixes that work. His server and WordPress guides come from systems he runs himself. Richard builds and maintains the platform behind Geek Rewind, from its Ubuntu servers and Nginx configuration to its custom WordPress plugins. Many new tutorials start with readers' questions, and he's always glad to answer them in the comments.
No comments yet — be the first to share your thoughts!