How to Create a Samba Public Share on Ubuntu 24.04

To create a Samba public share on Ubuntu 24.04, install Samba, create a folder, add a share section for it to /etc/samba/smb.conf with guest access turned on, and restart Samba. Anyone on your local network can then open and save files in that folder without a password.
Samba is a free networking tool that connects Windows and Linux computers, so the share works from Windows, Linux and macOS clients. You can set up any folder on your Ubuntu system in a few minutes to give other people in your house open access to documents, media and backups. Use it only on a network you trust, because everyone who can reach the share can read, change and delete what is in it.
To create a Samba public share on Ubuntu 24.04, install Samba with sudo apt install samba, create a folder such as /home/share, then add a [Share] section to /etc/samba/smb.conf with guest ok = yes and writable = yes. Restart Samba and any device on your local network can open and save files without a password.
Install Samba
Samba is not installed on Ubuntu by default, so you need to install its packages before you can share anything. Installing Samba does not share any folders on its own. It only gives you the service and the configuration file you edit later.
- Open a terminal on the Ubuntu machine.
- Run the command below to install Samba. You will be asked for your password, because the command needs administrator rights.
sudo apt update
sudo apt install samba
Create a share folder
After installing Samba, create the folder you want to share with everyone. If you already have a folder you want to use, skip this section.
Pick a location that makes sense for shared data and is not buried in a private home folder. Note the full path, because you will type it into the Samba configuration later.
Everyone has access and nobody has to authenticate. That means the folder’s permissions on Ubuntu must be open as well, or guests will see the share but fail to save files in it.
sudo mkdir /home/share
sudo chmod 777 /home/share
Configure Samba
To set up the public share, you edit the main Samba settings file at /etc/samba/smb.conf. This text file tells Ubuntu which folder to share, who can connect, and whether they can write to it. For a public share you point it at your folder, turn on guest access and allow writing.
The default Samba configuration file is at [/etc/samba/smb.conf]. You need administrator rights to change it, so open it with sudo in whichever text editor you prefer.
First, create a backup before editing the file. If a typo stops Samba from starting, you can copy the backup back over the original and restart the service to undo your changes.
sudo cp /etc/samba/smb.conf /etc/samba/smb.conf.bak
Then open the file in your editor and adjust the highlighted settings below. These are the global settings that apply to the whole Samba server.
sudo nano /etc/samba/smb.conf
Next, adjust the share settings below. This is the section that defines your public share. Make sure it does the following:
- It points to the path of the folder you created or chose.
- It sets writable = yes so guests can save files.
- It sets guest ok = yes to allow guest access without a password.
- It sets the file and directory modes to 777 for public access.
#======================= Global Settings =======================

[global]

# Change this to the workgroup/NT-domain name your Samba server will part of
   workgroup = WORKGROUP

# server string is the equivalent of the NT Description field
   server string = %h server (Samba, Ubuntu)

#### Networking ####

# Uncomment and add your interface name

  interfaces = 127.0.0.0/8 ens33

# Uncomment this to bind to the named interfaces and/or networks

  bind interfaces only = yes


####### Authentication #######
#
# This option controls how unsuccessful authentication attempts are mapped
# to anonymous connections

  map to guest = bad user

#======================= Share Definitions =======================
#
# Under share definitions, create your share with the folder above.

[Share]
   # specify shared directory
   path = /home/share
   # allow all to write
   writable = yes
   # allow guest user (nobody)
   guest ok = yes
   # consider all as guest
   guest only = yes
   # set all new files to public
   force create mode = 777
   # set all new folers to public
   force directory mode = 777
Save the file and exit the editor. Nothing changes on the network until you restart Samba in the next step.
Restart Samba so it reads the new configuration. You must restart it every time you change smb.conf. No reboot of Ubuntu is needed.
sudo systemctl restart smbd
The Samba share is now created. Users on the same network should be able to browse and find the shared folder. If it does not show up, check that the Ubuntu machine is on the same network as the client and that no firewall is blocking Samba traffic.
Map Samba shares on Windows
Mapping the Ubuntu share on Windows makes it appear in File Explorer as a normal network drive. You right-click the Network folder in File Explorer, select Map network drive, and enter your Ubuntu server's address and the share name.
- Open File Explorer.
- Right-click the Network folder and select Map network drive. Right-clicking This PC offers the same option.
The Map Network Drive window should open.
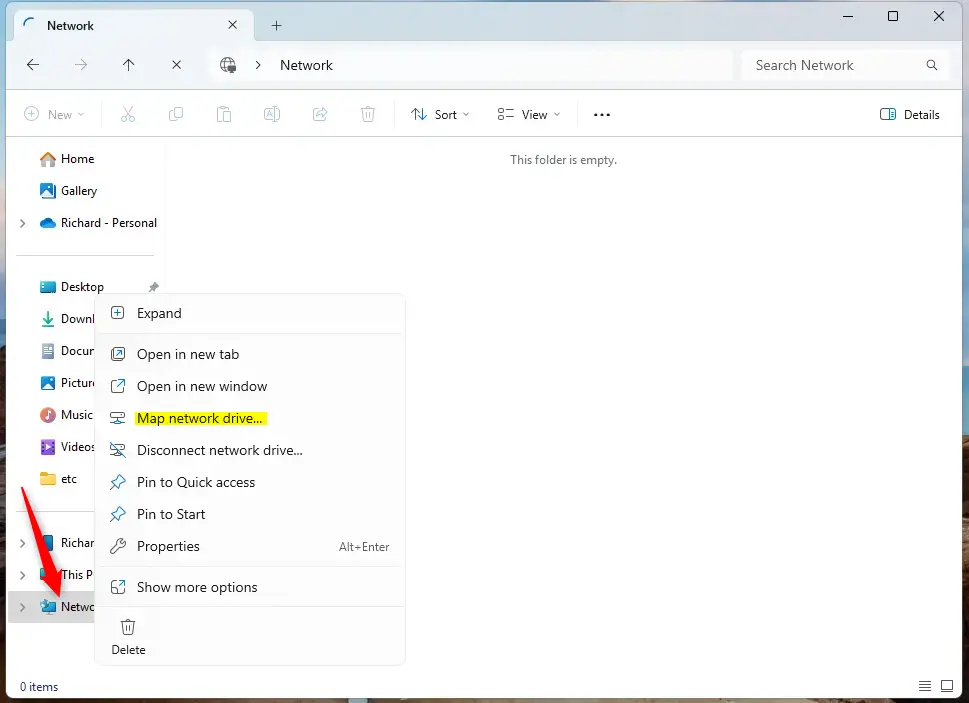
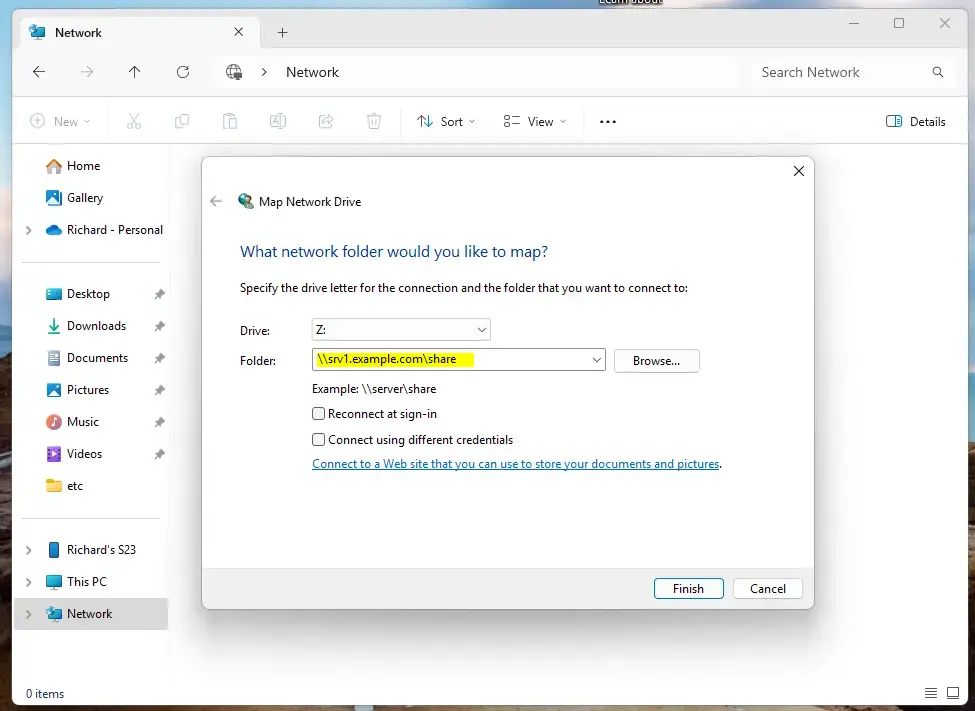
- In the Folder box, enter the server name followed by the share name. The server name can be the Ubuntu machine's IP address or its host name.
\srv1.example.comshare
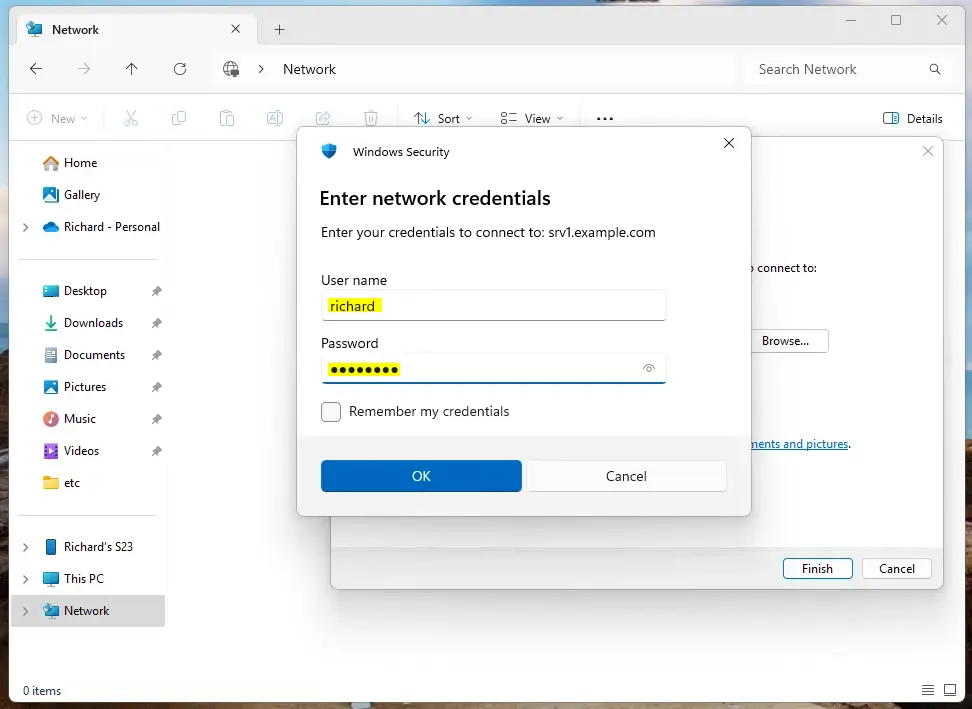
- When prompted for credentials, enter your account that lives on the Ubuntu server.
If Windows refuses the connection or keeps asking for a password, the Windows 11 guest access block described further down is the likely cause.
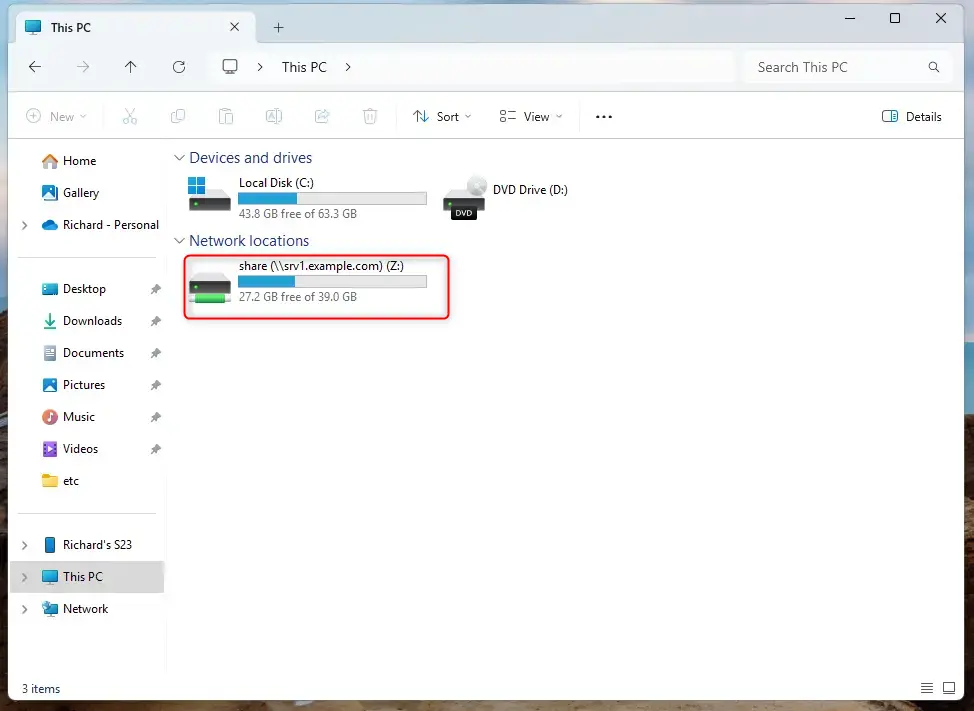
After that, the share should be mapped on your Windows machine. It shows up under This PC with a drive letter, and you can open it like any other drive.
Recent versions of Windows 11 block unauthenticated guest access by default. That is why a true no-password connection can fail even when the Samba side is correct. The workaround below allows guest access on the Windows client. Both changes use the Local Group Policy Editor, which is only included in Windows 11 Pro, Enterprise and Education. It is not available on Windows 11 Home.
- Select Start, type gpedit.msc, and select Edit group policy.
- In the left pane under Local Computer Policy, go to Computer Configuration Administrative Templates Network Lanman Workstation
- Open Enable insecure guest logons, select Enabled, then select OK.
Disable SMB signing as well. Windows may otherwise still refuse the guest connection, because a share with no authentication cannot sign its traffic.
Open the Local Group Policy Editor again if you closed it.
In the left pane, go to Computer Configuration Windows Settings Security Settings Local Policies Security Options
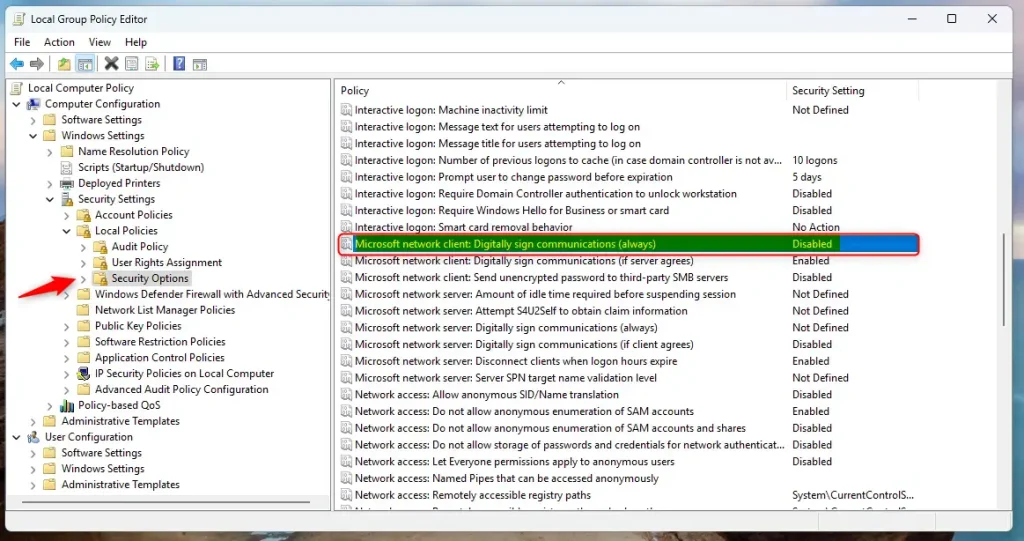
That should do it! If the share still does not connect, restart Windows so the policy changes apply, then map the drive again. To undo either change, set the policy back to Not Configured.
Conclusion:
Setting up a Samba public share on Ubuntu 24.04 gives everyone on your network easy access to a shared folder. Here are the key points to remember:
- Samba Installation: Install Samba first, because it is not on Ubuntu by default.
- Folder Creation: Create a public share directory and set its permissions so guests can write to it.
- Configuration: Edit the Samba configuration file to turn on guest access and set the right permissions. Back it up first.
- Restart Service: Always restart the Samba service after changing the configuration.
- Windows Mapping: Windows users can map the share as a network drive, but may need to enable guest access in Group Policy because of Windows 11 security defaults.
- Security Considerations: Allowing unauthenticated guest access means anyone on the network can change the files. Keep it to trusted networks and avoid putting sensitive data in the share.
With these steps done, your Samba share is ready to use and gives you a simple way to share files across your network.
Have a question about this guide?
Answered by AI from this guide. Good questions may be added to this page — please don't include personal details.
Did this guide fix your problem?

About the Author
Richard
Tech Writer, IT Professional
Richard is a writer at Geek Rewind who turns complex IT tasks into clear, step-by-step guides. He draws on years of hands-on experience in system administration and enterprise IT operations, focusing on Windows, Linux and WordPress: the problems people actually run into, and the fixes that work. His server and WordPress guides come from systems he runs himself. Richard builds and maintains the platform behind Geek Rewind, from its Ubuntu servers and Nginx configuration to its custom WordPress plugins. Many new tutorials start with readers' questions, and he's always glad to answer them in the comments.
[…] can create public shares with Samba, but it’s not recommended in a secure […]