How to Share Host Folders with Windows Sandbox in Windows 11


Windows Sandbox folder sharing lets you move files between your main PC and a temporary testing space. Windows Sandbox is a built-in feature that creates an isolated desktop environment on your computer so you can run untrusted apps and test files without putting your main system at risk.
Microsoft added host folder sharing in Windows 11 build 27686.1000 to make file transfers faster. This feature works on Windows 11 Pro, Enterprise, and Education editions.
Share a folder by opening Windows Sandbox, clicking the three-dot menu, selecting “Share folder,” and choosing your desired folder. For automatic sharing on startup, create and run a .wsb configuration file specifying the host folder path and read/write permissions.
Share a host folder with a sandbox environment
Windows Sandbox shared folders let you pass files back and forth between your main PC and the virtual desktop. You can share any folder on your computer by opening the Sandbox menu, selecting the share option, and picking the folder you want to use. This gives the temporary desktop access to your files without changing your main system settings.
First, open Windows Sandbox from your Start menu .
First, enable and open the Sandbox app.
Next, click on the 3 dots button at the top right of the Sandbox app’s title bar, and select Share folder.
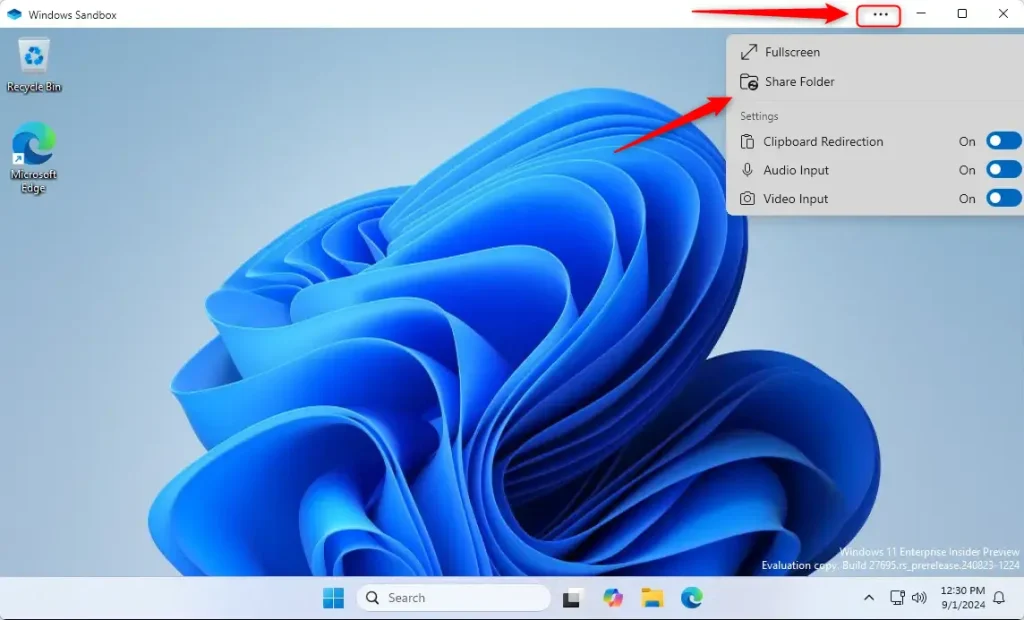
Navigate to and select the host and folder you wish to share.
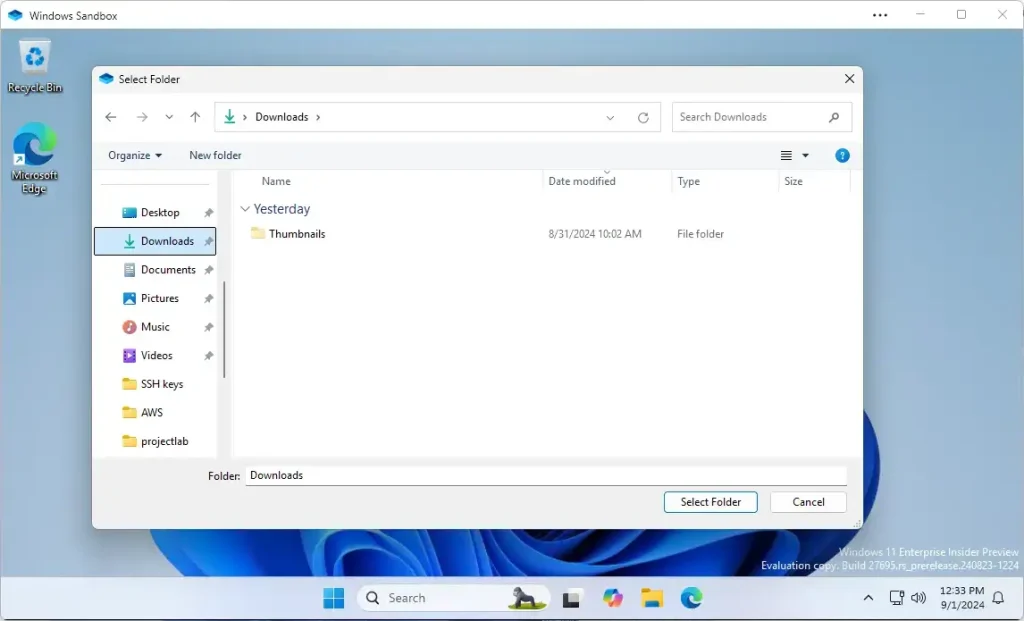
To complete the steps, click the Select Folder button on the File Explorer dialog box.
Repeat the process for all the folders you want to share with your sandbox.
Share a folder with Windows Sandbox using WSB file
Windows Sandbox shared folders can load automatically every time you launch the app if you use a configuration file. You create a text file with a .wsb extension and add specific code inside it to map your host folder. This saves you from having to manually select the folder every single time you open the sandbox.
First, create a text file with a WSB extension on the host computer. (ex. sandboxmap.wbs)
Then, add the lines below into the file and save it to map a folder as read-only.
<Configuration>
  <MappedFolders>
    <MappedFolder>
      <HostFolder>C:UsersRichardDownloads</HostFolder>
      <ReadOnly>true</ReadOnly>
    </MappedFolder>
  </MappedFolders>
</Configuration>
Change the highlighted folder location with your own.
Use the lines below to map a folder with read and write access.
<Configuration>
  <MappedFolders>
    <MappedFolder>
      <HostFolder>C:UsersRichardDownloads</HostFolder>
      <ReadOnly>false</ReadOnly>
    </MappedFolder>
  </MappedFolders>
</Configuration>
The next time you want to run Sandbox with mapped folders, use the WSB file created above on your desktop.
The sandbox will now map the folder on launch.
Conclusion:
- Windows Sandbox in Windows 11 provides a secure, isolated environment for testing untrusted applications and browsing potentially harmful websites.
- Sharing a host folder with Windows Sandbox enables convenient access to files within the virtual environment.
- It's essential to consider potential security risks when exposing host folders to a sandbox environment, as it could lead to system compromise or data theft.
- Additionally, utilizing a WSB configuration file allows for automatically mounting specific folders within the sandbox environment, providing users with a customized and efficient experience.
Was this guide helpful?

About the Author
Richard
Tech Writer, IT Professional
Richard is a writer at Geek Rewind who turns complex IT tasks into clear, step-by-step guides. He draws on years of hands-on experience in system administration and enterprise IT operations, focusing on Windows, Linux and WordPress: the problems people actually run into, and the fixes that work. His server and WordPress guides come from systems he runs himself. Richard builds and maintains the platform behind Geek Rewind, from its Ubuntu servers and Nginx configuration to its custom WordPress plugins. Many new tutorials start with readers' questions, and he's always glad to answer them in the comments.



No comments yet — be the first to share your thoughts!