How to Enable Networking in Windows 11 Sandbox
Windows 11 Sandbox networking lets you connect to the internet or your local network from within the isolated Sandbox environment.
Windows Sandbox is a safe, temporary desktop that appears when you turn on the Windows Sandbox feature. It’s perfect for trying out apps or visiting websites without risking your main computer.
By default, Sandbox blocks internet access to keep your main system secure. However, you can change this setting by editing a `.wsb` configuration file.
Enabling networking is helpful if you need to download files or test web apps inside the Sandbox, like checking a new software installer or a website’s security. Just remember that adding networking does make the Sandbox slightly less isolated.
Enable networking in Windows 11 Sandbox by editing Group Policy, using a .wsb file, or modifying the Registry. Navigate to Computer Configuration > Administrative Templates > Windows Components > Windows Sandbox and enable “Allow networking in Windows Sandbox” via Group Policy, or set 🗝️HKEY_LOCAL_MACHINE\SOFTWARE\Policies\Microsoft\Windows\Sandbox\AllowNetworking to 1 in the Registry.
How to turn on or off networking with Sandbox in 🪟 Windows 11
You can control internet access for your Windows Sandbox by turning networking on or off. By default, networking is off for security, but you can change this setting if your Sandbox needs to connect to the internet. This guide shows you how to manage Sandbox networking.
Networking is turned off by default to keep your computer secure. If you need to access the internet, you can change this.
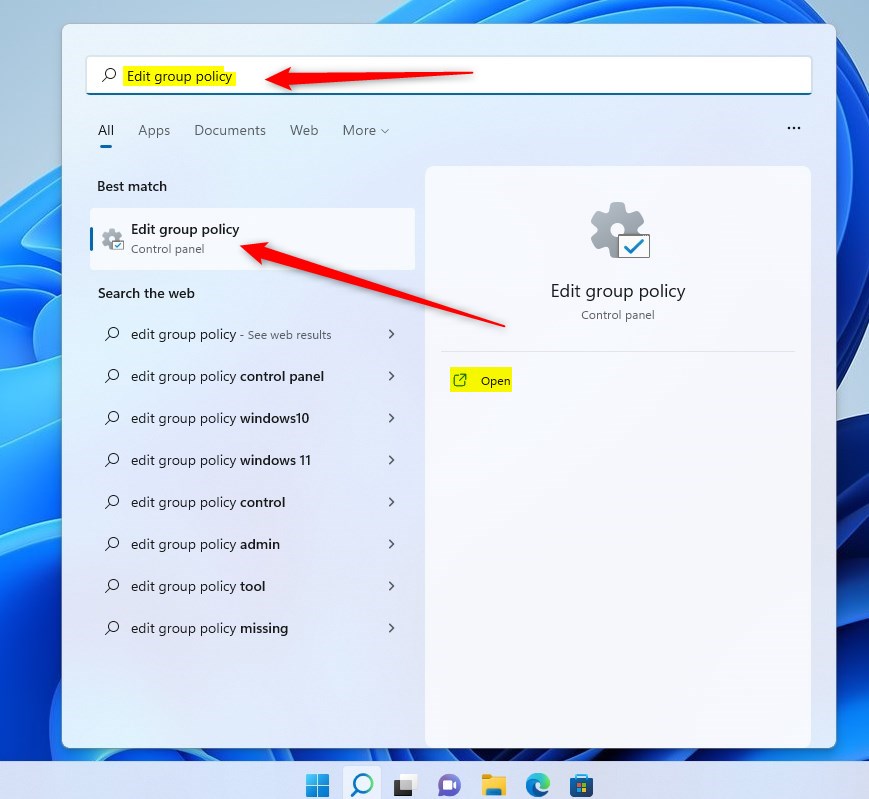
First, open the Local Group Policy Editor. You can do this by clicking the Start Menu and searching for “Edit group policy.”
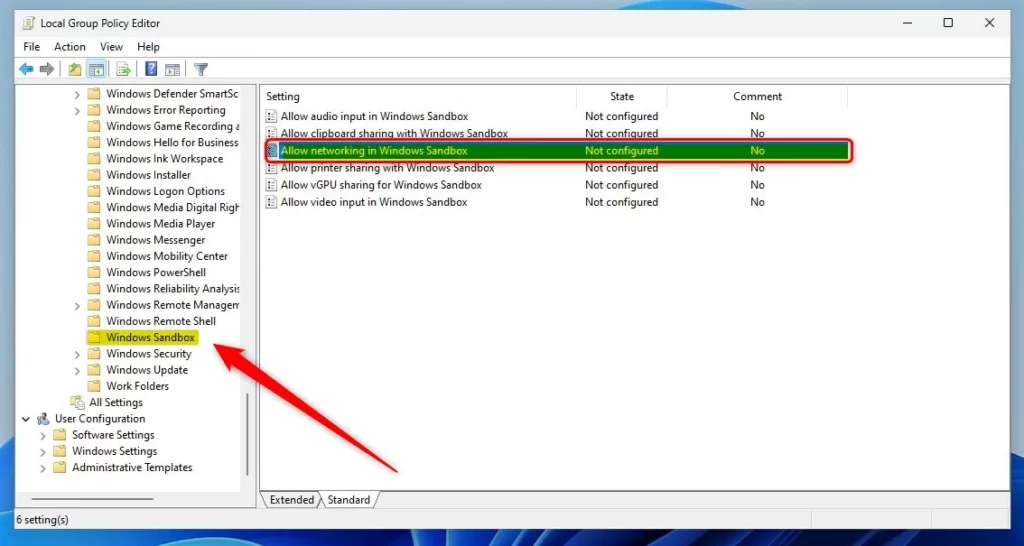
Once it’s open, navigate through the left folder tree:
Computer Configuration > Administrative Templates > Windows Components > Windows Sandbox
Look for the setting “Allow networking in Windows Sandbox” and double-click it.
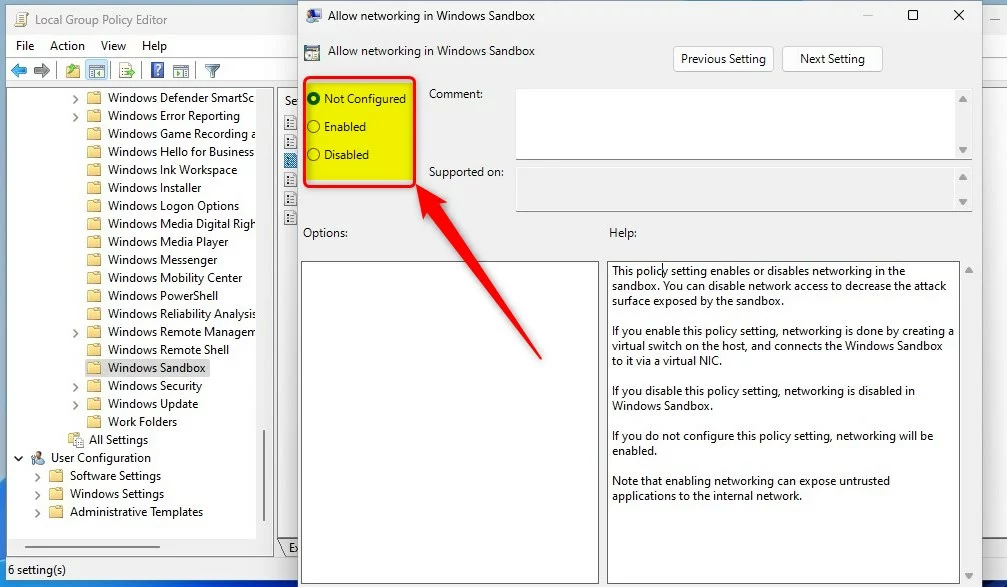
Then, select your preference:
- Not Configured: The default setting (Networking is off).
- Enabled: Allows the Sandbox to connect to the network.
- Disabled: Explicitly turns off all networking.
Using a .wsb file to enable networking
A .wsb file ensures networking is enabled every time you start your Windows Sandbox. You can create a basic configuration file that tells the Sandbox to allow internet access when it launches. This method helps you consistently use your Sandbox online.
<Configuration>
  <Networking>Enable</Networking>
</Configuration>
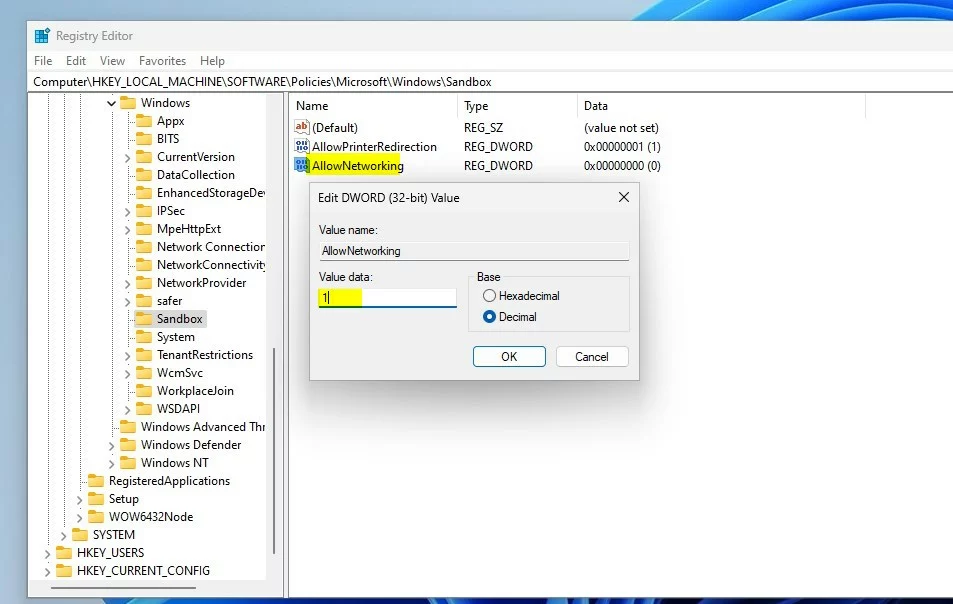
Enable or disable networking with Sandbox via Windows Registry
To enable or disable networking for your Windows Sandbox, make changes in the Windows Registry, especially if other methods haven’t worked. This involves navigating to a specific location within the registry editor and adjusting a setting. Be cautious when editing the registry, as incorrect changes can affect your system.
Open the Windows Registry and go to this path:
🗝️HKEY_LOCAL_MACHINE\SOFTWARE\Policies\Microsoft\Windows\Sandbox
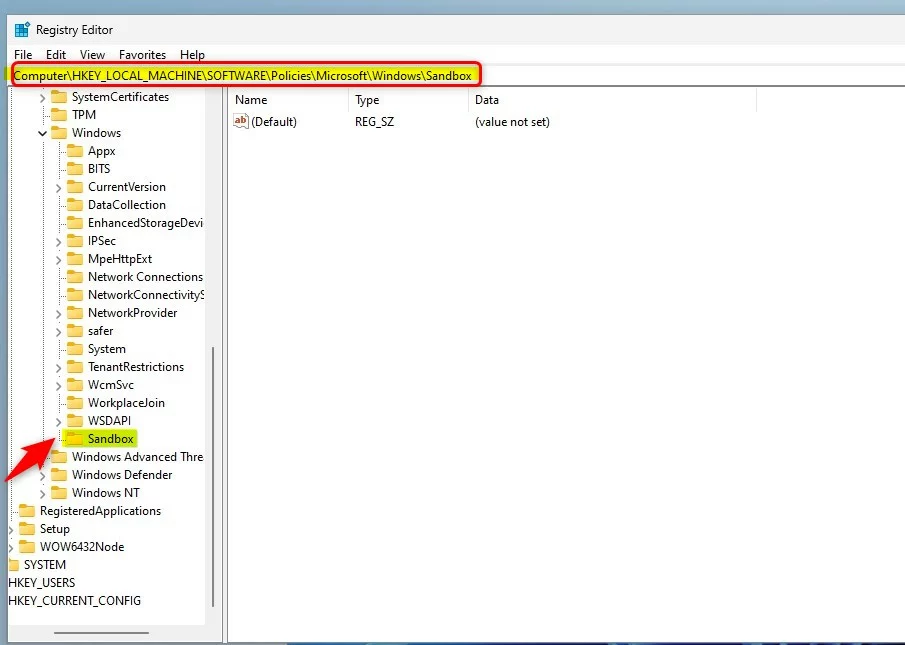
If a folder named “Sandbox” isn’t there, right-click the “Windows” folder, select New, then Key, and name it “Sandbox.”
Create a new DWORD (32-bit) value in the Windows 11 Sandbox registry editor. A DWORD value is a type of data used in the registry. To do this, right-click in an empty space on the right side of the editor, select “New,” and then choose “DWORD (32-bit) Value.” Name this new value “AllowNetworking” to enable networking features within the Sandbox environment.
AllowNetworking, a DWORD value, controls internet access in Windows 11 Sandbox. Double-click AllowNetworking and change its “Value data” to 1. This turns networking on, allowing the Sandbox to connect to the internet. Change the “Value data” to 0 to turn networking off.
That’s all there is to it!
Reference: Microsoft.com
Was this guide helpful?

About the Author
Richard
Tech Writer, IT Professional
Richard, a writer for Geek Rewind, is a tech enthusiast who loves breaking down complex IT topics into simple, easy-to-understand ideas. With years of hands-on experience in system administration and enterprise IT operations, he’s developed a knack for offering practical tips and solutions. Richard aims to make technology more accessible and actionable. He's deeply committed to the Geek Rewind community, always ready to answer questions and engage in discussions.


No comments yet — be the first to share your thoughts!