How to Create a Private Samba Share on Ubuntu 24.04
Creating a private Samba share on Ubuntu 24.04 lets you securely share files and printers with specific users over a network. Samba is free software that lets Linux and Windows computers talk to each other for file and printer sharing.
You set up a Samba server and give unique usernames and passwords to anyone you want to grant access. This gives you control over who sees your shared folders and files, protecting important data on your home or small office network.
For example, you can even tell your Samba share to only allow connections from certain computers on your network, adding an extra layer of security.
Install Samba using `sudo apt install samba`. Create a shared folder and group with `sudo mkdir /home/private`, `sudo groupadd smbgroup`, `sudo chgrp smbgroup /home/private`, and `sudo chmod 770 /home/private`. Configure `/etc/samba/smb.conf` with your share details, then restart Samba with `sudo systemctl restart smbd`.
Install Samba
Run the command below to install Samba.
sudo apt update
sudo apt install samba
Create a share folder
Creating a private Samba share folder on Ubuntu starts with making a new folder and a special group for users. This group acts like a guest list, deciding who can see and use the private folder, ensuring only approved people can connect.
The folder (private) below will be visible and accessible to members only requiring authentication.
But before that, create a Samba member group. This group will contain all the users who should have access to the private folder.
sudo groupadd smbgroup
Then, create the private share and adjust the permission so only group members have access.
sudo mkdir /home/private
sudo chgrp smbgroup /home/private
sudo chmod 770 /home/private
Configure Samba
You configure your private Samba share on Ubuntu by editing the main Samba settings file, located at /etc/samba/smb.conf. It’s crucial to back up this file first, using the command `sudo cp /etc/samba/smb.conf`, so you can easily restore it if any changes cause problems.
Samba default configuration file is at [/etc/samba/smb.conf].
First, create a backup before editing it.
sudo cp /etc/samba/smb.conf /etc/samba/smb.conf.bak
Then edit the file and adjust the highlighted settings below.
sudo nano /etc/samba/smb.conf
Adjust the settings below.
#======================= Global Settings =======================

[global]

# Change this to the workgroup/NT-domain name your Samba server will part of
   workgroup = WORKGROUP

# server string is the equivalent of the NT Description field
   server string = %h server (Samba, Ubuntu)

#### Networking ####

# Uncomment and add your interface name

  interfaces = 127.0.0.0/8 ens33

# Uncomment this to bind to the named interfaces and/or networks

  bind interfaces only = yes


#======================= Share Definitions =======================
#
# Under share definitions, create your share with the folder above.

[Private]
   # require authentication
   security = user
   # specify shared directory
   path = /home/private
   # allow all to write
   writable = yes
   # deny guest user (nobody)
   guest ok = no
   # allow only smbgroup members
   valid users = @smbgroup
   # smbgroup will inherit new files/directories
   force group = smbgroup
   # set all new files to members only
   force create mode = 770
   # set all new folers to members only
   force directory mode = 770
   # inherit permissions from parent folder
   inherit permissions = yes
Save and exit the file.
Restart Samba.
sudo systemctl restart smbd
Create Samba users
To create Samba users for your private share, you set up specific accounts and add them to the group you created. For existing accounts, you create a Samba password using `sudo smbpasswd -a sambauser` and then add that user to your Samba group to grant them access.
If you have an existing account, create a smbpasswd for the account.
sudo adduser sambauser
sudo smbpasswd -a sambauser
Type and configure a new password for the account.
sudo usermod -aG smbgroup sambauser
Samba share is created. Users on the same network should be able to browse and locate the shared folder.
Map Samba shares on Windows
You map your private Samba share on Windows using the ‘Map network drives’ tool in File Explorer. This connects you to your shared folder by entering the server’s name and the share’s name, and then you’ll enter your Samba account details when prompted.
Right-click the Network folder in File Explorer and select “Map network drives.”
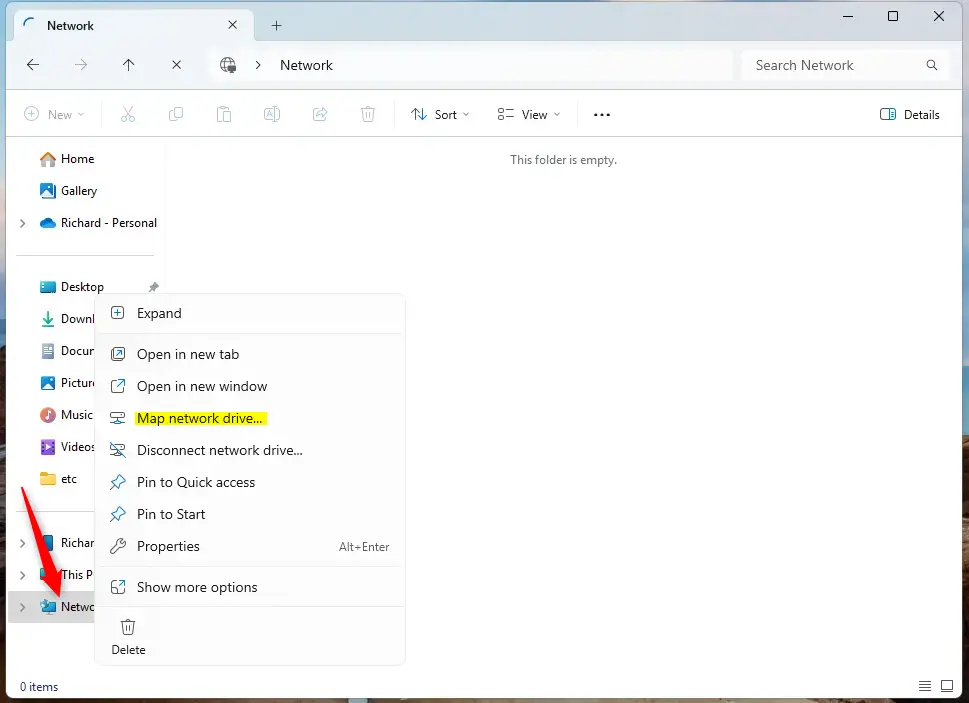
Enter the server name followed by the share name.
\srv1.example.comshare
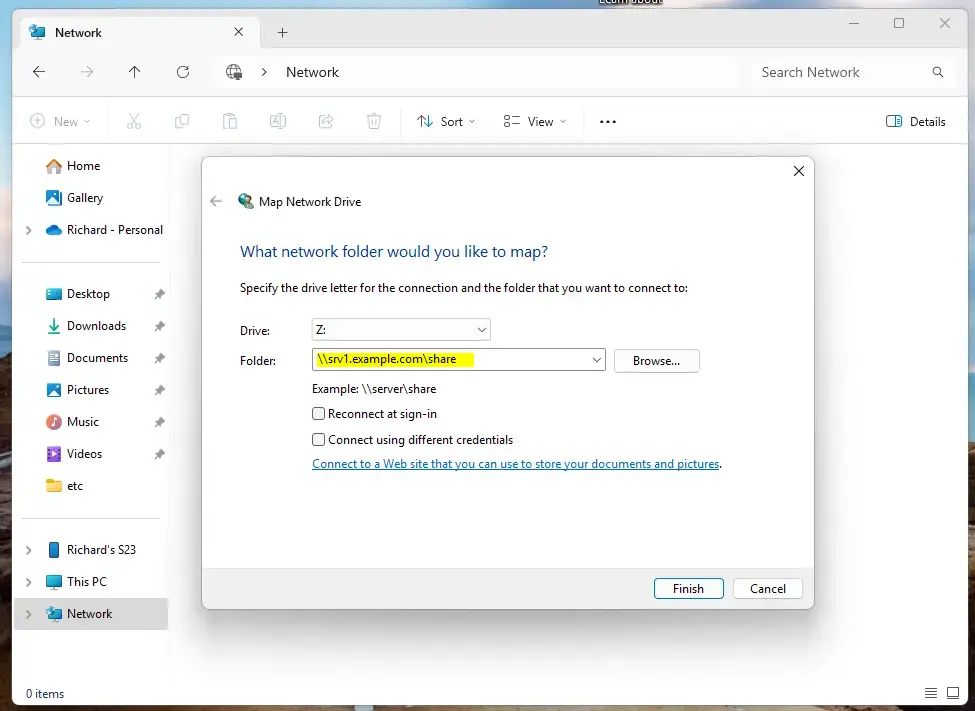
When prompted, enter the Samba account created above.

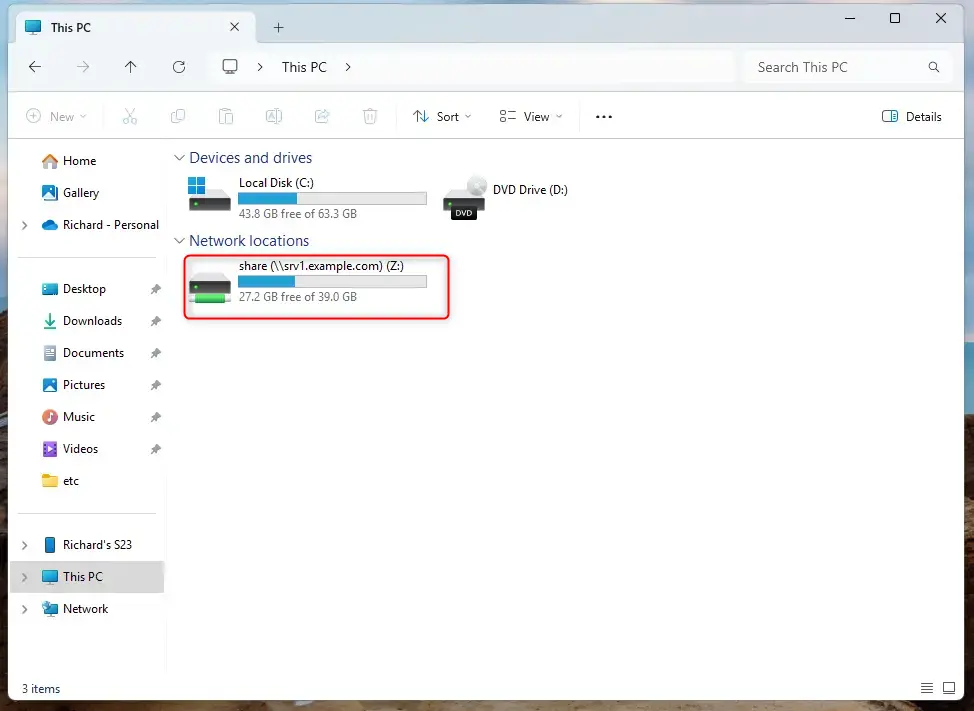
After that, the share should be mapped to your Windows machine.
That should do it!
Conclusion:
- Samba provides an effective way to share files and printers between Linux/Unix and Windows systems.
- Creating a private Samba share enhances security by restricting access to authorized users only.
- The installation and configuration of Samba on Ubuntu 24.04 ensures that only members of a specified group can access the shared resources.
- Users can easily map the Samba share on Windows, facilitating seamless access to shared files.
- Regular management of user accounts and permissions is crucial to maintaining the integrity and security of the shared environment.
Was this guide helpful?

About the Author
Richard
Tech Writer, IT Professional
Richard, a writer for Geek Rewind, is a tech enthusiast who loves breaking down complex IT topics into simple, easy-to-understand ideas. With years of hands-on experience in system administration and enterprise IT operations, he’s developed a knack for offering practical tips and solutions. Richard aims to make technology more accessible and actionable. He's deeply committed to the Geek Rewind community, always ready to answer questions and engage in discussions.

No comments yet — be the first to share your thoughts!