How to Check RAM Size and Type In Windows 11

- 14 steps
- Needs administrator rights
RAM (Random Access Memory) is your computer’s short-term memory. It holds data for the apps and games running right now. Checking your RAM size and type shows whether your PC meets the requirements for new software or heavy multitasking, and you don’t have to open the case.
Windows 11 requires at least 4GB of RAM, but most modern setups need 8GB or more to run smoothly. You can check your specs in seconds with Settings or Task Manager. System Information and PowerShell give more detail. All four tools are built into Windows 11 Home and Pro, none needs extra software, and none needs a restart.
Which tool to use depends on what you need. Settings and System Information show how much RAM is installed. Task Manager also shows the type and speed. PowerShell lists each memory module individually.
Open Settings, click System, scroll down and click About, then look for Installed RAM on the right side of the page. This shows your total RAM capacity in gigabytes. For RAM type and speed, open Task Manager, click Performance, then click Memory to see full details.
1Check RAM Using the Settings App
The Settings app is the quickest way to see how much RAM is installed. It shows only the total capacity, not the type or speed. Use Task Manager or PowerShell for those.
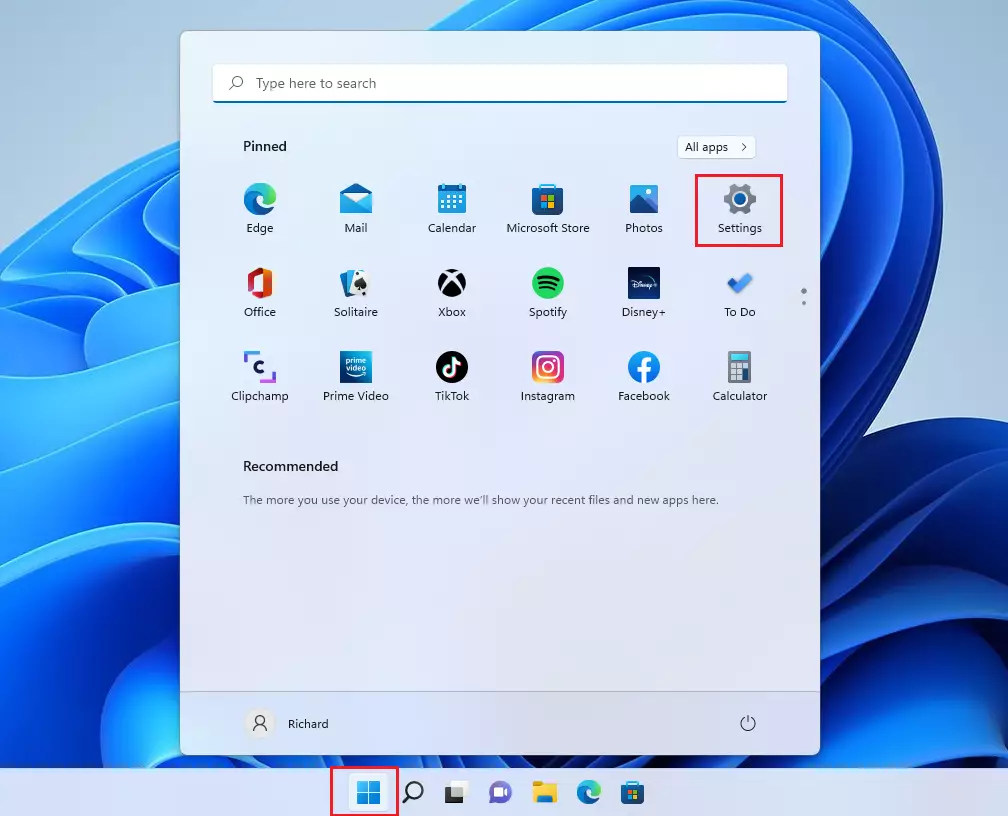
- Click the Start button (Windows icon) at the bottom-left of your screen. The Start menu opens.
- Click Settings (gear icon). Or press Windows key + I on your keyboard to open Settings directly. The Settings window opens.
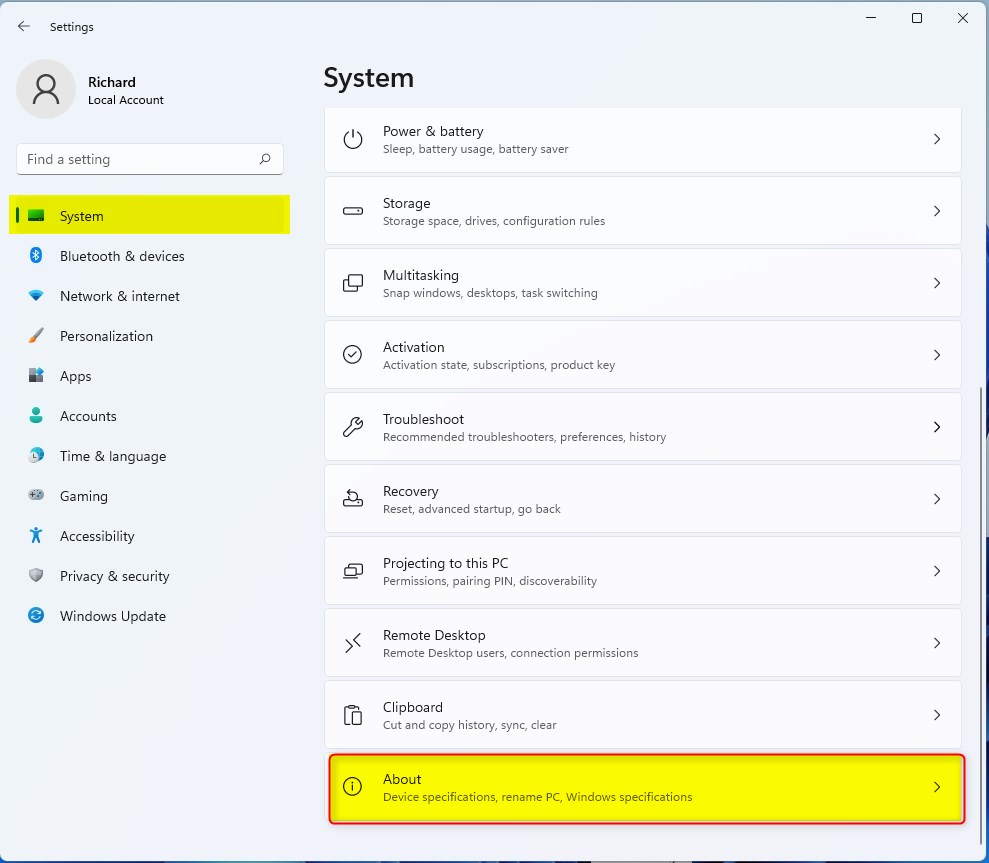
- In Settings, click System on the left side.
- Scroll down and click About at the bottom of the System menu. The page shows your device name and processor, followed by more details.
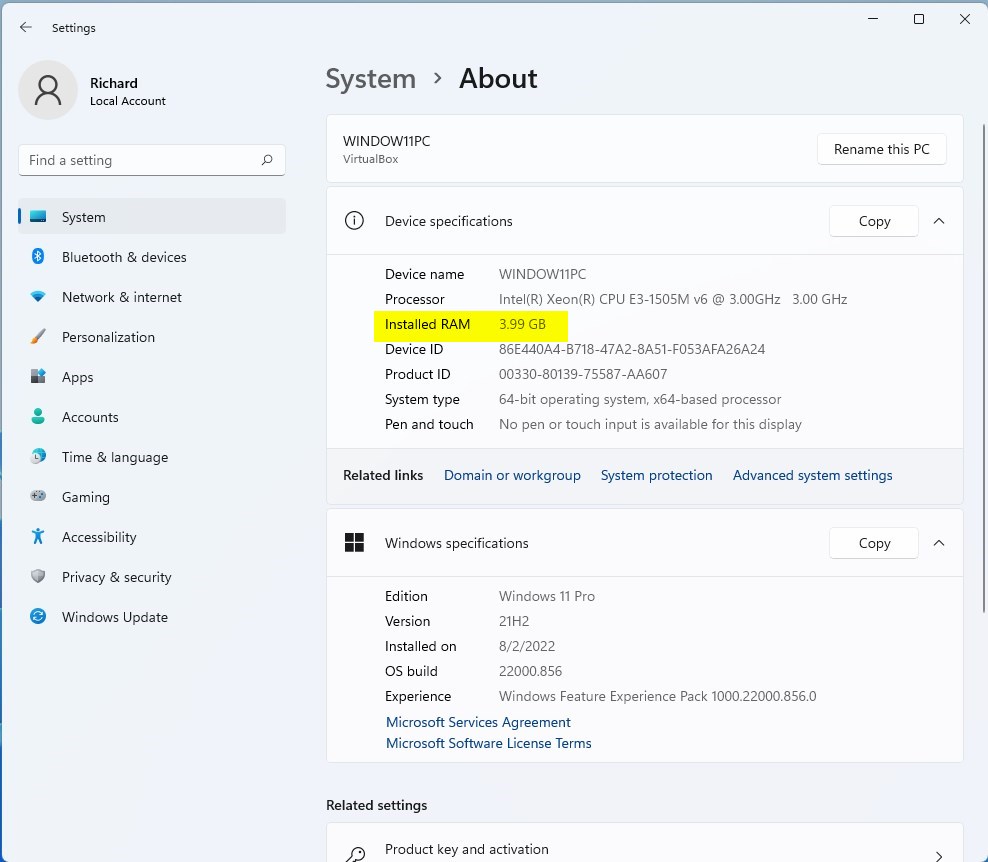
- Look for Installed RAM on the right. This shows how much RAM is installed, for example “16.0 GB (15.8 GB usable)”.
Windows reserves part of the memory for hardware. Integrated graphics are a common reason. If the usable figure is much lower, one memory module may not be seated properly or may not be detected.
2Check RAM Using Task Manager
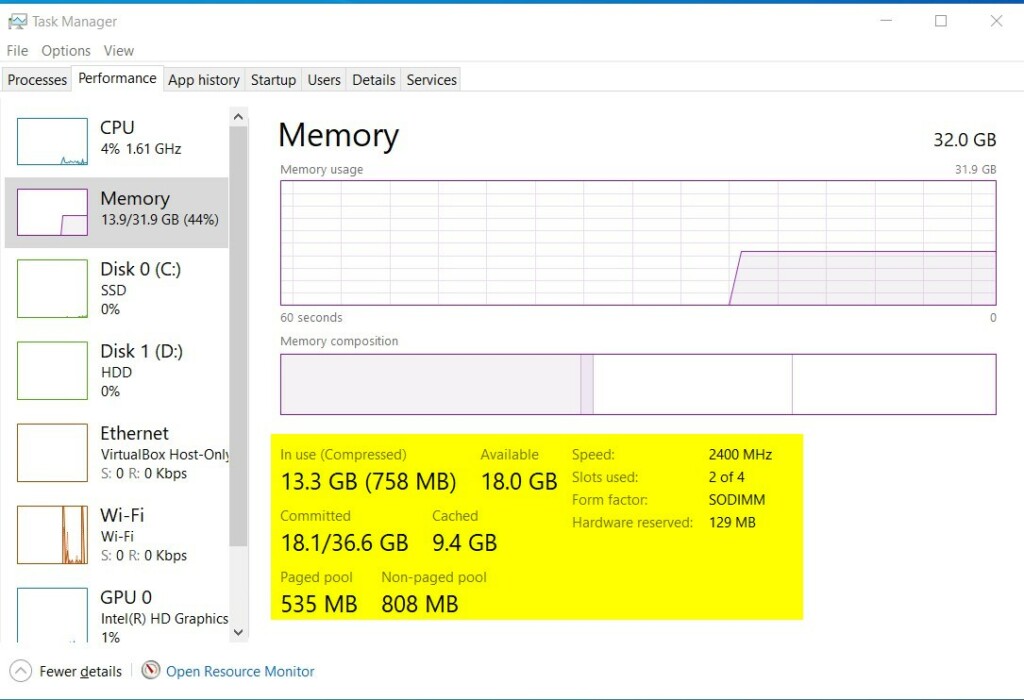
Task Manager shows the most useful RAM details in one place: total capacity, type, speed, and how many memory slots are in use. It also shows how much memory your apps are using right now, which helps if you’re checking for a shortage.
- Click Start and type Task Manager , then open it from the results.
- In Task Manager , click Performance. On older builds it’s a tab at the top. On newer builds it’s in the list on the left, and you may need to click the menu icon (three lines) to expand the list.
- Click Memory on the left side. A graph of memory usage appears, with the total RAM and its type, such as DDR4, at the top right.
- Look at the figures below the graph. You can see your total RAM, speed (in MHz, or MT/s on some builds), how many slots are used, and more.
That tells you whether you can add more RAM without replacing what you have. If the type, speed or slot information is missing, you may be on a virtual machine, or the system isn’t reporting those details. Use PowerShell to check instead.
3Check RAM Using System Information
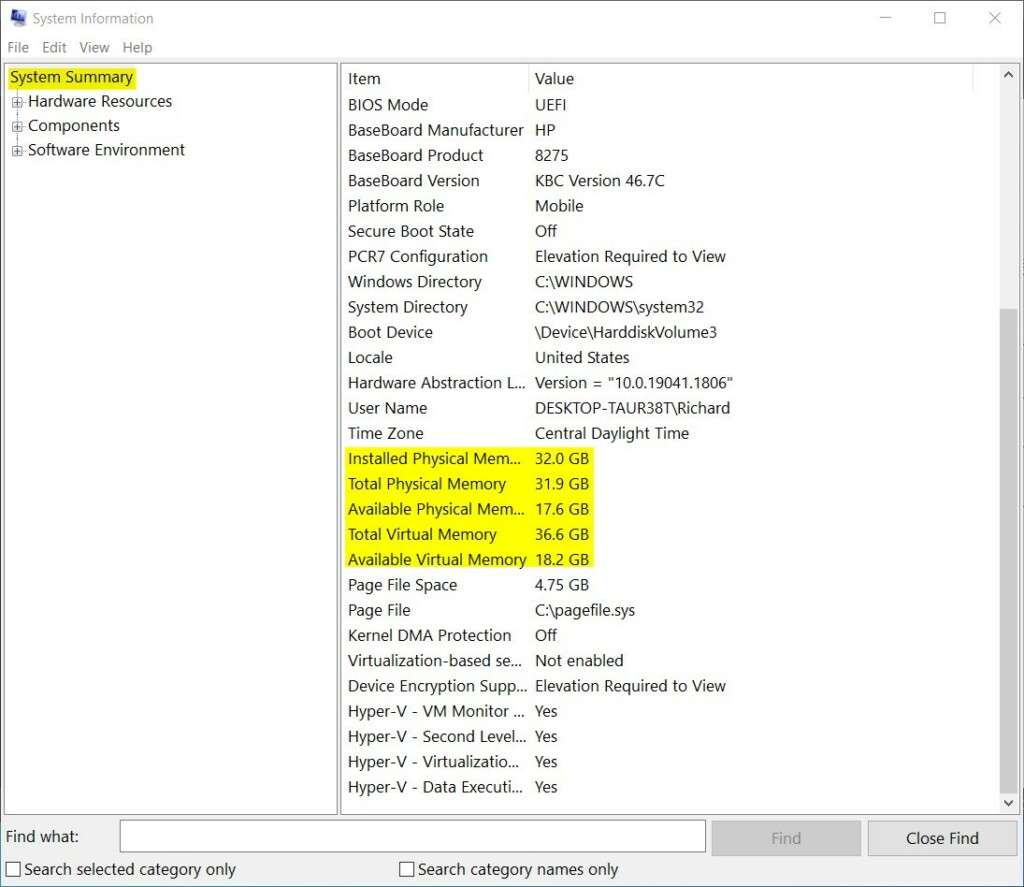
The System Information app compiles a full hardware summary, including memory totals. It’s handy when you want RAM details next to your BIOS version and processor. It doesn’t show the RAM type or speed.
- Click Start and type System Information, then open it. The System Information window opens.
- Make sure System Summary is selected on the left. The list of system details appears on the right.
- Look for Installed Physical Memory (RAM) to see your total RAM.
Nearby rows show Total Physical Memory, which is the usable amount, and Available Physical Memory, which is what is free right now. The available figure changes depending on what is running.
4Check RAM Using PowerShell Commands
PowerShell gives you the exact hardware details for each memory module, including manufacturer, speed and slot location. This is the best option when you’re buying matching RAM for an upgrade. You don’t need administrator rights for this query.
- Click Start, type Windows Terminal or PowerShell, and open it. A window opens with a command prompt.
- Type or copy-paste the following command and press Enter:PowerShell
Get-CimInstance Win32_PhysicalMemory | Format-Table Capacity, Manufacturer, FormFactor, BankLabel, ConfiguredClockSpeed, Speed, DeviceLocator, SerialNumber -AutoSize
This command queries physical memory properties to display module capacity, manufacturer details, speed ratings, and slot designations. You get one entry for each installed module, so a PC with two sticks shows two entries.
Capacity is shown in bytes, so a 16GB module appears as 17179869184. The slot label tells you which physical slot each module sits in. If the command returns nothing or an error, check that you typed or pasted it exactly as shown.
Summary
- RAM is important for your computer's speed and performance.
- You can check your RAM size and type using Windows 11's Settings, Task Manager, System Information, or PowerShell.
- Settings and System Information show the total. Task Manager adds type, speed and slots. PowerShell lists each module.
- Knowing your RAM details helps you decide if you need to upgrade or if your PC meets Windows 11 requirements.
You can check RAM size and type in Windows 11 using several built-in tools, depending on how much detail you need. Whether you use Settings, Task Manager, or PowerShell, knowing your memory specs helps you decide if your PC needs an upgrade to run faster.
Frequently asked questions
How to view RAM on 🪟 Windows 11?
Open Settings, select System, then About, and find Installed RAM under Device specifications. That shows the total capacity. For speed and memory slots, open Task Manager with Ctrl+Shift+Esc, select Performance, then Memory. Both views show how much RAM your PC has, and neither needs a restart.
How to I list the memory installed in my 🪟 Windows 11 PC with PowerShell?
Open Windows Terminal or PowerShell and run Get-CimInstance Win32_PhysicalMemory | Select-Object BankLabel, Capacity, Speed. Each row is one memory module. Capacity appears in bytes, so 8589934592 means 8 GB. Speed is shown in MHz.
How to check RAM on 🪟 Windows 11?
Open Settings, go to System, then About, and check the Installed RAM line. For more detail, press Ctrl+Shift+Esc to open Task Manager, select Performance, then Memory. The top right shows total size and speed. No extra software or restart is needed.
How to check what RAM I have on 🪟 Windows 11?
Open Settings, select System, then About, and read the Installed RAM line. It shows your total capacity, such as 16 GB. To see each memory stick's size and speed, open Task Manager with Ctrl+Shift+Esc, pick Performance, and select Memory.
How to figure out RAM type on win11?
Task Manager does not show the RAM type, so use PowerShell instead. Run Get-CimInstance Win32_PhysicalMemory | Select-Object SMBIOSMemoryType. A value of 26 means DDR4 and 34 means DDR5. A value of 0 means unknown, so check your motherboard manual or the label on the memory stick.
Still have a question?
Answered by AI from this guide. Good questions may be added to this page — please don't include personal details.
Did this guide fix your problem?

About the Author
Richard
Tech Writer, IT Professional
Richard is a writer at Geek Rewind who turns complex IT tasks into clear, step-by-step guides. He draws on years of hands-on experience in system administration and enterprise IT operations, focusing on Windows, Linux and WordPress: the problems people actually run into, and the fixes that work. His server and WordPress guides come from systems he runs himself. Richard builds and maintains the platform behind Geek Rewind, from its Ubuntu servers and Nginx configuration to its custom WordPress plugins. Many new tutorials start with readers' questions, and he's always glad to answer them in the comments.
No comments yet — be the first to share your thoughts!