How to Change Hover Activate Window Time in Windows 11
You change the hover activate window time in Windows 11 to adjust how long your mouse cursor must rest over a window before it automatically opens.
This feature, known as “Activate a window by hovering over it,” lets you switch between open applications without needing to click. The default hover time in Windows 11 is 500 milliseconds (half a second).
Adjusting this setting lets you fine-tune your workflow, making it faster to access the window you want. You can set a shorter duration for quicker activation or a longer one to prevent accidental openings.
Adjust the hover activate window time in Windows 11 Settings by going to Accessibility > Mouse and moving the slider under Activate on hover. Alternatively, use Registry Editor to change the ActiveWndTrkTimeout value in 🗝️HKEY_CURRENT_USERControlPanelDesktop.
Option 1Change Hover Time in Settings
You can easily change how long your mouse pointer needs to hover over a window before it opens automatically right in Windows 11 Settings.
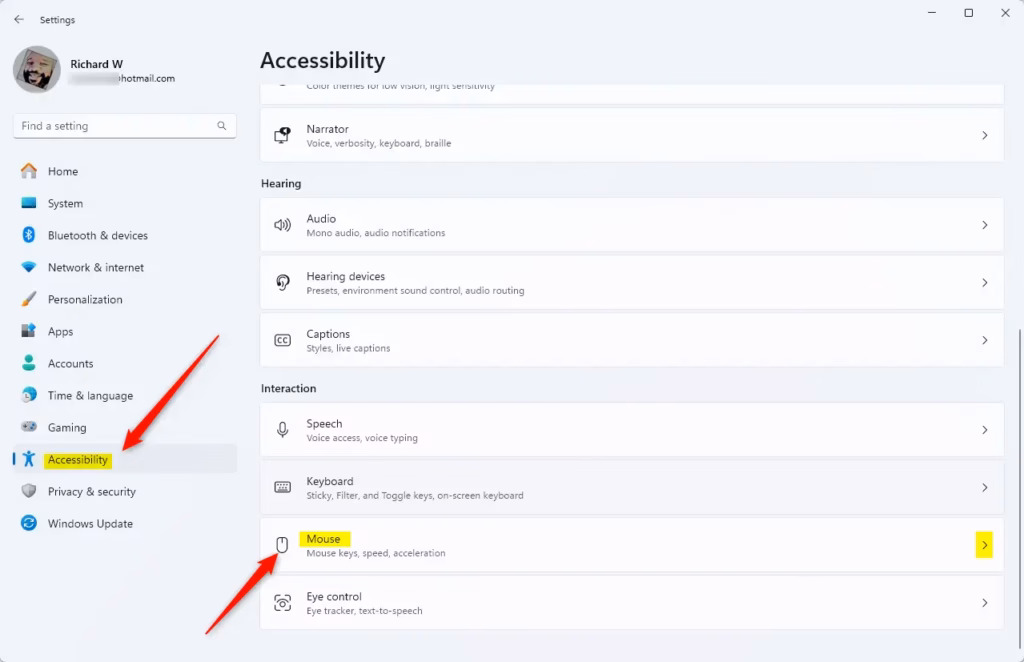
- Open Settings by pressing
Win+I. - Click Accessibility on the left side, then click Mouse on the right side under Interaction.
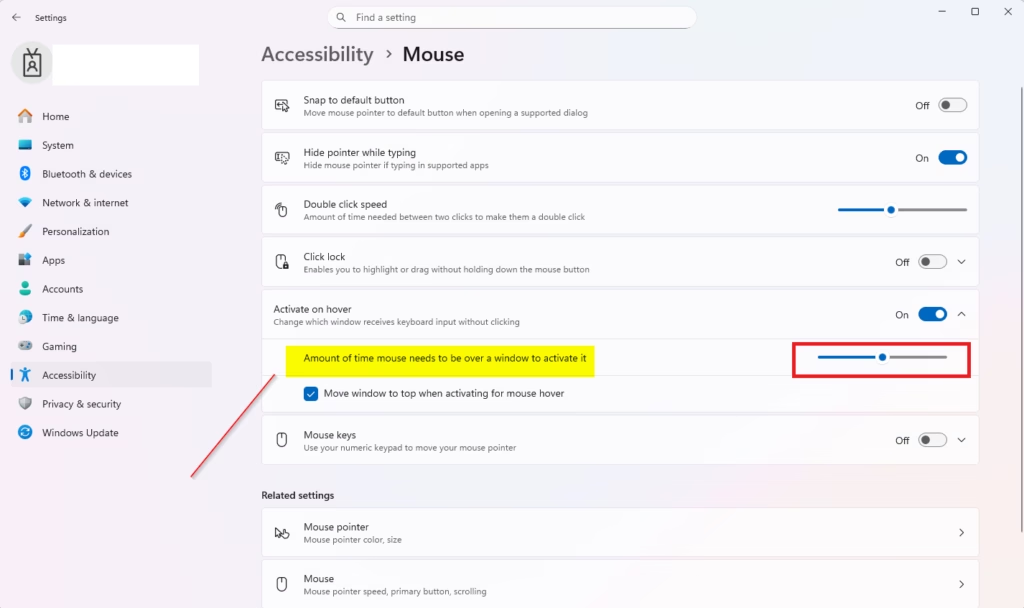
- Under Activate on hover, adjust the Amount of time mouse needs to be over a window to activate it to what you want.📝NoteThis requires Activate on hover to be turned on first.
- You can now close Settings if you like.
Option 2Change Hover Time Using Registry Editor
- Open Registry Editor by typing
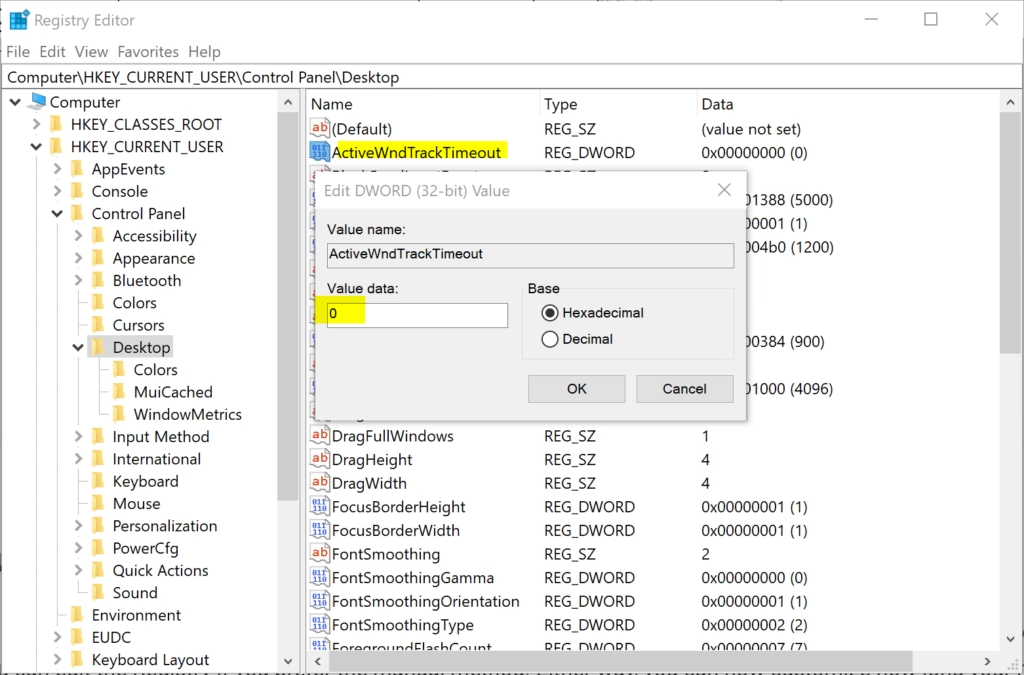
regedit.exein your search bar and pressing Enter.Changing the hover activate window time can also be done by editing the Windows Registry, which lets you manually set the delay before a window opens when you hover over it.
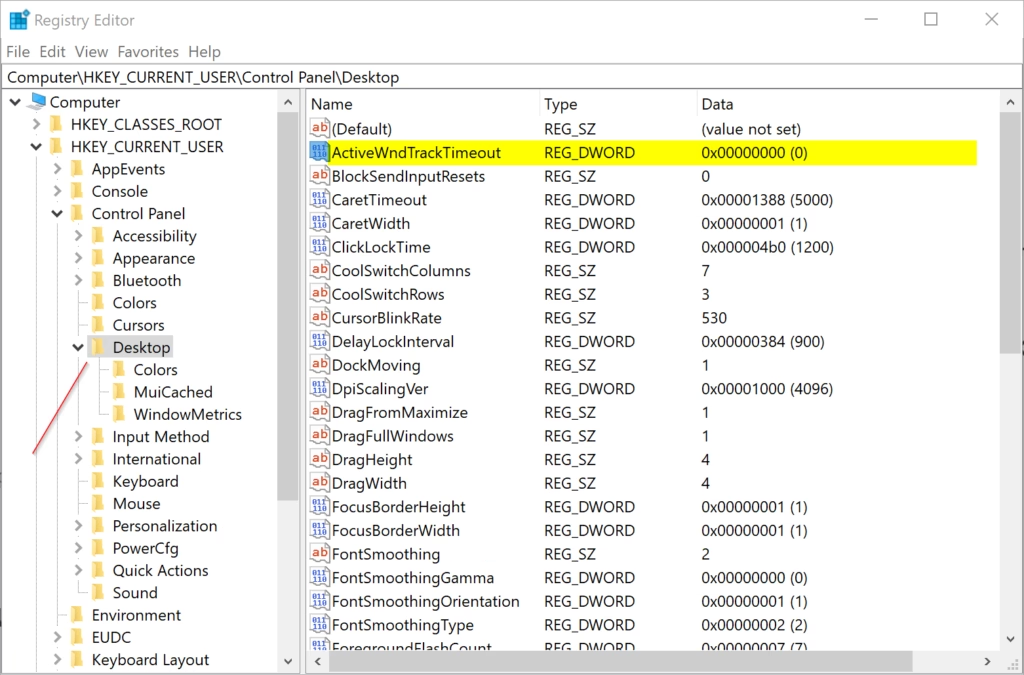
- Navigate to the location below in the left pane of Registry Editor.
HKEY_CURRENT_USER\Control Panel\Desktop - In the right pane of the Desktop key, double-click the ActiveWndTrkTimeout entry to modify it.📝NoteIf you do not see the ActiveWndTrkTimeout entry, verify you have turned on Activate a window by hovering over it with the mouse, refresh by pressing
F5in Registry Editor, and check again. - Select Decimal, type in a number for how many milliseconds (ms) you want for the timeout, and click OK.
Tip: The default time is 500 ms. 1000 ms equals 1 second.
- Close Registry Editor.
Summary
Changing your hover activate window time is simple, letting you pick between the easy Settings app for newer Windows versions or the manual Registry edit for full control.
Why is my PC randomly saying "Activate Windows"?
Your PC shows the “Activate Windows” message because your copy isn’t genuine or the product key hasn’t been properly validated, meaning Windows isn’t licensed.
How do you hover to activate a window in 🪟 Windows 11?
You can hover to activate a window in Windows 11 by going to Settings, then Accessibility, and choosing Mouse, where you can turn on the hover option and adjust the delay.
How do I Make a window active on my mouse over 🪟 Windows 10?
To make a window active when your mouse hovers over it in Windows 10, open the Control Panel, find the Ease of Access Center, and select the option to activate windows by hovering.
How do I scroll inactive windows when I hover over them?
You can scroll inactive windows just by hovering your mouse over them by going to Settings, then Bluetooth & devices, and clicking Mouse to turn on the scroll feature.
Was this guide helpful?

About the Author
Richard
Tech Writer, IT Professional
Richard, a writer for Geek Rewind, is a tech enthusiast who loves breaking down complex IT topics into simple, easy-to-understand ideas. With years of hands-on experience in system administration and enterprise IT operations, he’s developed a knack for offering practical tips and solutions. Richard aims to make technology more accessible and actionable. He's deeply committed to the Geek Rewind community, always ready to answer questions and engage in discussions.


No comments yet — be the first to share your thoughts!