How to Hide or Show OneDrive in Windows 11
Hiding or showing the OneDrive folder in Windows 11’s File Explorer lets you control its visibility in the left-hand sidebar.
OneDrive is a cloud storage service that integrates directly into Windows 11, showing its folder in File Explorer for easy access to your files.
This feature appears by default once you set up OneDrive on your PC.
If you find the OneDrive icon cluttering your File Explorer, you can easily remove it. Conversely, if you want to add it back, the same steps can help you show it again.
Removing OneDrive from the File Explorer sidebar does not delete your actual OneDrive files stored in your user folder, which is typically found at 📁C:\Users\<Username>\OneDrive.
Hide OneDrive by unlinking your PC via Settings > Account, or edit the registry at HKEY_CURRENT_USER\Software\Classes\CLSID\{018D5C66-4533-4307-9B53-224DE2ED1FE6} and set System.IsPinnedToNameSpaceTree to 0. This removes the shortcut without deleting files.
How to show or hide the OneDrive folder on the File Explorer navigation pane in 🪟 Windows 11
Here's how to show or hide the OneDrive folder on the File Explorer navigation pane in Windows 11.
As mentioned, OneDrive typically appears automatically when you set it up in Windows.
OneDrive folder on File Explorer navigation pane picture below:

First, open the Windows Registry, and navigate to the folder key path listed below.
HKEY_CURRENT_USER\Software\Classes\CLSID\{018D5C66-4533-4307-9B53-224DE2ED1FE6}If you don't see the {018D5C66-4533-4307-9B53-224DE2ED1FE6} folder key, right-click on the CLSID key, then create the subkey {018D5C66-4533-4307-9B53-224DE2ED1FE6} folders.
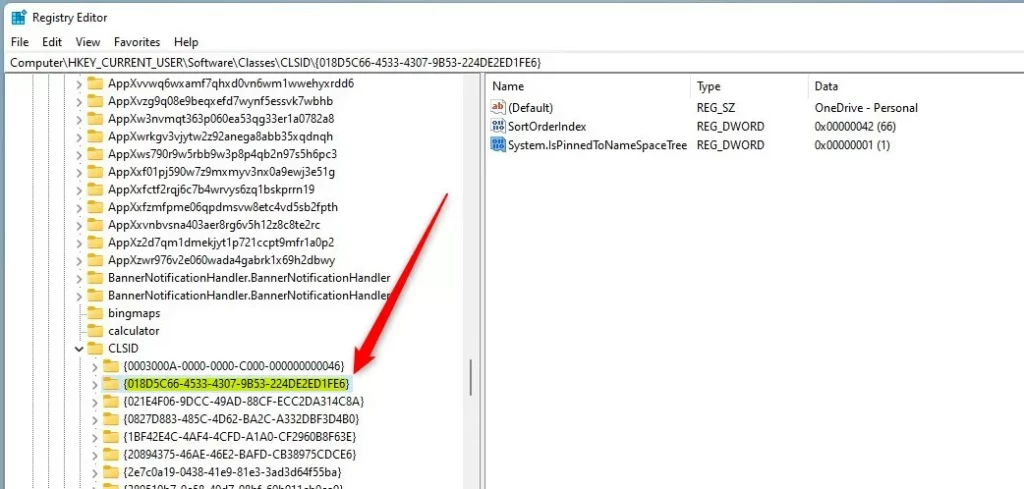
On the right pane, right-click and select New - DWORD (32-bit) Value (a type of registry entry). Name this new key System.IsPinnedToNameSpaceTree.
Then, double-click on System.IsPinnedToNameSpaceTree. Setting the Value data to 1 will show the OneDrive folder in File Explorer. A Value data of 0 will hide it.

Close out and restart your machine to apply the changes.
That should do it!
Conclusion:
- This article has provided step-by-step instructions on how to show or hide the OneDrive folder on the File Explorer navigation pane in Windows 11.
- The tutorial included detailed guidance on using the Windows Registry to make the necessary changes.
- Readers are encouraged to leave comments if they encounter any errors in the instructions or wish to contribute additional insights or tips.
Was this guide helpful?

About the Author
Richard
Tech Writer, IT Professional
Richard, a writer for Geek Rewind, is a tech enthusiast who loves breaking down complex IT topics into simple, easy-to-understand ideas. With years of hands-on experience in system administration and enterprise IT operations, he’s developed a knack for offering practical tips and solutions. Richard aims to make technology more accessible and actionable. He's deeply committed to the Geek Rewind community, always ready to answer questions and engage in discussions.


No comments yet — be the first to share your thoughts!