How to Install a Scanner on Windows 11

- 12 steps
- Includes a restart or sign-out
Setting up a scanner on Windows 11 lets you turn paper documents and old photos into digital files on your computer. Most modern scanners made after 2020 by brands like HP, Canon, and Epson are detected automatically, so you don’t need the old setup disks. Many of these scanners are part of an all-in-one printer. Windows usually lists those under Printers & scanners as well.
To begin, plug the USB cable into an open port on your computer and turn on the scanner’s power switch. Windows 11 handles most of the setup in the background. Give it a minute or two, and you can usually start scanning right away. If it doesn’t work, the manual methods below cover the common causes. The steps are the same on Windows 11 Home and Pro.
Plug the scanner’s USB cable into your computer, turn it on, and wait a minute for Windows 11 to detect and install it automatically. If it doesn’t appear, open Settings Bluetooth & devices Printers & scanners, click Add device, and select your scanner from the list.
How to Set Up a Scanner Connected by USB
Windows 11 detects the hardware, installs a driver, and configures it without any extra software from you. Plug the cable directly into the computer. A USB hub, especially an unpowered one, can cause detection problems. It also helps to use the cable that came with the scanner.
- Plug the scanner’s USB cable into a free USB port on your computer. If the scanner has its own power adapter, connect that too, and make sure the other end of the USB cable is firmly seated in the scanner.
- Turn on the scanner. Wait for its lights or display to settle. A scanner that is still warming up may not be detected yet. You may hear the usual Windows device-connected sound.
- Let Windows 11 install the scanner. It usually does this automatically, and you might see a notification near the clock saying it’s setting up the device. When the notification says the device is ready, the scanner is installed. If nothing appears after a couple of minutes, check that it is listed under Printers & scanners in Settings. If it isn’t, use the manual method below.
This method is the best choice when it works, because it skips the manual driver search entirely. Windows also takes care of picking a compatible driver. If you later want to undo the installation, open Settings, go to Printers & scanners, select the scanner, and click Remove.
This can happen with older scanners, with a faulty cable or port, or when Windows has no suitable driver built in. The manual steps below add the scanner yourself. Before you start, try a different USB port and a different cable, and turn the scanner off and on again.
- Open Settings . Click the Start button and then the gear icon. Or press
Windows key + Ion your keyboard. The Settings window opens. - Click Bluetooth & devices on the left side. The list of connected devices appears on the right.
- Click Printers & scanners. You will see any printers and scanners Windows already knows about. Check that your scanner isn’t already listed there.
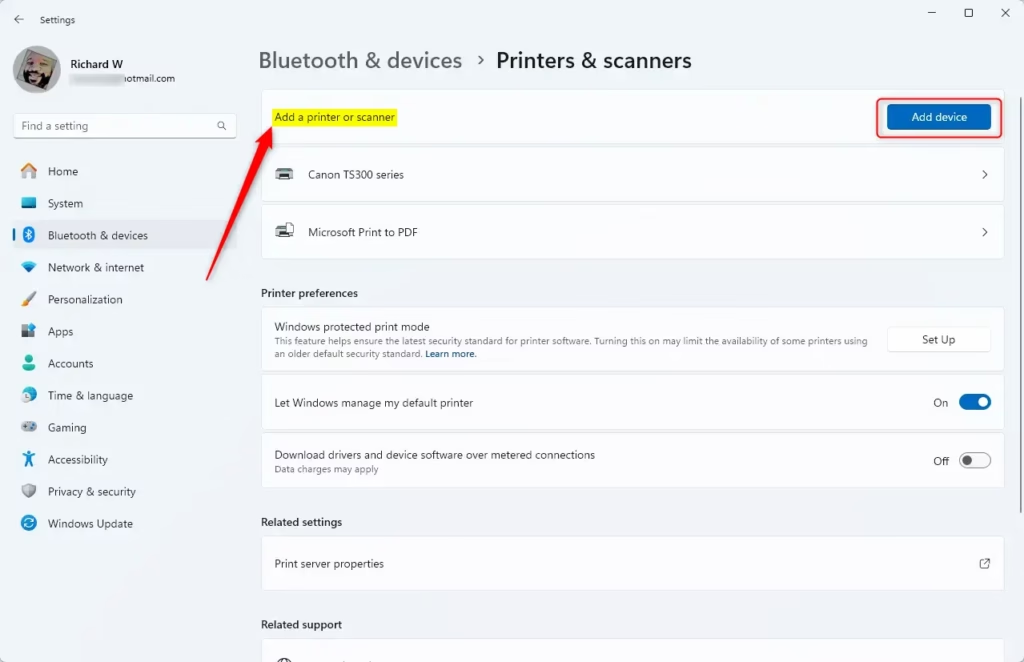
- Click the button that says Add device. Windows starts searching for hardware it can add, which takes a few seconds.
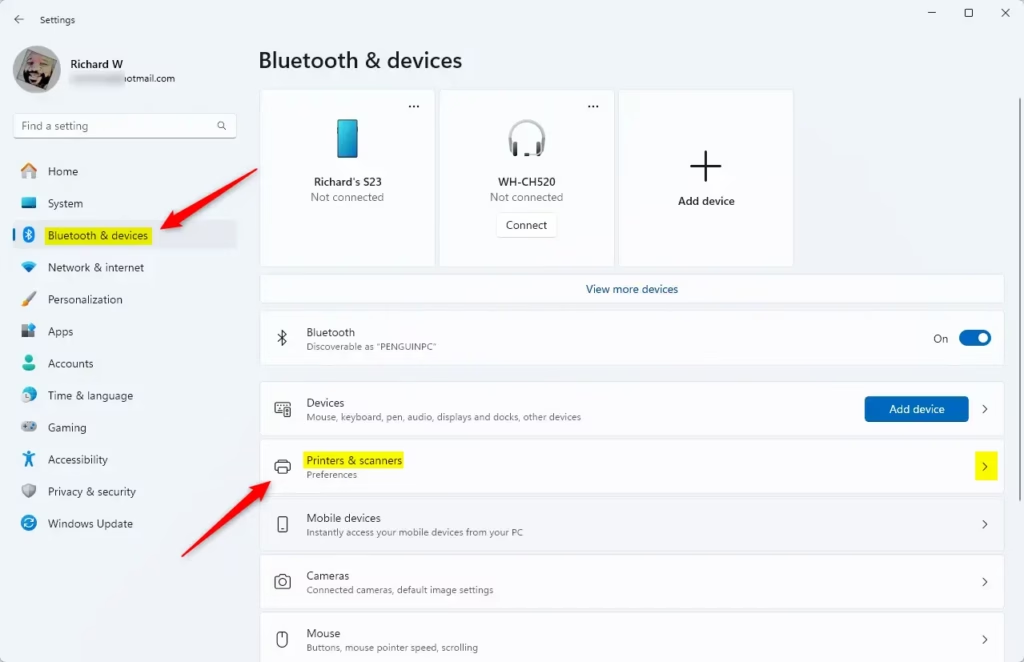
While Windows searches for connected hardware, wait for your scanner’s name to show up in the list. When it does, click the name, then click the Add device button to install that specific model. Windows downloads and sets up the driver. Once the scanner appears in the Printers & scanners list, you’re done.
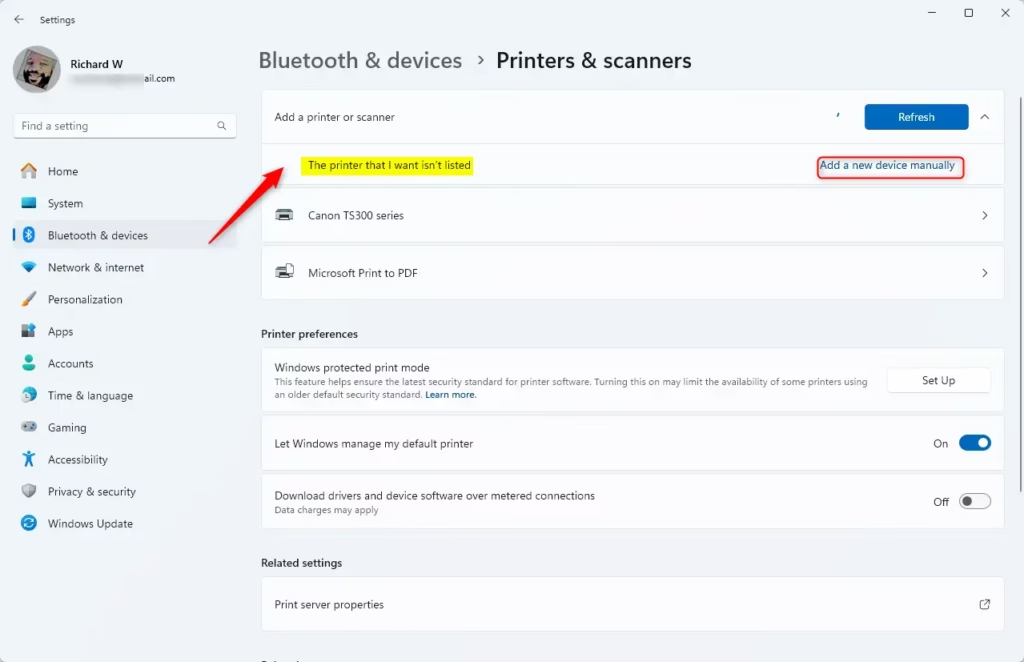
If the scanner doesn’t appear after the search finishes, click The printer that I want isn’t listed. This link appears next to the search progress, and it opens a separate Add Printer window. That window is designed to find and install hardware that Windows 11 misses during the initial scan. It works for multifunction devices and for some standalone scanners.
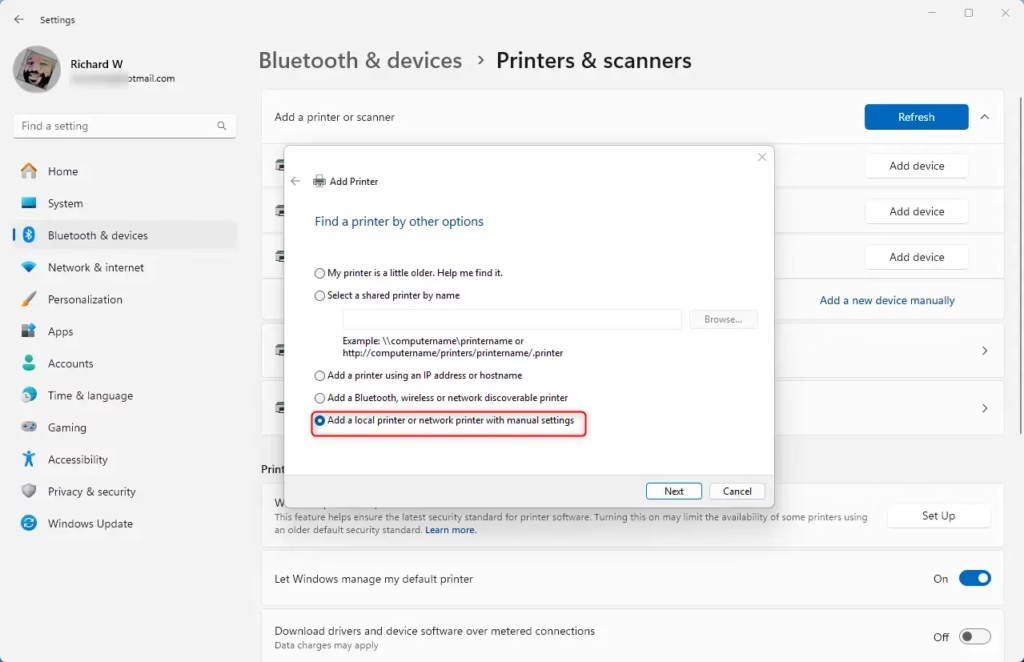
In the Add Printer window, select Add a local printer or network printer with manual settings, then click Next. The next screen asks you to choose a port.
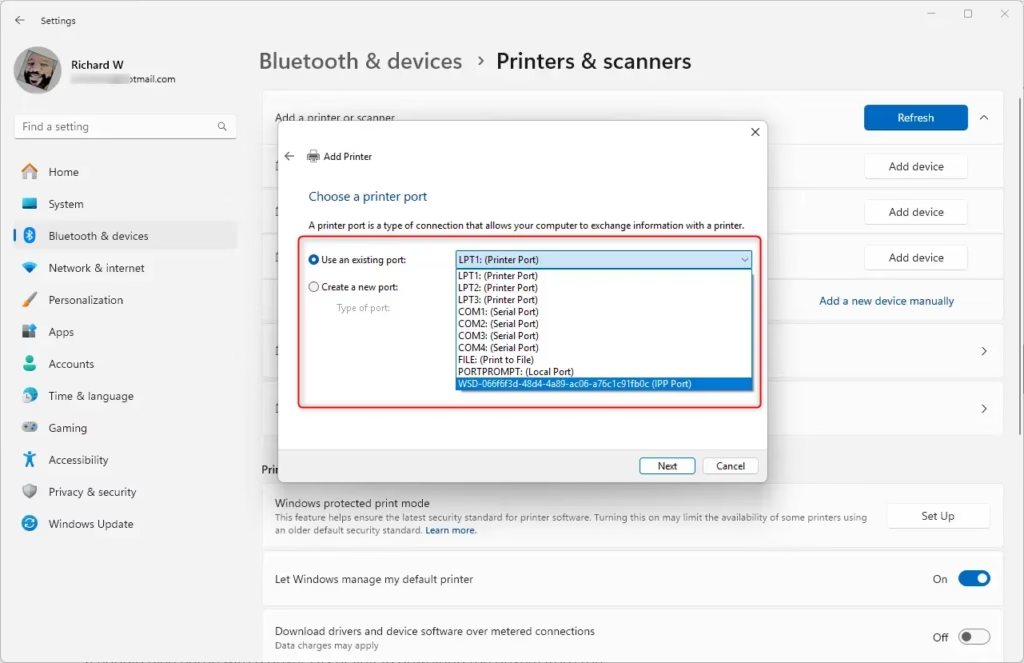
Select the port your scanner is connected to. For a USB device, this is often listed as something like USB001. If you are not sure which one to pick, choose the USB entry and carry on. Then click Next. You will then see a list of manufacturers and models.
Administrative privileges are required to complete a manual installation. If you are signed in with a standard account, Windows will ask for an administrator’s password. If you don’t have one, ask whoever manages the PC to do this step.
If Windows still fails to detect the hardware, a downloaded driver package or the installation disc from the manufacturer will get things moving. Download the driver from the manufacturer’s support site for your exact model, and choose the Windows 11 version if there is one. Many packages are installers you can simply run. Others are just driver files that you point to in the next step. If the package comes as a ZIP file, extract it first so you can browse to the files.
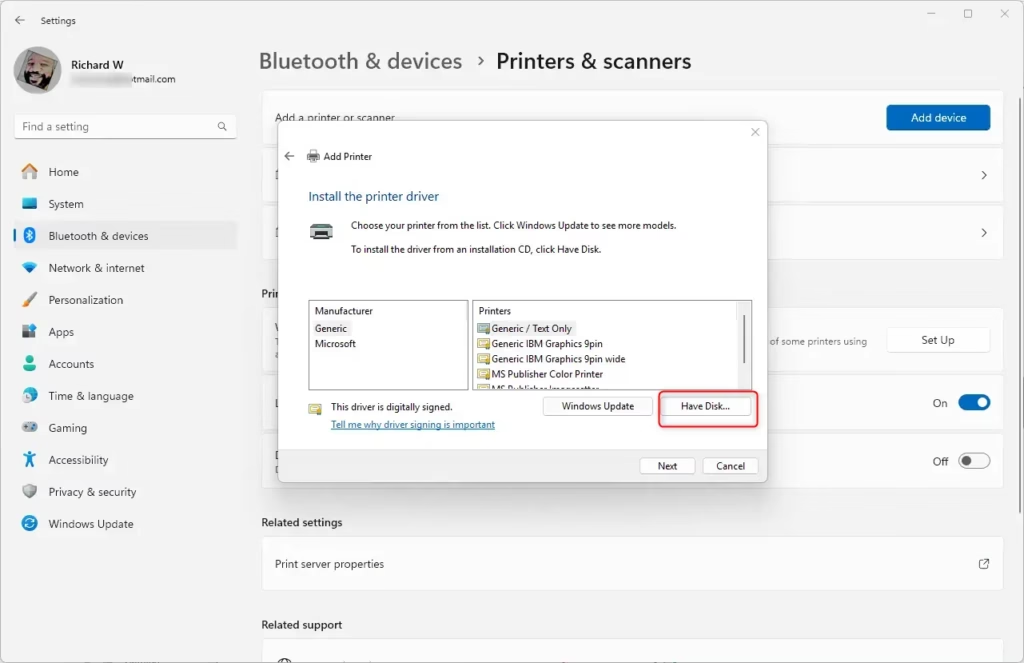
In the manufacturer and model list, click Have Disk, then click Browse and go to the folder where you saved the driver files. Select the driver’s setup information file, then click OK. Your model should now appear in the list. If it does not, the driver may not match your model or Windows version.
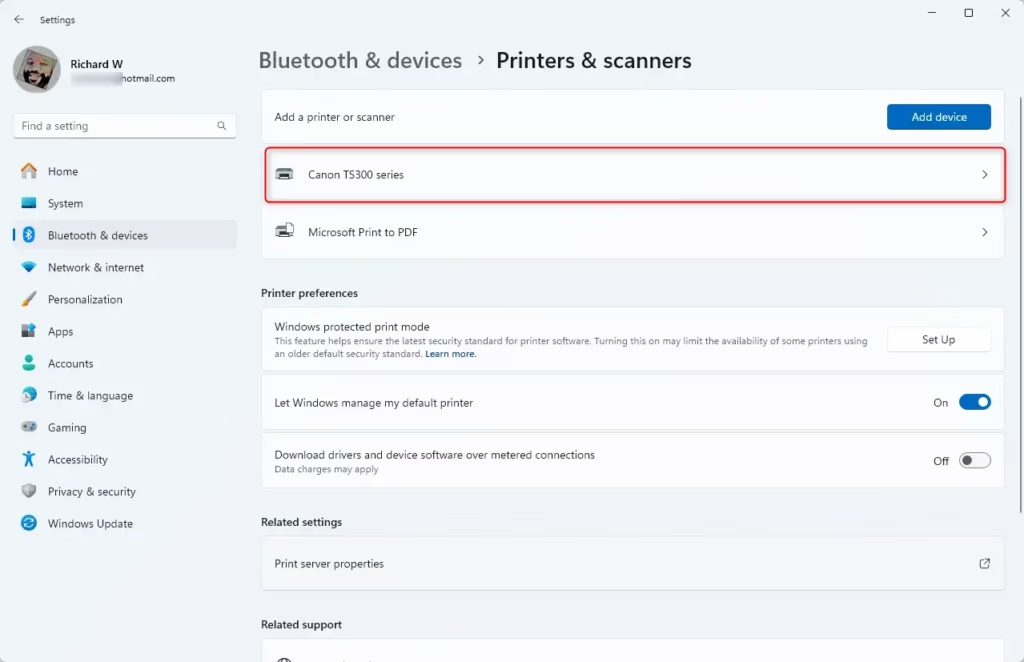
Follow the on-screen instructions to finish installing the driver, then click Finish when the wizard says it is done. Then test the scanner to confirm everything works. The easiest way is to put a page on the glass, open the Scan app, and run a preview. If the scan works, you are finished. If it doesn’t, restart the computer and the scanner and try again. A restart is not normally required, but it clears up a surprising number of driver problems.
How to Add a Wireless Scanner
To install a wireless scanner on Windows 11, turn on the device and connect it to your home Wi-Fi network. Then open Settings, go to Bluetooth & devices, and select Printers & scanners to add the device to your computer. The scanner and the computer must be on the same network. A guest network, or a router setting that isolates devices from each other, can stop the PC from seeing the scanner.
- Make sure your scanner is turned on and connected to your home Wi-Fi network. (Check your scanner’s manual if you’re not sure how to do this.) Most scanners show a Wi-Fi light or a network status on their display once connected. Also check that your computer is on the same Wi-Fi network.
- Open Settings . Click the Start button and the gear icon. Or press
Windows key + I. The Settings window opens. - Go to Bluetooth & devices Printers & scanners. You will see the printers and scanners Windows already knows about.
- Click Add device and wait while Windows searches for nearby wireless scanners. This can take up to a minute. Be patient and don’t click away while the search is running.
- When you see your scanner’s name, click it and select Add device. Windows installs the driver, and the scanner then shows up in the Printers & scanners list.
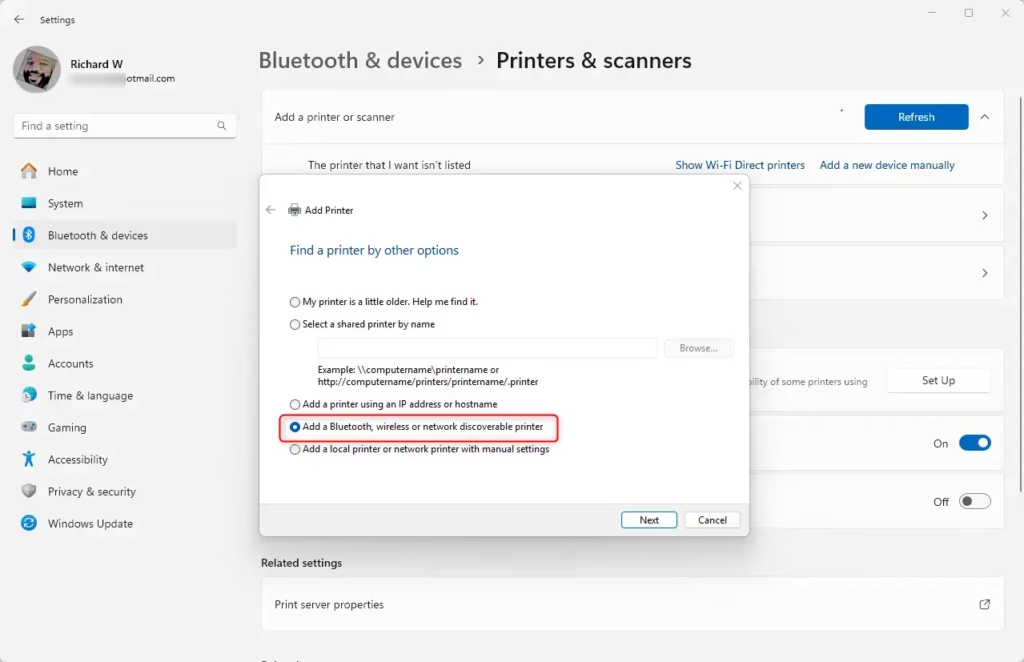
If the device remains hidden, click The printer that I want isn't listed and follow the prompts to add the hardware manually. The Add Printer window offers an option to add a Bluetooth, wireless or network discoverable printer. It also lets you add a device by IP address or hostname, which is handy if you know the scanner's address from its display or your router's device list. Also check that the scanner has not dropped off the Wi-Fi network, since scanners often do after a router restart.
Wireless scanners eliminate cable clutter and let you scan from anywhere on your home network. The trade-off is that they depend on your Wi-Fi, so a weak signal or a router change can make the scanner disappear until it reconnects.
Encountering hurdles? Consult the scanner manual or browse the manufacturer website for troubleshooting guidance. Have your exact model number ready, because drivers and instructions differ between models.
Quick Tips
- Always keep your scanner's drivers updated for best performance. In Settings, open Windows Update, then Advanced options and Optional updates, to see whether any driver updates are waiting. You can also download newer drivers from the manufacturer's website.
- Use the built-in Windows Scan app to scan documents easily. You can find it by typing Scan in the Start menu search box. In the app, choose your scanner, pick a file type and a resolution, and use Preview before you run the final scan.
- If you don't have the Scan app, you can download it for free from the Microsoft Store. Once it's installed, it appears in the Start menu like any other app.
Summary
Connecting and installing a scanner on Windows 11 is a straightforward process whether you use a USB cable or a wireless network connection. In most cases, plugging in the scanner is enough. If it isn't, you can add it through Windows Settings in a few steps, and Windows will usually install the correct drivers for you. When it doesn't, the manufacturer's driver package is the fallback.
- Connecting and installing a scanner on Windows 11 is simple, whether it's USB or wireless.
- You can add your scanner through Windows Settings in just a few steps: Bluetooth & devices Printers & scanners Add device.
- Installing the correct drivers helps your scanner work properly. Use the manufacturer's driver if Windows can't find one.
- Once set up, you can easily scan and save your documents and pictures.
- If you want more help or troubleshooting tips, check out the official Microsoft support page for scanning.
Have a question about this guide?
Answered by AI from this guide. Good questions may be added to this page — please don't include personal details.
Did this guide fix your problem?

About the Author
Richard
Tech Writer, IT Professional
Richard is a writer at Geek Rewind who turns complex IT tasks into clear, step-by-step guides. He draws on years of hands-on experience in system administration and enterprise IT operations, focusing on Windows, Linux and WordPress: the problems people actually run into, and the fixes that work. His server and WordPress guides come from systems he runs himself. Richard builds and maintains the platform behind Geek Rewind, from its Ubuntu servers and Nginx configuration to its custom WordPress plugins. Many new tutorials start with readers' questions, and he's always glad to answer them in the comments.
No comments yet — be the first to share your thoughts!