How to Disable Automatic Maintenance Windows 11
Automatic Maintenance in Windows 11 runs in the background to keep your PC healthy and secure without you needing to do anything.
This feature performs essential tasks like installing updates and running security scans automatically, usually around 2 AM daily when your computer is idle.
Automatic maintenance will try again later if your PC is busy or asleep during the scheduled time. You can set automatic maintenance to wake your computer from sleep to finish its jobs, but automatic maintenance won't run if the PC is completely off.
Automatic Maintenance is usually best for your Windows 11 system. You might want to turn Automatic Maintenance off sometimes, like when troubleshooting or if you prefer to manage all tasks yourself. Disabling Automatic Maintenance stops background jobs from running automatically.
You can enable or disable Automatic Maintenance in Windows 11 using the Registry Editor. Navigate to ComputerHKEY_LOCAL_MACHINESOFTWAREMicrosoftWindows NTCurrentVersionScheduleMaintenance, then modify the MaintenanceDisabled DWORD value. Set it to 1 to disable, or 0 or delete it to enable.
How Automatic Maintenance Works
Automatic Maintenance performs background tasks that Windows runs regularly. These tasks help keep your PC secure and running its best. For example, a security scan, which is one of these background tasks, checks for malware.
What Happens During Automatic Maintenance?
- Windows Updates: Downloads and installs important security fixes and new features.
- Security Scans: Checks for harmful software and viruses using Windows Security.
- System Diagnostics: Checks to make sure system parts are working correctly.
- Performance Optimization: Tasks like organizing files on your hard drive (for older drives) or optimizing them (for newer SSD drives) to keep your storage running fast.
- Software Updates: Sometimes, updates for other Microsoft programs are also part of this process.
Automatic Maintenance in Windows 11 runs tasks in the background when your PC is not in use. This includes downloading and installing important Windows updates, checking for viruses with Windows Security, running system health checks, and optimizing your storage drives to keep things running smoothly.
Using the Registry Editor to Control Automatic Maintenance
You can control automatic maintenance using the Windows Registry, which is a special database for Windows settings. Be very careful when changing things here, because mistakes can cause problems with your computer. This guide will show you how to turn automatic maintenance off or on using the Registry Editor.
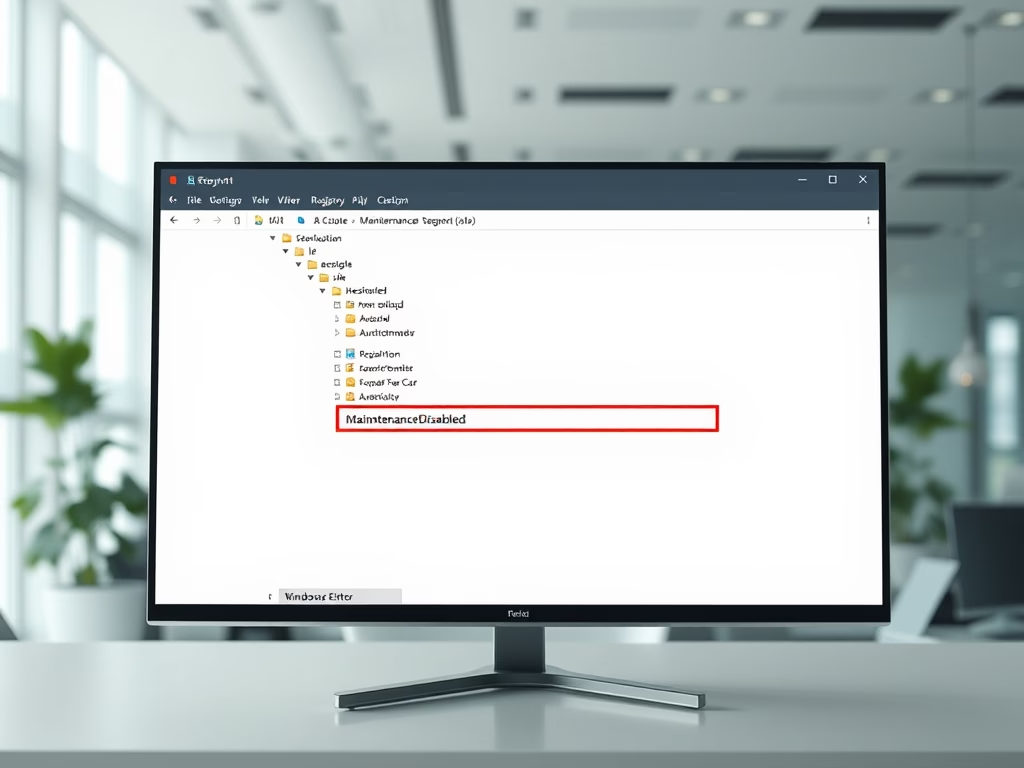
Automatic Maintenance in Windows 11 is a feature that runs background tasks, like disk checks and defragmentation, when your computer is idle. You can disable or enable this Automatic Maintenance using the Registry Editor. This process involves navigating to `HKEY_LOCAL_MACHINE\SOFTWARE\Microsoft\Windows NT\CurrentVersion\Schedule\Maintenance` and changing the `MaintenanceDisabled` value.
Step 1Open the Registry Editor
- Press the Windows key + R on your keyboard. This opens the Run box.
- Type
regeditinto the box and press Enter or click OK. - If a User Account Control (UAC) window appears, click Yes to allow Registry Editor to make changes.
Step 2Go to the Correct Registry Location
With Registry Editor open, navigate to a specific location (a "key") within the registry. This key houses the configuration settings for Automatic Maintenance.
On the left-hand pane of Registry Editor, carefully browse to the following path:
HKEY_LOCAL_MACHINE\SOFTWARE\Microsoft\Windows NT\CurrentVersion\Schedule\Maintenance
Step 3Change the 'MaintenanceDisabled' Setting
The Registry Editor allows you to change the 'MaintenanceDisabled' setting to turn off automatic maintenance. If you do not see 'MaintenanceDisabled', right-click an empty spot in the folder, choose 'New', then 'DWORD (32-bit) Value', and name it 'MaintenanceDisabled'. Double-click the new 'MaintenanceDisabled' value to set its data.
To Disable Automatic Maintenance:
- In the right side of the window, look for a value named
MaintenanceDisabled. - If it's not there, you need to create it. Right-click on an empty space in the right panel, select New, and then choose DWORD (32-bit) Value. Name it exactly
MaintenanceDisabled. - Double-click on the
MaintenanceDisabledvalue. - In the "Value data" box, enter
1. - Make sure "Base" is set to Hexadecimal.
- Click OK.
Explanation: Setting the value to 1 for MaintenanceDisabled tells Windows to stop the automatic maintenance tasks.
To Enable Automatic Maintenance (Default):
- If the
MaintenanceDisabledvalue is there, double-click on it. - Change the "Value data" to
0. - Make sure "Base" is set to Hexadecimal.
- Click OK.
- If the
MaintenanceDisabledvalue does not exist, you can simply delete it. Right-click on theMaintenanceDisabledvalue and select Delete. Confirm if asked.
Explanation: Setting the value to 0, or removing the value entirely, tells Windows to allow automatic maintenance tasks to run as scheduled.
MaintenanceDisabled value is often the most reliable method for ensuring it's enabled, as it reverts the system to its default behavior.Step 4Close Registry Editor and Restart
After applying your modifications, close Registry Editor. For the changes to take effect properly, it's recommended to restart your computer. This action ensures that all system services incorporate the new settings.
Summary
Automatic maintenance in Windows 11 keeps your PC running well and securely by doing tasks like updates and security scans when you're not using it. You can manage some settings through Windows Security and Update, but for more control, you can use the Registry Editor carefully. Disabling automatic maintenance is usually not recommended.
How to disable maintenance activator?
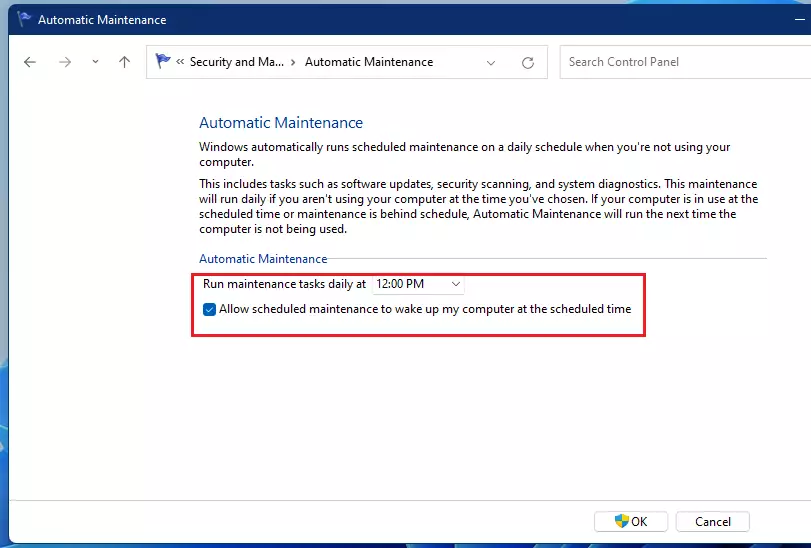
Resolution. To prevent the Regular Maintenance task from waking the machine at 3:00am, go to Action Center > Automatic Maintenance and disable the Allow scheduled maintenance to wake up my computer at the scheduled time checkbox.
Was this guide helpful?

About the Author
Richard
Tech Writer, IT Professional
Richard, a writer for Geek Rewind, is a tech enthusiast who loves breaking down complex IT topics into simple, easy-to-understand ideas. With years of hands-on experience in system administration and enterprise IT operations, he’s developed a knack for offering practical tips and solutions. Richard aims to make technology more accessible and actionable. He's deeply committed to the Geek Rewind community, always ready to answer questions and engage in discussions.

No comments yet — be the first to share your thoughts!