How to Add or Remove Scrollbar in Windows Terminal

Windows Terminal shows a scrollbar on the right side of the window. You drag it to look at older output from Command Prompt, PowerShell or WSL. You can show it, hide it, or let it appear only when you need it. You do this in the Settings page, or in your settings.json file if you prefer editing the file directly.
Open Windows Terminal, press Ctrl +, to open Settings , click Defaults under Profiles, then Appearance, scroll to Scrollbar visibility under Window, and choose Visible, Hidden, or Always from the dropdown. Click Save to apply the change immediately.
What is Windows Terminal?
Windows Terminal is a modern app that brings Command Prompt, PowerShell and WSL (Windows Subsystem for Linux, a feature that lets you run Linux tools on Windows) together in one window. It supports tabs, split panes and a lot of visual customization. One part of that is the scrollbar, which helps you move quickly through long command output.
Whether you want the scrollbar depends on how you work. If you often read long output such as logs, directory listings or build results, a visible scrollbar shows you where you are in the buffer. If you mostly use the mouse wheel or keyboard and want a cleaner window, hide it.
Why Change the Scrollbar?
The scrollbar has three display states:
- Shown, which is the default.
- Hidden completely.
- Always visible.
Pick the one that fits your habits. The steps below show where to set it. The change can apply to every profile or to a single one.
How to Change the Scrollbar Visibility in Windows Terminal
- Open Windows Terminal. Click the Start menu , type Terminal, then click Terminal (listed as Windows Terminal on some builds) in the results. A Terminal window opens with your default shell.

The Settings page is easier and is what these steps use. Settings has an Open JSON file button at the bottom of the left sidebar if you want the file instead.
- Open Settings. Click the small down arrow (˅) near the top of the window, then select Settings. You can also press
Ctrl + ,on your keyboard. A Settings tab opens with a list of options on the left.

The left sidebar has a Profiles section with one entry for each shell, such as Windows PowerShell or Command Prompt, plus an entry called Defaults. Choose Defaults to change the scrollbar everywhere. Choose a single profile to change it for that shell only. A profile-specific setting overrides the default.
- Go to Defaults and Appearance. In the left sidebar, under Profiles, click Defaults. Then click Appearance on the right to open it. The visual options for that profile appear.
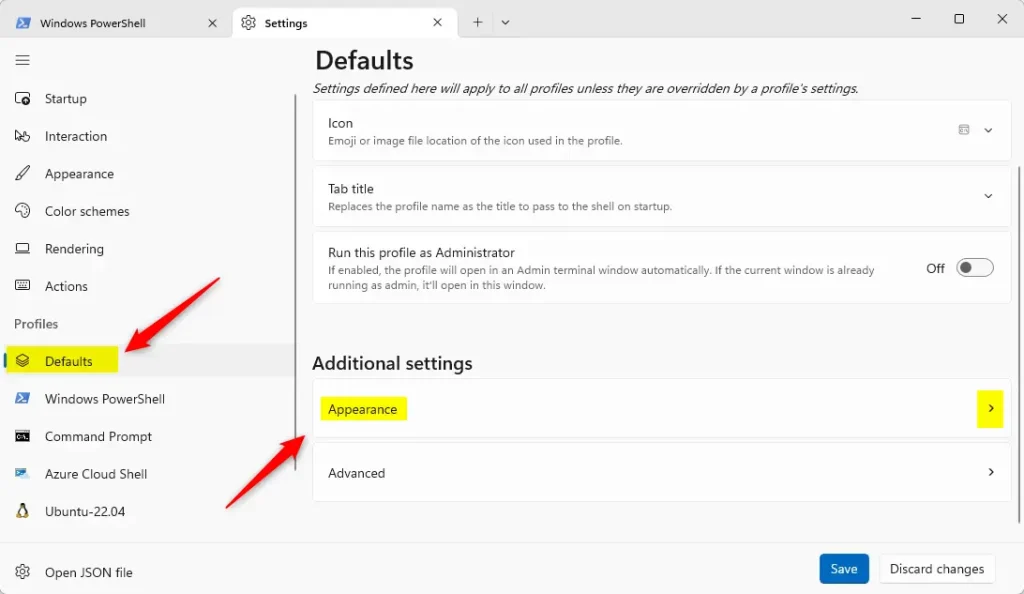
The Appearance page covers the look of the terminal, including font, color scheme, cursor and the scrollbar. If you picked a single profile instead of Defaults, the same Appearance page is in that profile's settings.
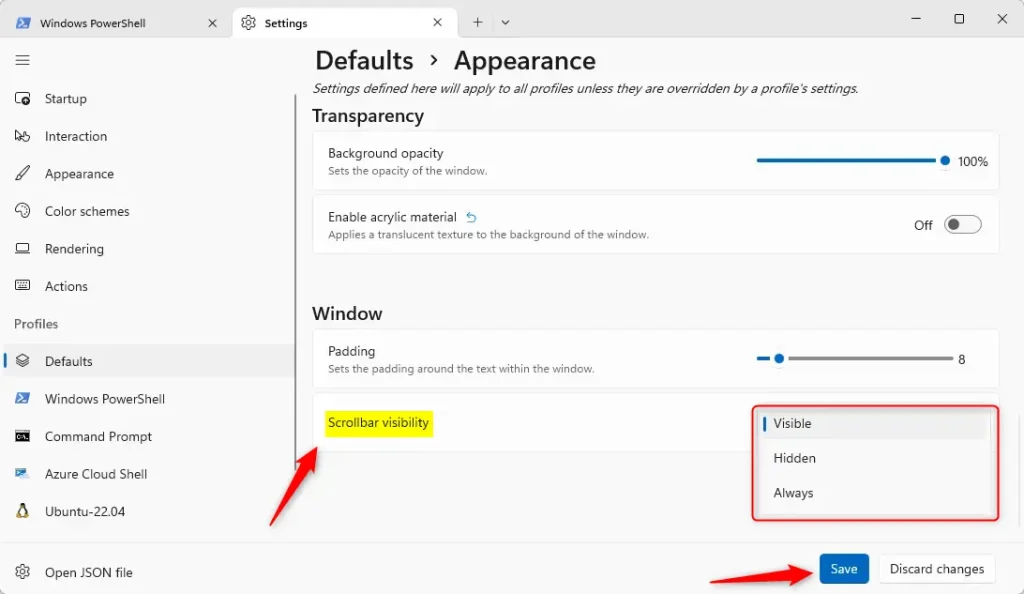
- Change Scrollbar visibility. Scroll down to Scrollbar visibility, which is listed under the Window section. Click the dropdown menu and choose one of these options:
- Visible (default): The scrollbar appears when you move your mouse near the edge. How it fades in and out can also depend on your Windows scrollbar setting.
- Hidden: The scrollbar is always hidden.
- Always: The scrollbar is always visible.
The dropdown now shows the option you chose.
Very old versions of Windows Terminal may also lack the Always option. Update Terminal from the Microsoft Store if you do not see it.
- Save your changes. Click the Save button at the bottom right. The new scrollbar setting applies to your open Terminal windows, with no restart needed.
To undo the change, return to the same dropdown and choose Visible, the default, then click Save again. If you are unsure about a change, the Discard changes button next to Save throws away anything you have not saved.
Summary
The scrollbar setting controls when the scrollbar appears while you read long output. Pick the state that suits how you work, and change it back whenever you like.
Questions or tips can go in the comments below.
Was this guide helpful?

About the Author
Richard
Tech Writer, IT Professional
Richard is a writer at Geek Rewind who turns complex IT tasks into clear, step-by-step guides. He draws on years of hands-on experience in system administration and enterprise IT operations, focusing on Windows, Linux and WordPress: the problems people actually run into, and the fixes that work. His server and WordPress guides come from systems he runs himself. Richard builds and maintains the platform behind Geek Rewind, from its Ubuntu servers and Nginx configuration to its custom WordPress plugins. Many new tutorials start with readers' questions, and he's always glad to answer them in the comments.

No comments yet — be the first to share your thoughts!