How to Add App to Run Automatically at Startup in Windows 11

Adding an app to run automatically at startup in Windows 11 means a program will open by itself right after you log in.
This handy feature lets you make your most-used applications ready the moment your computer boots up. For example, you can set your web browser, like Chrome version 110 or later, or communication tools like Discord to start instantly.
Windows 11, especially version 22H2 or newer, allows you to put an app’s shortcut file into a special startup folder. This way, essential programs like your antivirus or email client are available without you having to open them manually.
You can add apps to run at startup by placing their shortcuts in the Startup folder. Open File Explorer, type shell:startup in the address bar, and press Enter. Then, drag and drop or create shortcuts for the desired apps into this folder.
What Can You Add?
You can add many different things to start automatically when your Windows 11 computer turns on. This includes regular apps, shortcuts to programs or folders, entire folders, access to drives, specific files like documents, and even simple scripts for automated tasks.
Reference:
Configure Startup Applications in Windows – Microsoft Support
Learn how to optimize system performance by managing startup applications in Windows.
Important Note About Admin Apps
Option 1Add Startup App for Your Account Only
- Open File Explorer by pressing ⊞ Win+E.
- Copy this text:
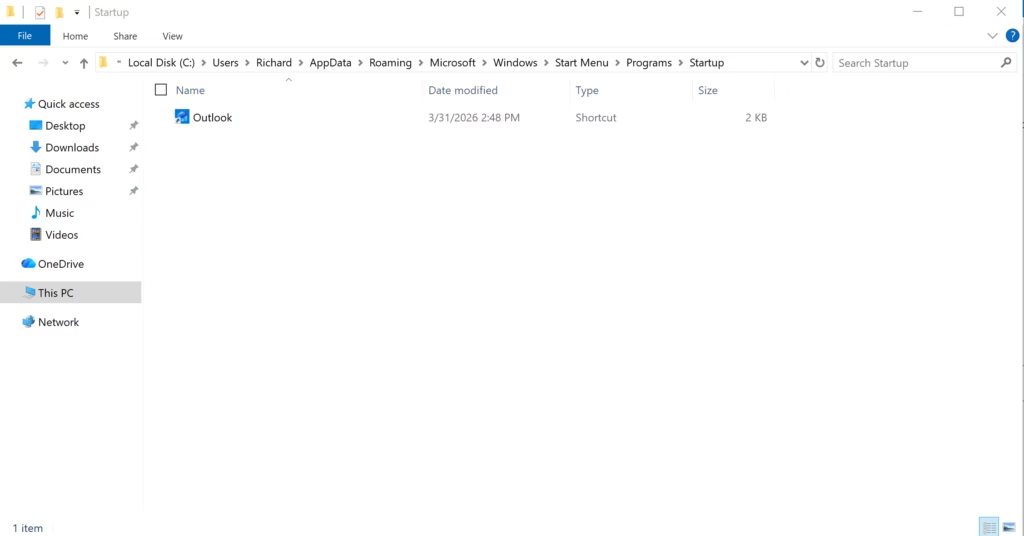
shell:startupand paste it into the address bar at the top of File Explorer. Press Enter. This opens your Startup folder. (see screenshot below) - Add or create a shortcut of any app, folder, drive, file, or script you want to run at startup. Put it in this Startup folder.
You can add an app to start automatically just for your user account in Windows 11. This means only you will see it launch when you log in. You’ll use a special folder that Windows creates for your account’s startup programs.
Option 2Add Startup App for a Specific User
If you’re an administrator, you can set an app to start automatically for a specific user on your Windows 11 computer. This is useful if you need a program to launch only for someone else who uses the PC. You’ll need to find that user’s special Startup folder.
- Open File Explorer by pressing ⊞ Win+E.
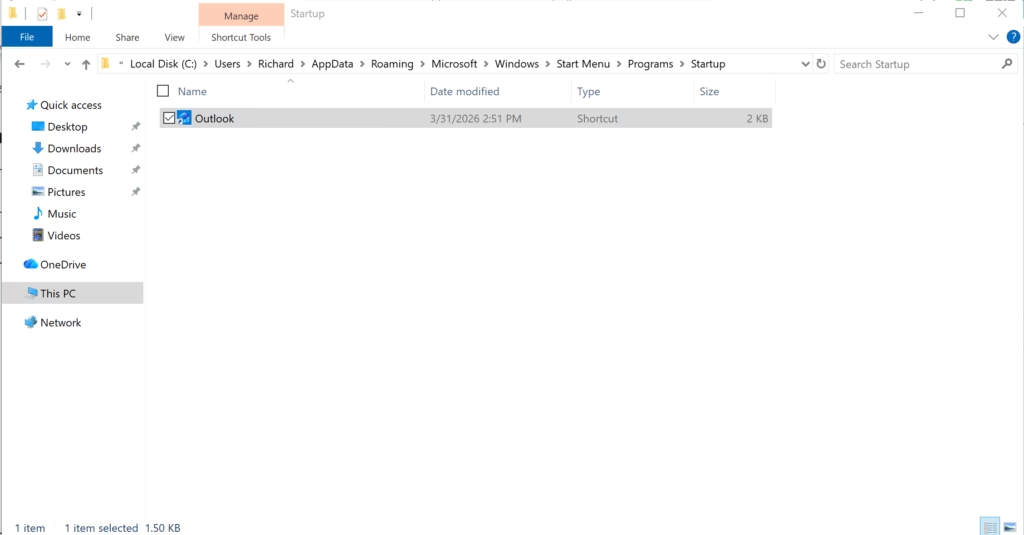
- Navigate to this folder in File Explorer (see screenshot below):📝Good to Know
C:\Users\<username>\AppData\Roaming\Microsoft\Windows\Start Menu\Programs\StartupReplace <username> with the actual username. For example:
C:\Users\Richard\AppData\Roaming\Microsoft\Windows\Start Menu\Programs\StartupWindows may prompt you to click "Continue" to open a specific folder. Clicking this button allows the application to run automatically when Windows 11 starts. This step is necessary for certain program installations.
- Add or create a shortcut of any app, folder, drive, file, or script you want to run at startup for this user. Put it in this Startup folder.
For Microsoft Store apps: Go to the Start menu, then ‘All apps.’ Find the app you want, and drag and drop it into this Startup folder to create a shortcut.
Option 3Add Startup App for All Users
To make an app start automatically for everyone who uses a Windows 11 computer, you need administrator rights. This method places a shortcut into a system-wide Startup folder. Any user who logs in after this will see the app launch automatically.
- Open File Explorer by pressing ⊞ Win+E.
- Navigate to this folder in File Explorer:
C:\ProgramData\Microsoft\Windows\Start Menu\Programs\Startup - Copy or move a shortcut of any app, folder, drive, file, or script you want to run at startup for everyone. Put it in this Startup folder. (see screenshot below)
For Microsoft Store apps: Go to the Start menu, then ‘All apps.’ Find the app you want and drag and drop it to your desktop to create a shortcut. Then copy or move that shortcut from your desktop into the Startup folder.
- Click Continue to approve copying or moving the shortcut into this Startup folder.
That’s it!
Summary
Windows 11 lets you add apps to start automatically when you sign in, making your computer ready to go.
Was this guide helpful?

About the Author
Richard
Tech Writer, IT Professional
Richard, a writer for Geek Rewind, is a tech enthusiast who loves breaking down complex IT topics into simple, easy-to-understand ideas. With years of hands-on experience in system administration and enterprise IT operations, he’s developed a knack for offering practical tips and solutions. Richard aims to make technology more accessible and actionable. He's deeply committed to the Geek Rewind community, always ready to answer questions and engage in discussions.



No comments yet — be the first to share your thoughts!