Access Phone Photos on a Lenovo IdeaPad in Windows 11

Phone Link and a USB cable are the two built-in ways to get your phone’s photos onto a Lenovo IdeaPad running Windows 11. The USB cable method works with almost any phone and needs no setup. Phone Link pairs an Android phone with the laptop and shows your recent photos without a cable.
An IdeaPad is a standard Windows 11 laptop, so Lenovo has no special software for this job. Every method here uses tools that come with Windows 11 or free apps from your phone’s app store. None of the steps need administrator rights, except one driver update in the troubleshooting section. That step is marked where it appears.
To access phone photos on a Lenovo IdeaPad, connect your phone with a USB cable and open it under This PC in File Explorer , then copy the photos into a folder such as Pictures. For an Android phone, you can also pair it with the Phone Link app to view your recent photos without a cable.
Which Method to Use
Pick the method that matches your phone and how often you need the photos.
- USB cable: Works with Android and iPhone. Best for copying a large batch of photos once. It needs no account and no internet connection.
- Phone Link: Android only for photos. Best if you want to grab a photo now and then without plugging in. It needs a Microsoft account and an app on the phone.
- Cloud service (Google Photos, iCloud Photos or OneDrive): Works with both phone types. Best if you want every photo available on the laptop automatically.
Method 1Use Phone Link With an Android Phone
Phone Link is the Windows 11 app that connects your Android phone to the laptop. It has a Photos tab that lists your recent photos and screenshots. Phone Link for iPhone does not show photos, so iPhone owners should use the cable or iCloud methods below.
Check That Windows Allows Mobile Device Connections
This setting controls whether the laptop can talk to your phone at all. If it is off, Phone Link cannot connect. The page exists in current Windows 11 releases (22H2 and later).
- Open Settings Bluetooth & devices Mobile devices
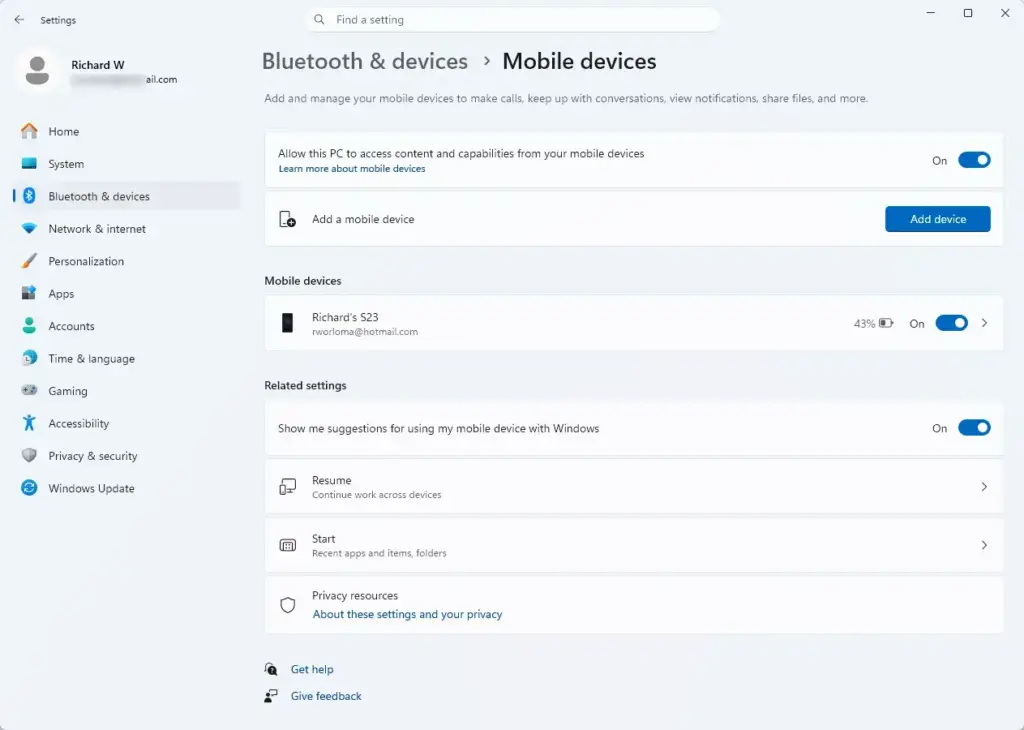
Settings › Bluetooth & devices › Mobile devices - Turn on Allow this PC to access your mobile devices. The toggle should read On.
If you can’t find this page, update Windows through Settings Windows Update first If the toggle is greyed out or missing on a work or school laptop, your organization’s policy is blocking the feature. Only your IT team can change that.
Pair Your Android Phone
Pairing links your phone to your Microsoft account on the laptop. Keep both devices on the same Wi-Fi network while you do this.
- Select Start, type Phone Link, and open the app. If Windows asks you to sign in, use your Microsoft account.
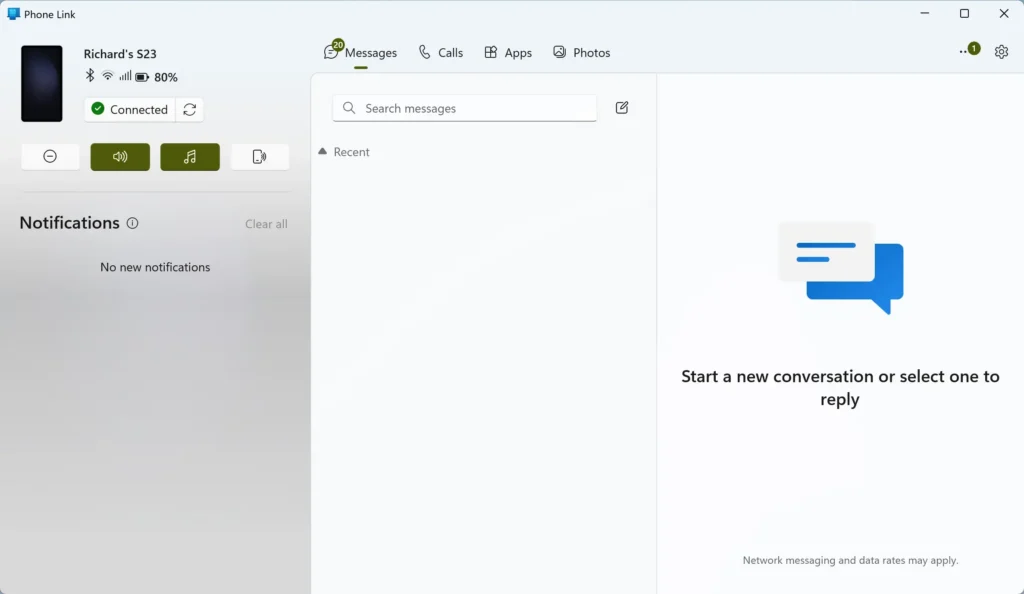
- Select Android when the app asks which type of phone you have. A QR code appears on screen.
- On your phone, install the Link to Windows app from Google Play. Some phones, such as many Samsung models, already include it.
- Open Link to Windows on the phone and choose the option to scan the QR code. Point the camera at the code on your laptop screen.
- Tap Allow on each permission request on the phone, including access to photos and media. If you deny the photo permission, the Photos tab stays empty.
- Wait for Phone Link on the laptop to show that your phone is connected. You should see tabs such as Messages, Calls and Photos.
If the QR code fails to scan, check that you are signed into the same Microsoft account on both devices. Also check the phone's battery saver. It can stop the Link to Windows app from running in the background, so make sure it does not block the app.
View and Copy Photos in Phone Link
Phone Link shows your most recent photos, not your whole library. For older photos, use the cable or a cloud service.
- Select the Photos tab in Phone Link. Thumbnails of your recent photos and screenshots appear.
- Double-click a photo to open it in a larger view.
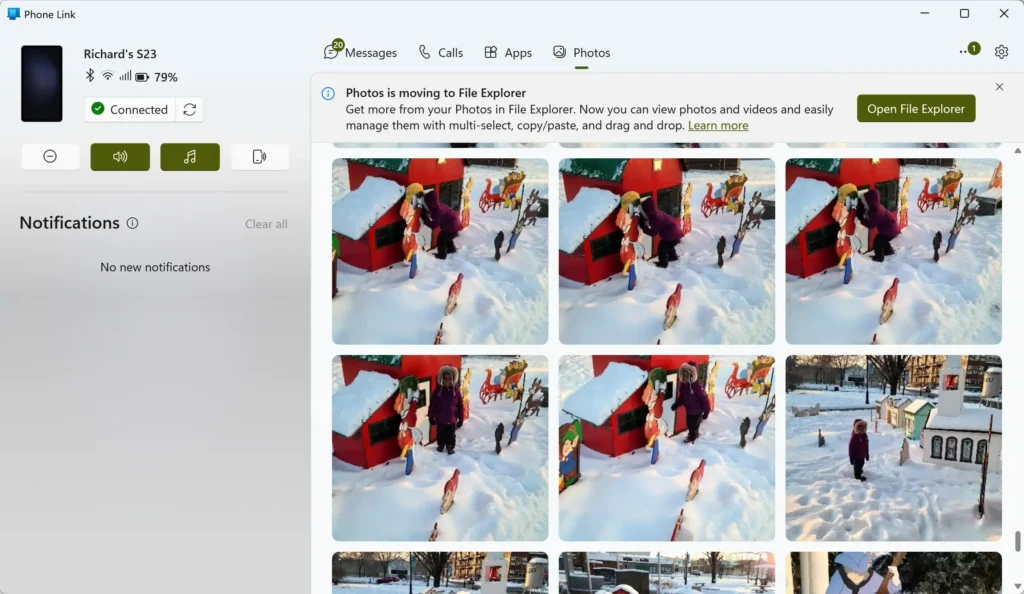
- Right-click the photo to see the options available, which include copying or saving it. These options can differ slightly between Phone Link versions.
- Choose Save as and pick a folder, such as Pictures, to keep a copy on the laptop. You can also drag a thumbnail onto the desktop or into a File Explorer window.
If the Photos tab shows an error or stays empty, open the Link to Windows app on the phone and confirm that photo access is allowed. Then close and reopen Phone Link on the laptop.
Method 2Use a USB Cable
The cable method shows your phone as a drive in File Explorer. It reaches every photo stored on the phone, and it is the fastest way to move hundreds of files.
Use a cable that carries data. Some cables included with accessories only charge. Your IdeaPad's USB-C and USB-A ports both work for this, as long as the cable matches your phone.
Copy Photos From an Android Phone
Android phones connect in charging-only mode by default. You have to switch the USB mode before photos become visible.
- Unlock your phone and plug it into the IdeaPad with the USB cable.
- Swipe down from the top of the phone screen and tap the USB notification. It usually reads something like Charging this device via USB.
- Choose File transfer (some phones call it Transferring files or MTP). The label varies by phone maker.
- On the laptop, press Windows key + E to open File Explorer.
- Select This PC in the left pane. Your phone appears with its model name.
- Open the phone, then open Internal storage DCIM Camera. DCIM is the folder where phones and cameras store their photos. Screenshots are usually in Pictures Screenshots.
- Select the photos you want. Press Ctrl + A to select all of them.
- Press Ctrl + C to copy them, open a folder such as Pictures on the laptop, and press Ctrl + V to paste.
Cutting deletes the originals from the phone as soon as the transfer finishes, and a failed transfer can leave you with missing files. Check that the copies open on the laptop before you delete anything from the phone.
If the phone does not appear under This PC, the USB mode is almost certainly still on charging only. Unlock the phone, check the notification again and reselect File transfer.
Copy Photos From an iPhone
- Unlock your iPhone and connect it to the IdeaPad with a Lightning cable (Apple's older connector) or a USB-C cable.
- Tap Trust when the iPhone shows Trust This Computer?, then enter your passcode. If the prompt does not appear, unplug the cable, unlock the phone and plug it in again.
- Press Windows key + E to open File Explorer and select This PC.
- Open your iPhone, then open Internal Storage DCIM. The photos sit in folders with names like 100APPLE.
- Select the photos, press Ctrl + C, and paste them into a folder on the laptop with Ctrl + V.
An iPhone that uses iCloud Photos with Optimize iPhone Storage turned on keeps only small previews of older photos on the device. The cable copies those previews, not the full-quality originals. To get full-quality files, download the originals through iCloud, as described in the cloud section below.
Import With the Photos App (Optional)
Some versions of the Windows 11 Photos app include an Import button that pulls photos from a connected device into your Pictures folder. If you see it in the top bar, select Import, choose your phone from the list, select the photos and confirm. The Microsoft Store updates the Photos app, so its layout changes between versions. If you don't see Import, use File Explorer as described above.
Method 3Use a Cloud Service
A cloud service uploads photos from the phone over Wi-Fi and makes them available on the laptop. This takes more setup, but after that it needs no cable and no pairing.
Google Photos
- Open the Google Photos app on your phone and confirm that backup is turned on for your account.
- On the IdeaPad, open Microsoft Edge and go to
photos.google.com. Sign in with the same Google account. - Select a photo, or select several using the check mark that appears on each thumbnail.
- Select the three-dot menu at the top right and choose Download. Pressing Shift + D does the same thing.
A single photo downloads as an image file. Several photos download as a ZIP archive. Right-click the ZIP file in your Downloads folder and choose Extract All to open the photos inside.
iCloud Photos
- Make sure iCloud Photos is turned on in the Photos settings of your iPhone.
- On the IdeaPad, go to
icloud.comin Microsoft Edge and sign in with your Apple Account. - Open Photos, select the photos you want, and choose the download option.
For ongoing access, install iCloud for Windows from the Microsoft Store and turn on Photos in its settings. Your iCloud photos then appear in File Explorer in an iCloud Photos folder.
OneDrive
OneDrive is built into Windows 11, so photos that your phone uploads show up in File Explorer without any download step.
- Install the OneDrive app on your phone and sign in with your Microsoft account.
- Turn on camera upload in the app's settings. The menu names differ between the Android and iPhone versions of the app.
- On the IdeaPad, open File Explorer and select OneDrive in the left pane.
- Open Pictures Camera Roll. Photos appear here after the phone finishes uploading them to OneDrive.
If a photo shows a cloud icon in File Explorer, it is stored online only. Right-click it and choose Always keep on this device to download a full copy.
If Your Phone Does Not Appear on the IdeaPad
Work through these checks in order, from most to least common.
- Unlock the phone. Both Android and iPhone hide their files while the screen is locked.
- Try a different cable. A charge-only cable is the most common cause of a phone that charges but never appears in File Explorer.
- Plug the cable into a different USB port on the IdeaPad, and avoid USB hubs while you troubleshoot.
- Restart the phone and the laptop, then connect them again.
- Check the USB mode on Android, or the Trust prompt on iPhone, as described in Method 2.
If none of that works, update the driver. This step needs administrator rights, so Windows may ask for approval or an administrator password.
- Right-click Start and select Device Manager.
- Expand Portable Devices and look for your phone. A yellow warning icon means Windows has a driver problem with it.
- Right-click the phone and select Update driver.
- Select Search automatically for drivers. Windows checks for a driver and installs one if it finds it.
If your phone does not appear under Portable Devices at all, the laptop does not detect it as a device. In that case the cable or the port is the likely cause, not the driver.
If iPhone Photos Won't Open or Look Wrong
Recent iPhones save photos in the HEIC format (a compact image format that older software can't read). If thumbnails show up blank or a photo won't open, Windows may be missing the HEIF Image Extensions add-on. Search for it in the Microsoft Store and install it.
You can also have the iPhone convert photos as it copies them. On the iPhone, open Settings Photos and scroll to Transfer to Mac or PC. Choose Automatic to convert photos to a more widely supported format when you copy them over a cable. Choose Keep Originals to copy the HEIC files unchanged.
What to Do Next
Once the photos are on the IdeaPad, copy them to a second location, such as an external drive or OneDrive, before you delete anything from the phone. If the cable method stops working after a phone update, check the USB notification first, because Android often goes back to charging-only mode each time you connect. To get new photos onto the laptop without any cables, turn on camera upload in OneDrive, Google Photos or iCloud Photos.
Have a question about this guide?
Answered by AI from this guide. Good questions may be added to this page — please don't include personal details.
Did this guide fix your problem?

About the Author
Richard
Tech Writer, IT Professional
Richard is a writer at Geek Rewind who turns complex IT tasks into clear, step-by-step guides. He draws on years of hands-on experience in system administration and enterprise IT operations, focusing on Windows, Linux and WordPress: the problems people actually run into, and the fixes that work. His server and WordPress guides come from systems he runs himself. Richard builds and maintains the platform behind Geek Rewind, from its Ubuntu servers and Nginx configuration to its custom WordPress plugins. Many new tutorials start with readers' questions, and he's always glad to answer them in the comments.
No comments yet — be the first to share your thoughts!