How to Access Android Files on Windows 11
Open Windows Settings, go to Bluetooth & Devices, then Mobile devices. Click Manage devices and toggle “Access in File Explorer” to On. Your Android phone will then appear in File Explorer for easy file management.
What You Need Before You Start
To access Android files on Windows 11, you’ll need a few things ready. Your Android phone must be running Android 11 or newer, and you need the Link to Windows app installed. Your Windows 11 PC also needs to meet certain requirements, like being part of the Windows Insider Program.- Your Android phone must be running Android 11 or newer.
- You need to have the Link to Windows app (Beta version 1.24071 or higher) installed on your phone.
- Your PC must be running Windows 11 and be part of the Windows Insider Program. Also, your PC should be signed up for one of the Insider Channels.
How to Turn On Android Phone Access in File Explorer
Turning on access to your Android phone files in Windows 11 File Explorer is simple. You just need to open Windows Settings, go to Bluetooth & Devices, and then click on Mobile devices to get started.
- Open Windows Settings: Click the Start menu button and select Settings, or press Windows key + I on your keyboard.
- Go to Bluetooth & Devices: In the Settings window, click Bluetooth & devices on the left side.
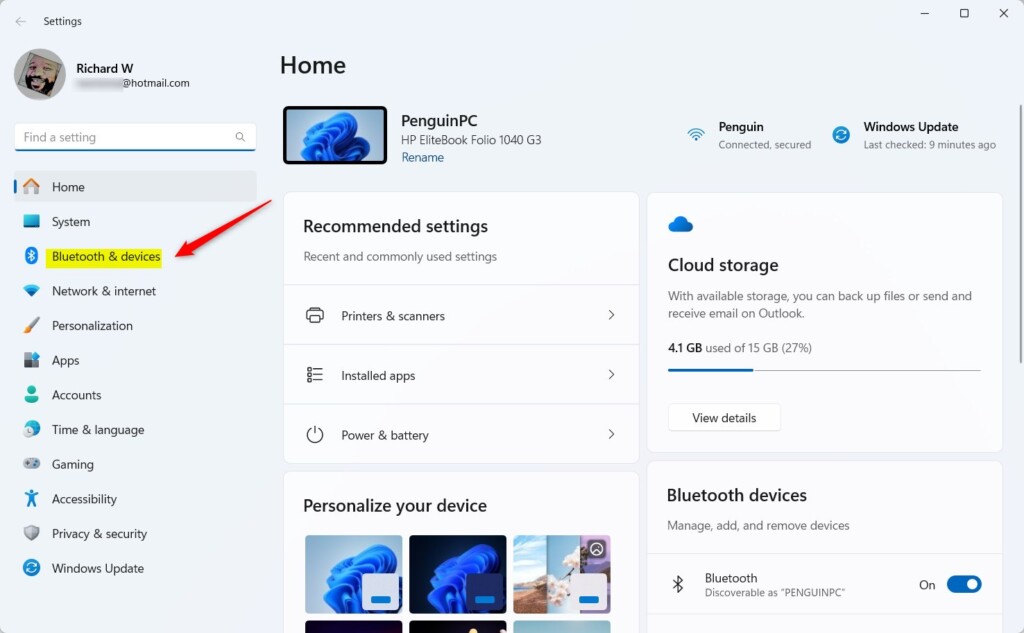
Windows 11 Bluetooth & devices settings - Open Mobile Devices: On the right side, click the Mobile devices tile to open more options.
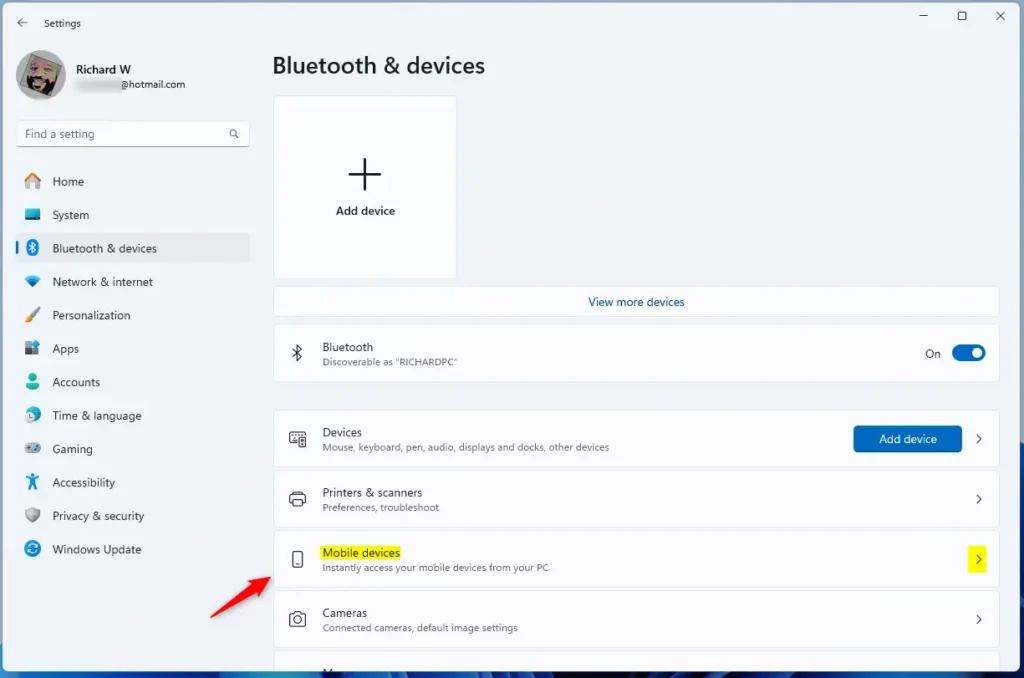
Windows 11 Mobile devices tile - Manage Mobile Devices: Click the Manage devices button.
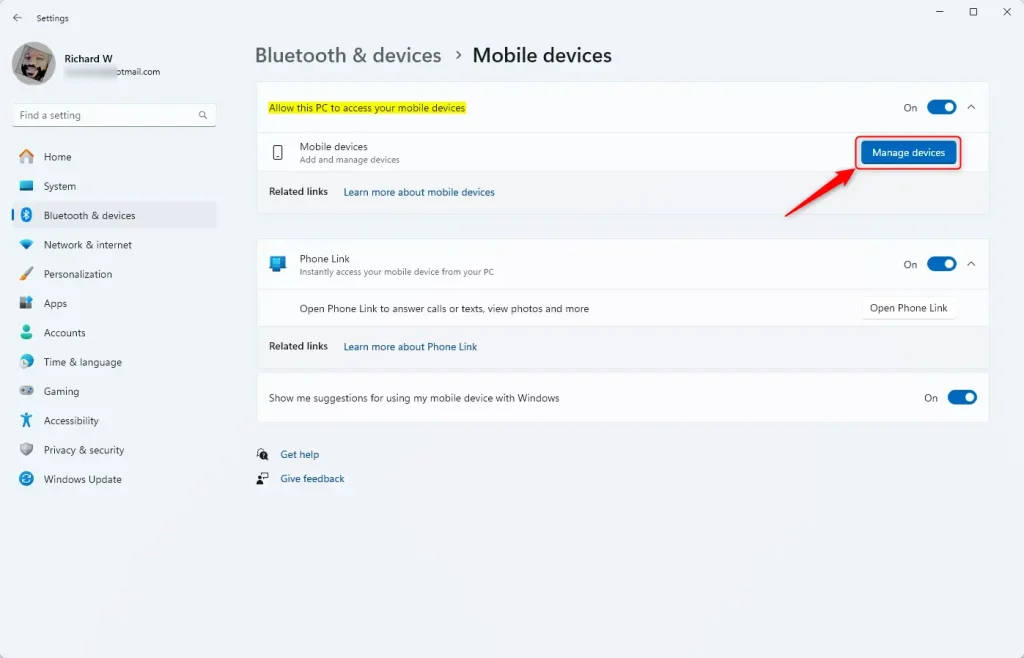
Manage devices button in Settings - Enable Access in File Explorer: In the window that pops up, find the “Access in File Explorer” tile and toggle it to On to enable or Off to disable.
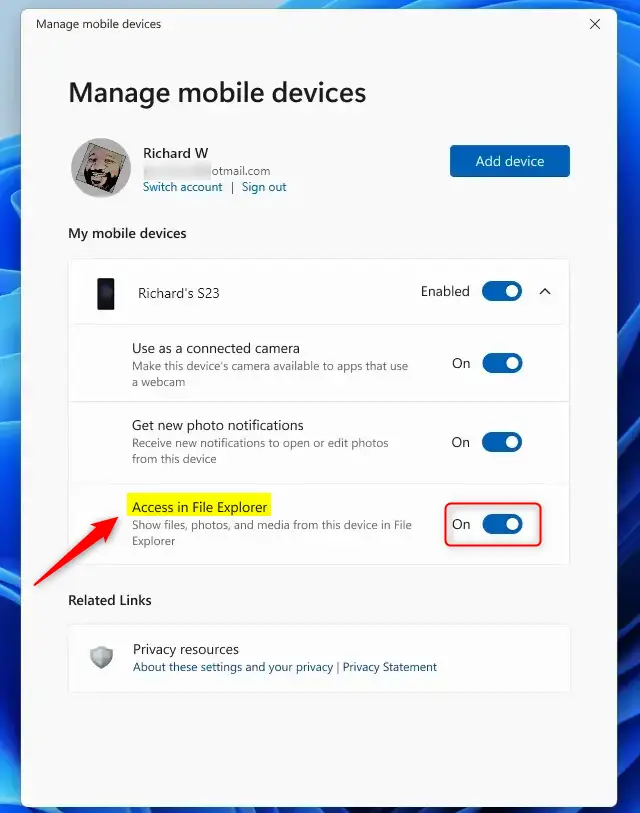
Access in File Explorer toggle switch
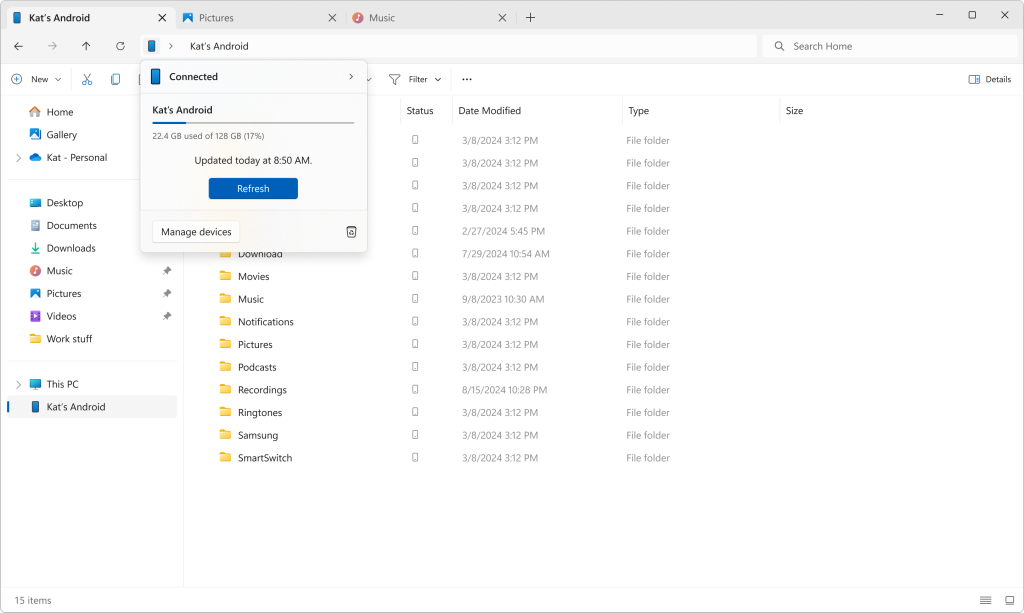
Once enabled, open File Explorer on your PC, and you should see your Android phone listed under Mobile devices. Click it to browse your phone’s files just like you do with your computer files!
Summary
Windows 11 makes it easy to access Android files on Windows 11 wirelessly through File Explorer, so you can move files between your phone and PC without needing any cables.- Windows 11 lets you wirelessly access your Android phone’s files through File Explorer.
- This makes it easy to transfer files back and forth without cables.
- Make sure your phone and PC meet the requirements before trying it.
- Follow the steps above to turn this feature on or off whenever you want.
- Learn more from the official Microsoft announcement: Microsoft Windows Insider Blog
How to access Android phone files on 🪟 Windows 11?
With a USB cable, connect your device to your computer. On your device, tap the "Charging this device via USB" notification. Under "Use USB for," select File Transfer. A file transfer window will open on your computer.
Can you access Android files on PC?
With Link to Windows, you can seamlessly access and manage your Android mobile device's files on your PC through File Explorer, once you paired your mobile device with your PC in the Settings.
Want to see and manage files on your Android phone right from your Windows 11 PC? This guide will show you how to do that easily using built-in Windows features.
Windows Mobile devices (sometimes called Phone Link) lets you connect your phone to your PC wirelessly. Why would you want this? Because you can move files, send texts, and get notifications without picking up your phone.
When you turn on “Allow this PC to access your mobile devices”, something great happens. You can browse your Android phone’s files right inside File Explorer on your PC. You can open, copy, move, rename, or delete files just like they were on your computer.
Open Windows Settings, go to Bluetooth & Devices, then Mobile devices. Click Manage devices and toggle “Access in File Explorer” to On. Your Android phone will then appear in File Explorer for easy file management.
What You Need Before You Start
To access Android files on Windows 11, you’ll need a few things ready. Your Android phone must be running Android 11 or newer, and you need the Link to Windows app installed. Your Windows 11 PC also needs to meet certain requirements, like being part of the Windows Insider Program.- Your Android phone must be running Android 11 or newer.
- You need to have the Link to Windows app (Beta version 1.24071 or higher) installed on your phone.
- Your PC must be running Windows 11 and be part of the Windows Insider Program. Also, your PC should be signed up for one of the Insider Channels.
How to Turn On Android Phone Access in File Explorer
Turning on access to your Android phone files in Windows 11 File Explorer is simple. You just need to open Windows Settings, go to Bluetooth & Devices, and then click on Mobile devices to get started.
- Open Windows Settings: Click the Start menu button and select Settings, or press Windows key + I on your keyboard.
- Go to Bluetooth & Devices: In the Settings window, click Bluetooth & devices on the left side.
Windows 11 Bluetooth & devices settings - Open Mobile Devices: On the right side, click the Mobile devices tile to open more options.
Windows 11 Mobile devices tile - Manage Mobile Devices: Click the Manage devices button.
Manage devices button in Settings - Enable Access in File Explorer: In the window that pops up, find the “Access in File Explorer” tile and toggle it to On to enable or Off to disable.
Access in File Explorer toggle switch
Once enabled, open File Explorer on your PC, and you should see your Android phone listed under Mobile devices. Click it to browse your phone’s files just like you do with your computer files!
Summary
Windows 11 makes it easy to access Android files on Windows 11 wirelessly through File Explorer, so you can move files between your phone and PC without needing any cables.- Windows 11 lets you wirelessly access your Android phone’s files through File Explorer.
- This makes it easy to transfer files back and forth without cables.
- Make sure your phone and PC meet the requirements before trying it.
- Follow the steps above to turn this feature on or off whenever you want.
- Learn more from the official Microsoft announcement: Microsoft Windows Insider Blog
How to access Android phone files on 🪟 Windows 11?
With a USB cable, connect your device to your computer. On your device, tap the "Charging this device via USB" notification. Under "Use USB for," select File Transfer. A file transfer window will open on your computer.
Can you access Android files on PC?
With Link to Windows, you can seamlessly access and manage your Android mobile device's files on your PC through File Explorer, once you paired your mobile device with your PC in the Settings.
Was this guide helpful?

About the Author
Richard
Tech Writer, IT Professional
Richard, a writer for Geek Rewind, is a tech enthusiast who loves breaking down complex IT topics into simple, easy-to-understand ideas. With years of hands-on experience in system administration and enterprise IT operations, he’s developed a knack for offering practical tips and solutions. Richard aims to make technology more accessible and actionable. He's deeply committed to the Geek Rewind community, always ready to answer questions and engage in discussions.

No comments yet — be the first to share your thoughts!