Stop Unwanted Emails from Signing In to Your Microsoft Account

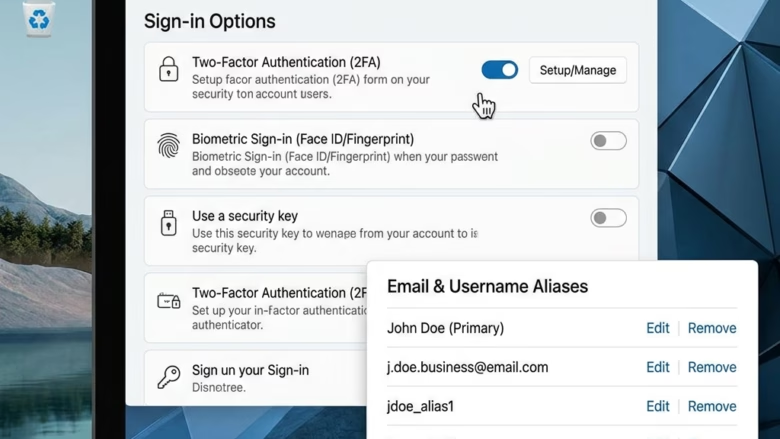
Extra email addresses and phone numbers attached to one Microsoft account are called aliases. Each alias can be used as a sign-in name. If an old or unrecognized alias, such as Outlook_1234ABC@outlook.com, is still allowed to sign in, it gives someone one more way to try to get into your account. Turning off sign-in for the aliases you don’t use closes those extra doors and protects your personal information from hackers.
This is a setting on your Microsoft account, not on your PC. It works the same on Windows 11 Home and Pro, and you can do it from any device with a browser. No restart is needed.
Microsoft account aliases are extra email addresses and phone numbers attached to one account that can be used to sign in. To stop unwanted aliases from signing in, go to account.microsoft.com, sign in, click Your info, then Sign-in preferences, and uncheck or turn off the switch next to any alias you don’t want to use for logging in.
How to Stop Unwanted Emails from Signing In
You manage sign-in aliases on Microsoft’s website, in a web browser. There you choose which email addresses and phone numbers are allowed to log in to your Microsoft profile. Before you start, make sure you can still reach your usual verification method (your phone or authenticator app), because Microsoft may ask you to confirm it.
Step 1Sign In to Your Microsoft Account
First, sign in to your Microsoft account so you can change which aliases can log in.
- Open your web browser, such as Edge, Chrome, or Firefox.
- Go to account.microsoft.com. You should see the Microsoft sign-in page.
- Type the email address or phone number for your Microsoft account and click Next. The page should now ask for your password.
- Enter your password and click Sign in. If Microsoft asks you to confirm your identity, complete that step. You should then land on your account dashboard.
Two-factor authentication (2FA) is a security process that asks you to prove who you are in two different ways. It might be your password plus a code from an authentication app, a text message, or a security key. If you haven’t turned it on, do it. A stolen password alone then won’t be enough to get into your account.
account.microsoft.com).Phishing sites are built to look like the real page and steal your credentials. If the address looks wrong, close the tab.
Step 2Go to Sign-In Preferences
Next, find the sign-in preferences page, which controls how each alias can access your profile.
- After you sign in, look at the menu at the top or down the left side of the page.
- Click Your info. This page shows your account details.
- In the Your info section, find and click Sign-in preferences. The page with your list of sign-in names should open.
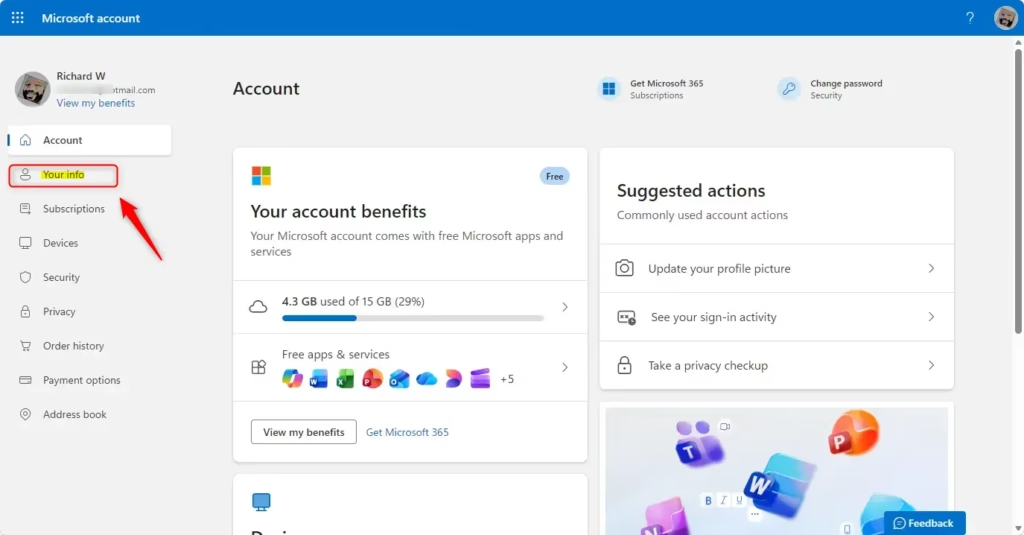
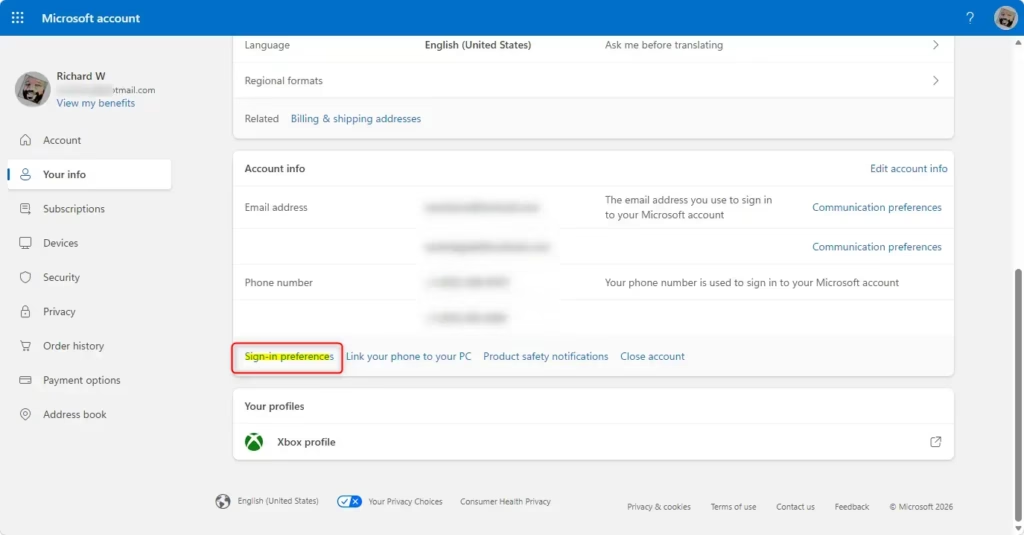
Tip: Microsoft changes its page layouts often, so your screen may not match this guide exactly. If you can't find Your info, look for labels such as Account security, Personal info, or Manage how you sign in. The last one is usually the page you want.
Step 3Choose Which Aliases Can Sign In
Now decide which aliases may sign in. The page lists every email address and phone number tied to your account.
- On the Sign-in preferences page, find the list of your aliases.
- Look next to each alias. You will probably see a checkbox or a switch.
- Uncheck the box, or turn the switch off, for any alias you do not want to use for logging in.
- Leave the box checked, or the switch on, for the aliases you do want to use for signing in.
If a box is greyed out, you usually can't change that alias. This often applies to your primary alias, which has to stay available for sign-in. If you want to block it, you would first have to make a different alias your primary one, if the page offers that option.
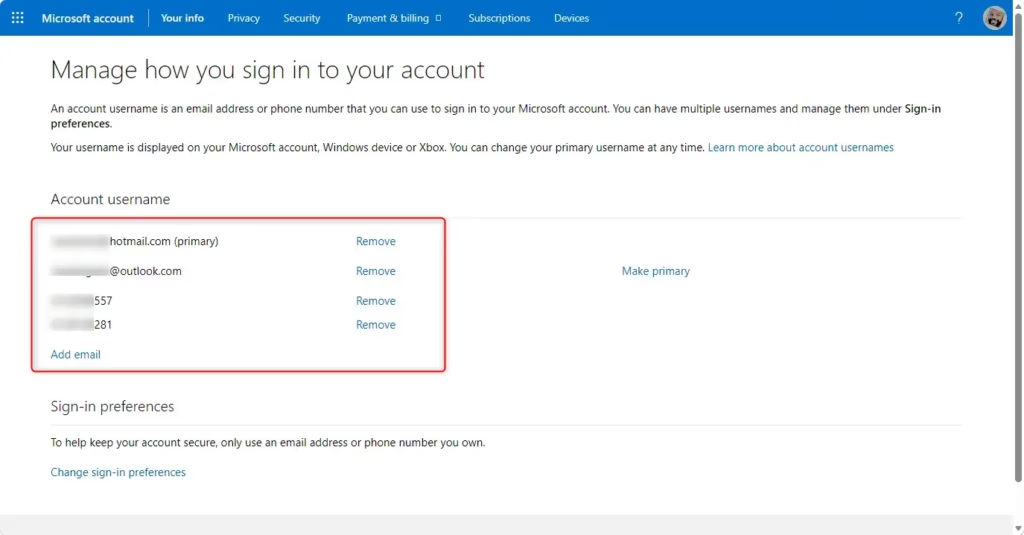
Keep your primary email address active. It's also worth leaving one trusted secondary alias turned on as a backup, so a problem with one address doesn't lock you out.
Turning off sign-in for an alias does not remove it from your account. The address stays attached, and mail sent to it still reaches your inbox. Only the ability to log in with that address is switched off. You can reverse this at any time by coming back to this page and turning the alias on again.
Step 4Save Your Changes
Save your changes so the new sign-in rules take effect.
- Scroll to the bottom of the Sign-in preferences page and look for a button labeled Save or Apply. Some versions of the page apply a change as soon as you flip the switch. If you see no button, check that the setting stuck by refreshing the page.
- Click Save. You should see a confirmation, or the page should show your updated settings.
Alias settings update right after you save. From then on, if someone tries to sign in with a blocked alias, they get an error saying the username is turned off or not recognized. If you use a blocked alias on a device, such as a PC where you sign in with a Microsoft account, you may need to sign in again with an alias that is still allowed.
If none can sign in, getting back into your account becomes very hard. Always leave at least one active sign-in alias.
What Happens After You Block an Alias?
Blocking an alias stops that email address or phone number from being used to log in, but you can still receive messages sent to it. Mail sent to a blocked address keeps arriving in your primary inbox as normal. The difference is that no one can use that old address to try to break into your account.
This makes blocking a good fit for temporary or old aliases. It ends login attempts through them without losing any mail sent to that address.
Trouble and More Help
If you get stuck while managing your aliases, Microsoft offers a few ways to get help.
- Sign-in Helper Tool: This tool checks for common sign-in problems and helps fix many of them. You can usually find a link to it on Microsoft's sign-in pages when you have trouble logging in.
- Contact Microsoft Support: If the tools don't solve it, contact Microsoft's official support for technical help. Most Microsoft help pages have a Contact Support link.
A Very Important Warning from Microsoft Support: Support agents are not allowed to send you a manual password reset link or change your account credentials for you. Microsoft's security rules mean that if you are locked out, you have to use the automated recovery tools. Keep your recovery details up to date before you need them.
Conclusion: Take Control of Your Microsoft Account Security
Managing which aliases can sign in is a quick job and an important layer of protection for your private data. Review the list now and then, and turn off any address you no longer use.
Reference: Block an email address from signing in - Microsoft Support
Was this guide helpful?

About the Author
Richard
Tech Writer, IT Professional
Richard is a writer at Geek Rewind who turns complex IT tasks into clear, step-by-step guides. He draws on years of hands-on experience in system administration and enterprise IT operations, focusing on Windows, Linux and WordPress: the problems people actually run into, and the fixes that work. His server and WordPress guides come from systems he runs himself. Richard builds and maintains the platform behind Geek Rewind, from its Ubuntu servers and Nginx configuration to its custom WordPress plugins. Many new tutorials start with readers' questions, and he's always glad to answer them in the comments.



No comments yet — be the first to share your thoughts!