Set a Machine Inactivity Limit in Windows 11 Local Security Policy

The machine inactivity limit locks a Windows 11 PC after a set number of seconds with no keyboard or mouse input. It is a single setting, and it affects every account on the PC.
You can set it in Local Security Policy, a tool that holds security rules for the whole computer. Look for the Interactive logon: Machine inactivity limit policy. This option is only in Windows 11 Pro, Enterprise and Education, and you need an administrator account to change it.
When the timer runs out, Windows shows the lock screen. Your open apps and unsaved work stay right where they are, and nobody is signed out. Below, you can find the policy, pick a time limit, and turn the change off again if you need to.
To set a machine inactivity limit in Windows 11, open Local Security Policy (run secpol.msc as an administrator), go to Local Policies Security Options, and double-click Interactive logon: Machine inactivity limit. Enter the time in seconds, not minutes, then select OK. Windows 11 Pro, Enterprise and Education include this policy; Windows 11 Home does not.
What the machine inactivity limit does
The policy takes a number of seconds. If nobody touches the keyboard, mouse or touchscreen for that long, Windows locks the session. Whoever comes back must sign in again with a password, PIN or other sign-in method.
It works separately from screen savers and power settings. A PC set to never turn off its display still locks when the limit is reached. A PC that turns its display off after two minutes still waits for the machine inactivity limit before it shows the lock screen. Something else can lock it sooner.
The policy is a security control more than a convenience feature. Shared offices, reception desks, labs and kiosk PCs are the usual places to use it. A user who walks away without pressing Win+L leaves the session open. This setting closes that gap.
Before you start
Check your 🪟 Windows 11 edition
Local Security Policy is not included in Windows 11 Home. To check your edition, open Settings System About and read the Edition line under Windows specifications. If it says Home, go to the section on Windows 11 Home further down.
Use an administrator account
Every step that opens or changes Local Security Policy needs administrator rights. If you are signed in with a standard account, Windows asks for administrator credentials when you open the console. If you do not have those credentials, ask your IT team.
Check whether the PC is managed
If the PC belongs to a work or school domain (a central network that sets rules for many PCs), or is managed by your organisation, a policy from the domain or a management tool can override what you set locally. Your change may appear to work and then disappear at the next policy refresh. If you manage a fleet of PCs, set the value in the central policy instead of on each machine.
Set the machine inactivity limit in Local Security Policy
Open Local Security Policy
Local Security Policy opens as a separate console window. There are two reliable ways to open it. Use whichever you prefer.
- Press Windows key + R to open the Run dialog.

Run dialog - Type
secpol.mscand press Enter. (Administrator required.) If User Account Control appears, select Yes. The Local Security Policy window opens.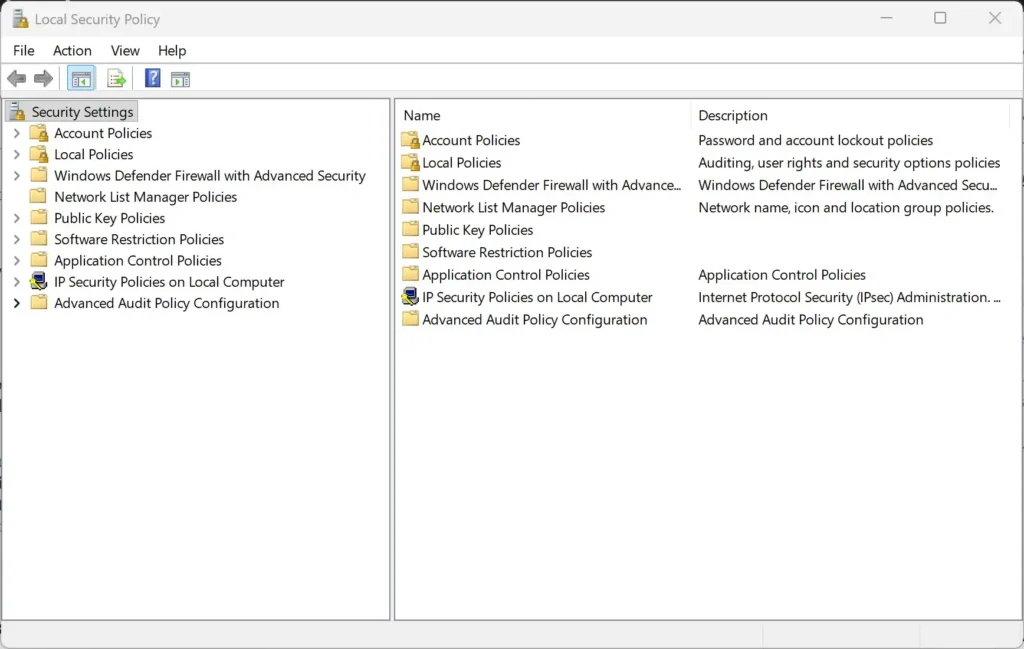
You can also select Start, type Local Security Policy, and open the result. If it does not appear in the search results, your edition is probably Windows 11 Home. If you typed secpol.msc and Windows says it cannot find the file, the same applies.
Find the policy
The policy sits among the other sign-in rules in the Security Options list. This list is long, so the steps below show how to get to the right entry quickly.
- In the left pane, expand Local Policies by selecting the arrow next to it.
- Select Security Options. The right pane fills with a long list of policies, sorted alphabetically.
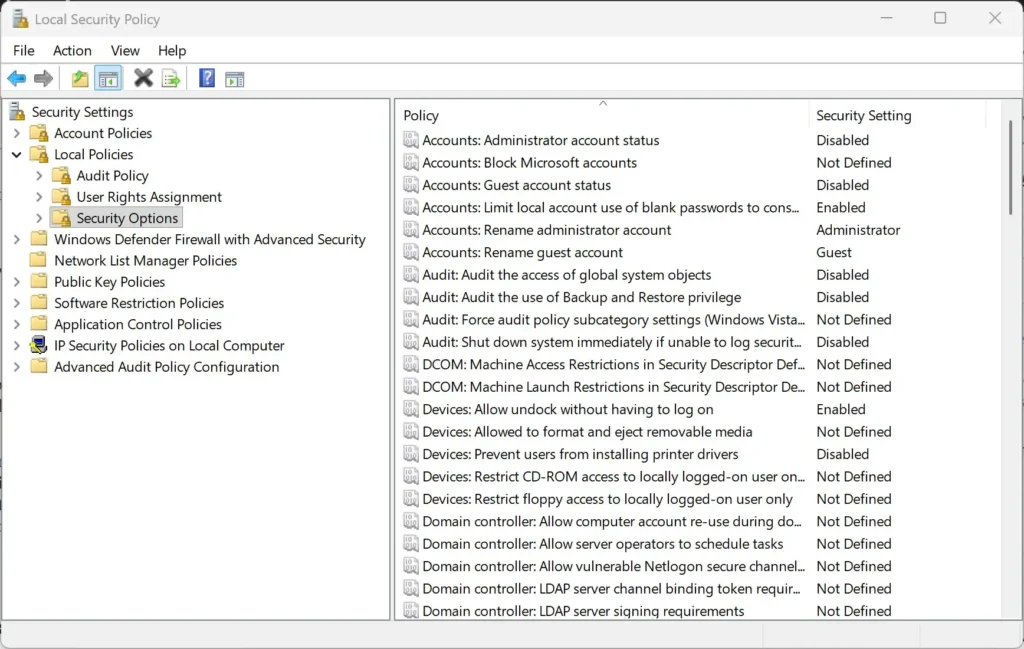
- Scroll down to the entries that start with Interactive logon:. You can also select any policy in the list and type I a few times to jump through the entries that begin with that letter.
- Double-click Interactive logon: Machine inactivity limit. A Properties dialog opens with a box for a number and the label seconds.
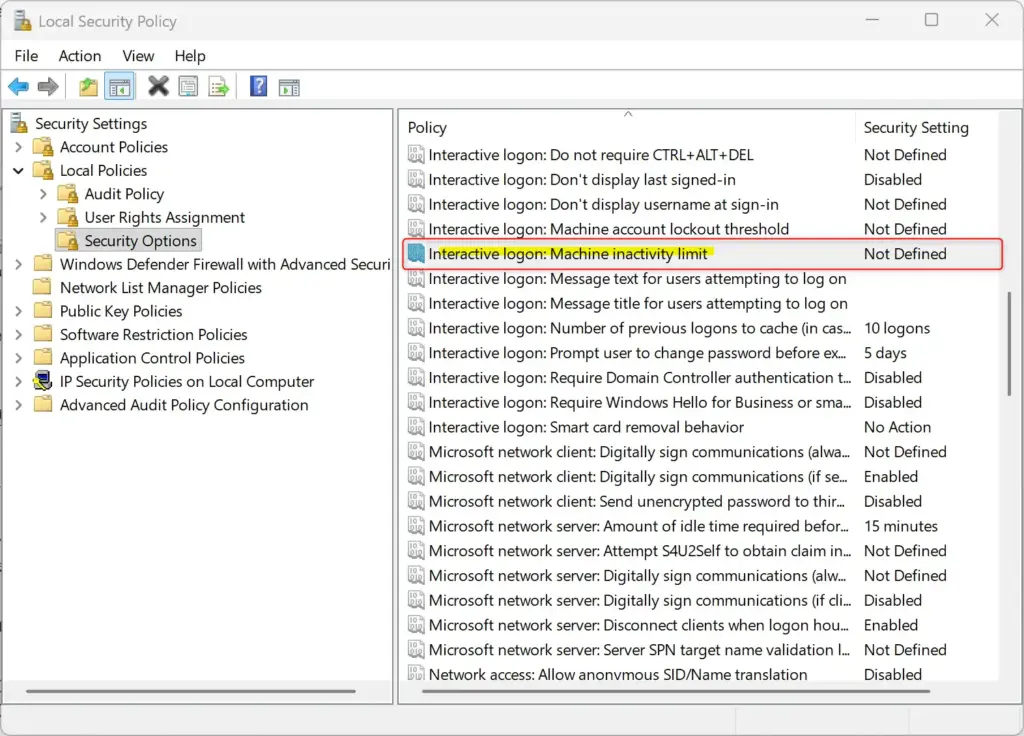
Setting machine inactivity lock time in Windows security policy.
Enter the limit and apply it
The value is in seconds, not minutes. Watch the units: typing 10 gives a ten-second lock, not a ten-minute one.
- Select the Local Security Setting tab if it is not already showing.
- Enter the number of seconds in the box. For example, enter
600for a ten-minute limit. The table below lists common values. - Select Apply, then select OK. The dialog closes, and the Security Setting column for the policy now shows your value, for example 600 seconds.
If the dialog rejects your number, it is outside the range the policy accepts. Enter a smaller value. Entering 0 means the limit is off.
Choose a sensible value
Pick a value that locks the PC soon enough to protect it but does not interrupt people who are reading or on a call. Fifteen minutes is a common baseline in office environments. Shared or public-facing PCs usually use less.
| Lock after | Enter this value (seconds) |
|---|---|
| 1 minute | 60 |
| 5 minutes | 300 |
| 10 minutes | 600 |
| 15 minutes | 900 |
| 30 minutes | 1800 |
| 1 hour | 3600 |
Avoid very short values on a PC that people use for presentations or reading long documents. Someone watching a presentation without touching the mouse will be locked out mid-slide.
Apply and test the change
Refresh the policy
Local policies normally apply on their own within a short time. To apply the change now, refresh the policy by hand.
- Select Start, type
cmd, right-click Command Prompt, and select Run as administrator. (Administrator required.) - Type
gpupdate /forceand press Enter. Windows prints a message that the computer policy update completed successfully.
If you would rather not use the command line, restart the PC. A restart applies the policy for certain.
Test it with a short limit
Do not wait fifteen minutes to find out whether it works. Test with a short value first, then change it to the real one.
- Set the policy to
60using the steps above, then select Apply and OK. - Run
gpupdate /forceagain, or restart the PC. - Sign in, leave the keyboard and mouse alone, and wait a little over a minute. The lock screen appears.
- Sign in again, then open the policy and change the value to the one you want to keep.
If the PC does not lock, see the troubleshooting section below.
What to do when the policy is missing or does not work
Local Security Policy is not on the PC (🪟 Windows 11 Home)
Windows 11 Home does not include secpol.msc or the Local Group Policy Editor. You have two options:
- Upgrade to Windows 11 Pro through Settings System Activation This is a paid upgrade.
- Set the same limit through the registry. [Registry method: to be verified]
Do not copy a path from a forum post without confirming it against Microsoft's documentation. A wrong registry entry does nothing at best, and at worst it changes an unrelated setting.
The PC does not lock after the limit
Work through these checks in order.
- Confirm the value is in seconds. A value of
10locks after ten seconds, and a value of0turns the limit off. - Confirm you selected Apply or OK in the policy dialog. Closing the window with the X discards your change.
- Run
gpupdate /forcefrom an elevated Command Prompt, or restart the PC. - Check for a domain or management policy. If the PC is managed, a central policy can replace your local value. Ask whoever manages the PC.
- Check that something is not creating activity. Software that moves the mouse or simulates keystrokes, such as a "keep awake" utility, resets the inactivity timer.
The value reverts after a while
A value that keeps going back to its old setting almost always comes from a domain Group Policy (a rule set centrally by an administrator) or a device management tool. Local changes cannot beat those. The fix has to be made where the policy is set centrally.
Use the Local Group Policy Editor instead
The same policy appears in the Local Group Policy Editor on Pro, Enterprise and Education. Local Security Policy is a smaller view of the same settings, so changing it in either tool has the same effect.
- Press Windows key + R, type
gpedit.msc, and press Enter. (Administrator required.) - Go to Computer Configuration Windows Settings Security Settings Local Policies Security Options
- Double-click Interactive logon: Machine inactivity limit, enter the seconds, and select OK.
Use one tool or the other for a given PC to avoid confusion about where a value was set.
How this differs from other lock settings
Windows 11 has several settings that look similar. They do different jobs, and changing one does not change the others.
- Machine inactivity limit. Locks the session after no input for a set time. It is a security policy that applies to all users.
- Screen saver with the sign-in screen on resume. Locks only when the screen saver starts and is set per user.
- Screen and sleep timeouts. These turn off the display or put the PC to sleep. They are power settings, and whether the PC asks for a sign-in afterwards is controlled separately.
- Dynamic lock. Locks the PC when a paired phone moves out of Bluetooth range. It is a different mechanism and is also set per user.
For a PC that must lock reliably, the machine inactivity limit is the strongest of these because a user cannot switch it off from their own settings.
Undo the change
To remove the limit, set it back to zero. This turns it off and returns the PC to its earlier behaviour.
- Open Local Security Policy by running
secpol.msc. (Administrator required.) - Go to Security Settings Local Policies Security Options
- Double-click Interactive logon: Machine inactivity limit.
- Enter
0in the box, then select Apply and OK. - Run
gpupdate /forcefrom an elevated Command Prompt, or restart the PC.
The PC no longer locks on its own after a period of inactivity. Users can still lock it by hand with Windows key + L.
What to do next
If the PC locks too often or not often enough, change the number of seconds and test again. The new value applies after the next policy refresh. If the value keeps reverting, check with whoever manages the PC's Group Policy, because a central policy overrides the local one. On a Windows 11 Home PC, the registry route stays unavailable here until its path is verified, so upgrading to Pro is the dependable option.
Have a question about this guide?
Answered by AI from this guide. Good questions may be added to this page — please don't include personal details.
Did this guide fix your problem?

About the Author
Richard
Tech Writer, IT Professional
Richard is a writer at Geek Rewind who turns complex IT tasks into clear, step-by-step guides. He draws on years of hands-on experience in system administration and enterprise IT operations, focusing on Windows, Linux and WordPress: the problems people actually run into, and the fixes that work. His server and WordPress guides come from systems he runs himself. Richard builds and maintains the platform behind Geek Rewind, from its Ubuntu servers and Nginx configuration to its custom WordPress plugins. Many new tutorials start with readers' questions, and he's always glad to answer them in the comments.
No comments yet — be the first to share your thoughts!