Install WSL on Windows 11 from the Command Line

WSL (Windows Subsystem for Linux) runs a real Linux system inside Windows 11. You can install it with one command, wsl --install, typed into a terminal that has administrator rights.
That single command turns on the Windows features WSL needs, installs its parts, and downloads Ubuntu, a popular version of Linux. You restart your PC once to finish. The whole process takes a few minutes, depending on your internet speed.
This works on every edition of Windows 11, including Home. It does not need Hyper-V, a Windows feature that Home edition lacks, so you do not need to upgrade to Pro.
To install WSL on Windows 11 from the command line, open Terminal as administrator and run wsl –install. The command enables the required Windows features, installs WSL, sets WSL 2 as the default and downloads Ubuntu. Restart the PC once to finish. The command is wsl –install, not wslc install, which is not a valid command.
Which command to use (not wslc install)
The install command is wsl --install, run through wsl.exe. If you searched for “wslc install” or typed it into a terminal and got an error that the term is not recognized, that is why. I could not confirm a separate command named wslc for installing WSL, so nothing in this guide uses one.
Before you start
What you need
- Turn the requirements into a bulleted list, starting with: – A PC running Windows 11, any edition. – Hardware virtualization turned on in the firmware. – An internet connection. – Administrator rights on the PC.
- Hardware virtualization turned on in the firmware (the low-level settings your PC stores, which you open through BIOS or UEFI). WSL 2, the default version, runs Linux in a lightweight virtual machine, so it needs this.
- An internet connection. The distribution (a version of Linux, such as Ubuntu) downloads during install.
- Administrator rights on the PC. The install turns on Windows features, and that requires elevation.
Check that virtualization is on
This check takes under a minute and avoids the most common install failure. Most PCs from the last several years ship with virtualization on, but some do not.
- Press Ctrl+Shift+Esc to open Task Manager .
- Select the Performance tab. If you see only a short list of processes, select More details first.
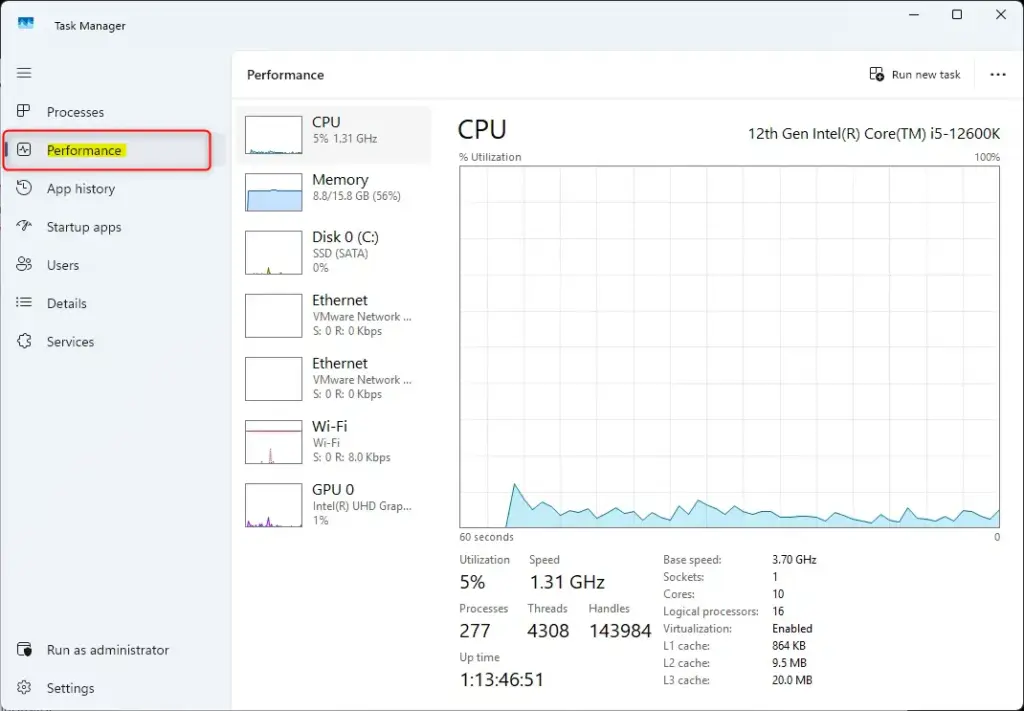
Performance tab selected in Windows 11 Task Manager. - Select CPU.
- Find Virtualization in the lower-right block of details. You want to see Enabled.
If it says Disabled, restart the PC, open the firmware settings and turn on the virtualization option. The name and location vary by manufacturer. Look for labels such as Intel Virtualization Technology, VT-x, SVM Mode or AMD-V. The exact key to open firmware settings also varies, so check your PC maker’s documentation.
If you run Windows 11 inside a virtual machine, the host must pass virtualization through to it (nested virtualization). That setting lives in the virtualization software that runs the virtual machine (the hypervisor), not in Windows.
Install WSL with the wsl --install command
This section requires administrator privileges. A standard terminal fails at the feature-install stage.
Open an administrator terminal
Open a window with administrator rights, which Windows calls an elevated window. Windows Terminal with PowerShell works, and so does Command Prompt.
- Select Start and type Terminal.
- Right-click Terminal in the results and select Run as administrator.
- Select Yes when User Account Control asks whether to allow the app to make changes. If you sign in with a standard account, enter an administrator's credentials instead.
A terminal window opens. The title bar or tab shows Administrator. If it does not, close the window and repeat the steps.
Run the install command
This single command does all the work. It enables the Windows Subsystem for Linux and Virtual Machine Platform features (the second is the Windows component that lets lightweight virtual machines run), installs the WSL package, sets WSL 2 as the default version and downloads Ubuntu.
- Type the following and press Enter:Code
wsl --install - Wait while the progress lines run. You see entries for the Windows Subsystem for Linux and for Ubuntu, each with a percentage. The download takes anywhere from a minute to several minutes, depending on your connection.
- Read the final message. It says the operation succeeded and that the changes do not take effect until you restart.
- Save your work, then restart the PC. Select Start Power Restart.
You must restart. Until you do, the WSL features are not active and Ubuntu cannot start.
If you see a help screen instead of an install
On a PC where WSL is already partly or fully present, wsl --install can print a list of options instead of installing anything. The list starts with a line about usage. In that case, install a distribution by name with the command in the next section.
Choose a different Linux distribution
Ubuntu is the default, but you can install another one. Do this before or after the main install. It also works if you want a second distribution next to Ubuntu.
- Open an administrator terminal as described above.
- List the distributions available to install:Code
wsl --list --onlineYou see a table with a NAME column and a FRIENDLY NAME column. The list changes over time, so use what appears on your screen.
- Install one by typing its value from the NAME column after
-d. For example, for Debian:Codewsl --install -d Debian - Wait for the download to finish. If WSL was already installed and working, the distribution may start without a restart. If it was not, restart when the message tells you to.
Use the name exactly as listed. A wrong name returns an error saying the distribution name is invalid, and the list command shows the correct one.
Finish the first-time setup
After the restart, the distribution finishes installing and asks you to create a Linux user. This account is separate from your Windows account.
- Sign in to Windows. A terminal window for Ubuntu opens on its own and says it is installing. If it does not, select Start, type Ubuntu and open it.
- Wait for the prompt Enter new UNIX username:. This takes a few minutes the first time.
- Type a username and press Enter. It does not have to match your Windows username.
- Type a password at the New password: prompt and press Enter. Nothing appears on screen as you type. That is normal, not a frozen window.
- Retype the password at the confirmation prompt and press Enter.
You now see a Linux shell prompt that shows your new username and the PC name. Write the password down somewhere safe. You need it whenever a command uses sudo (a command prefix that runs something with administrator rights inside Linux).
Update the Linux packages
The Ubuntu image is a snapshot, so update it once before you install anything else. These commands apply to Ubuntu and Debian.
- In the Ubuntu window, type:Bash / Shell
sudo apt update && sudo apt upgrade - Enter your Linux password when asked.
- Type Y and press Enter if the upgrade asks you to confirm.
Check that the install worked
Run these from any terminal, elevated or not. They confirm that WSL is installed and that your distribution runs under WSL 2.
- Show the installed distributions and their versions:Code
wsl --list --verboseYou see a table with the columns NAME, STATE and VERSION. Ubuntu should show 2 under VERSION.
- Show the WSL package details:Code
wsl --versionThe output lists the WSL version, the kernel version and the Windows version.
You can also browse the Linux files from File Explorer. Type \\wsl.localhost\Ubuntu in the address bar if your distribution is Ubuntu. Replace Ubuntu with your distribution's name if you chose another one.
Fix common install problems
Error 0x80370102 or a message about virtualization
You see an error mentioning that the virtual machine could not be started, with code 0x80370102, or text saying virtualization is not enabled. Virtualization is off in the firmware. Go back to the Task Manager check, turn the option on in your firmware settings and run the command again. In a virtual machine, turn on nested virtualization in the host.
The download stalls or fails
By default the installer gets its files through the Microsoft Store service. If that is blocked on your network, or the Store is disabled by policy, the download can time out or fail. Try downloading directly instead:
- Open an administrator terminal.
- Type:Code
wsl --install --web-download - Press Enter and wait for the download to finish.
If that still fails, the network is probably blocking the download. Ask whoever manages the network, or try a different connection.
The command is not recognized
A message that wsl is not recognized means the PC is not running a current Windows 11 build, or the terminal opened in an unusual state. Run Windows Update first: Settings Windows Update > Check for updates. Install what it finds, restart and try again.
The Ubuntu window closes straight after opening
You may have skipped the restart. Restart the PC, then open Ubuntu again from the Start menu. If it still closes, run wsl --list --verbose in a terminal and check the STATE column for clues.
Install WSL without a distribution
You can install the WSL components and pick the distribution later. This suits a PC you are preparing for someone else, or one where you plan to import your own image.
- Open an administrator terminal.
- Type:Code
wsl --install --no-distribution - Press Enter and restart if the message tells you to.
- Install a distribution later with
wsl --install -dfollowed by its name fromwsl --list --online.
Update WSL
WSL ships as a package that updates separately from Windows. Update it when something behaves oddly or when a guide asks for a newer version.
- Open a terminal. An administrator terminal is the safer choice.
- Type:Code
wsl --update - Press Enter. The command downloads a newer package if one exists, or tells you that you already have the latest.
- Apply the update by shutting down all running distributions:Code
wsl --shutdownThe next time you open a distribution, it starts on the updated package.
Remove a distribution or WSL
You can reverse the install in stages. Each stage removes more.
Remove one distribution
This deletes everything inside that distribution, including your Linux files, and you cannot undo it. Copy anything you want to keep to a Windows folder first.
- Open a terminal.
- Type this, replacing
Ubuntuwith the name shown bywsl --list:Codewsl --unregister Ubuntu - Press Enter. The distribution disappears from the list.
- Optionally, open Settings Apps Installed apps, find the distribution (for example Ubuntu), select the More button (three dots) and select Uninstall. This removes the launcher entry.
Turn off the WSL Windows features
This section requires administrator privileges. Unregister your distributions first if you want their data gone. Turning the features off does not delete the files, but you can no longer reach them.
- Select Start, type Turn Windows features on or off and open it.
- Clear the check boxes for Windows Subsystem for Linux and Virtual Machine Platform. Leave Virtual Machine Platform checked if other software on the PC uses it, such as the Windows Sandbox or some Android emulators.
- Select OK.
- Select Restart now when Windows finishes applying the changes.
To reinstall later, run wsl --install again from an administrator terminal.
What to do next
Open your new Ubuntu window and install the tools you need with sudo apt install, such as git or python3. If you plan to code in Windows and run the project in Linux, install Visual Studio Code and its WSL extension so you can open Linux folders directly. A feature update to Windows can sometimes leave WSL needing wsl --update, so run it if your distribution stops starting after a major update.
How do I install WSL2 on 🪟 Windows 11?
Open Windows Terminal as administrator, then run wsl --install. That command turns on the needed Windows features, installs WSL, and downloads Ubuntu. WSL2 is the default version, so you get it automatically. Restart your PC when the install finishes, then finish Ubuntu's setup with a username and password.
Is WSL as fast as Linux?
WSL runs a real Linux kernel, so most command-line and development tasks run at close to native speed. Work that crosses between Windows and Linux files is slower, because data moves between the two systems. Keep project files inside the Linux file system for better speed. Heavy graphics and hardware-specific tasks may still behave differently.
Is WSL free to use?
Yes. WSL is free and comes built into Windows 11, so you pay nothing to turn it on. Ubuntu and most other Linux versions you install through WSL are also free. You only pay if you choose a paid app or service that you run inside Linux.
How to activate the WSL?
WSL has no activation step or key. You turn it on by installing it. Open Windows Terminal as administrator, run wsl --install, and restart your PC. If WSL is installed but not working, run wsl --update in the same terminal. Then restart your PC.
Was this guide helpful?

About the Author
Richard
Tech Writer, IT Professional
Richard is a writer at Geek Rewind who turns complex IT tasks into clear, step-by-step guides. He draws on years of hands-on experience in system administration and enterprise IT operations, focusing on Windows, Linux and WordPress: the problems people actually run into, and the fixes that work. His server and WordPress guides come from systems he runs himself. Richard builds and maintains the platform behind Geek Rewind, from its Ubuntu servers and Nginx configuration to its custom WordPress plugins. Many new tutorials start with readers' questions, and he's always glad to answer them in the comments.

No comments yet — be the first to share your thoughts!