How to Repair or Reset WSL Ubuntu on Windows 11
Repairing or resetting WSL Ubuntu on Windows 11 fixes problems when your Linux environment isn’t working right. WSL stands for Windows Subsystem for Linux, which lets you run Linux programs directly on your Windows 11 computer.
When your Ubuntu on WSL becomes unresponsive or corrupted, you have two main ways to fix it through Windows Settings. Repairing keeps your Linux apps and files intact.
Resetting, on the other hand, puts Ubuntu back to its original, factory default state, meaning it will erase all your data and installed programs within that Linux environment. Most users can repair their WSL Ubuntu in about 5 minutes using Windows 11’s built-in tools.
Repair your WSL Ubuntu by navigating to Settings > Apps > Installed apps, clicking the three dots next to Ubuntu, selecting Advanced options, and clicking Repair. Reset Ubuntu using the same path but click Reset instead, which will delete all your Ubuntu data for a fresh start.
How to Repair WSL Ubuntu
Repairing your WSL Ubuntu is the best way to fix common problems and get it working right again without losing any of your files or data. This process puts Ubuntu back into its normal working state, so you won’t lose any of your installed programs or the work you’ve done.
What happens? Ubuntu will work normally again without you losing any of your work.
Follow these simple steps:
- Open the Settings app. Click the Start menu and choose Settings, or press Windows key + I on your keyboard.
- In Settings, click Apps on the left side.
- Click on Installed apps on the right.
- Scroll down and find the Ubuntu app in the list.
- Click the three dots next to Ubuntu, then select Advanced options.
- On the new page, scroll down and click the Repair button.
- Wait a little while for Windows to fix the app. When done, try opening Ubuntu again.

The Repair button fixes Ubuntu without losing your data.
How to Reset WSL Ubuntu
Resetting your WSL Ubuntu gives you a completely fresh start if the repair options didn’t fix your issues, but be aware it will delete all your files and settings inside Ubuntu. You’ll lose all your data and configurations within the Linux environment, so only do this if you have backups or don’t need the existing data anymore.
What happens? This will delete all your files and settings inside Ubuntu. Only do this if you have backups or don’t mind losing your data.
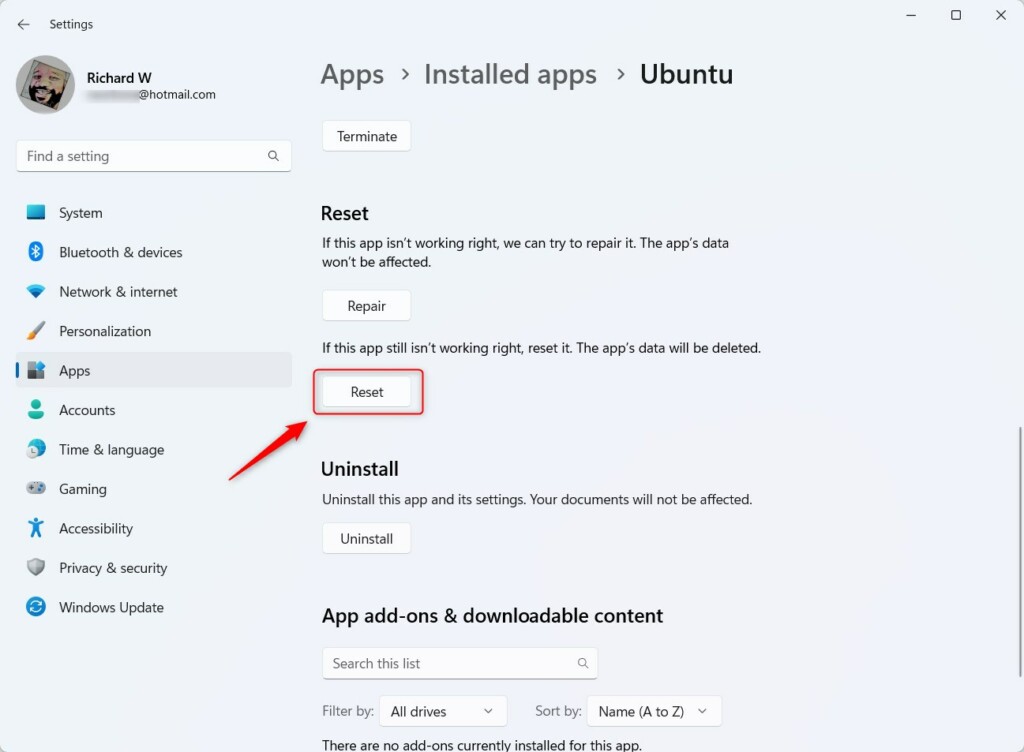
Reset deletes all data and gives you a fresh Ubuntu installation.
Ubuntu's reset process will complete, and then users can open Ubuntu again to check if the Ubuntu operating system functions better.
Alternative: Reset WSL Ubuntu Using Windows Terminal
You can reset your WSL Ubuntu using the Windows Terminal app, which is a handy alternative if you prefer using commands. You’ll need to run Windows Terminal with administrator rights to do this, giving you direct control over resetting your Linux environment from the command line.
- [REQUIRES ADMIN PRIVILEGES] Open Windows Terminal as admin:
- Click the Start menu and type Windows Terminal.
- Right-click it and choose Run as administrator.
- In the terminal window, type this command and press Enter to see all installed WSL Linux distributions:
wsl --list - To reset Ubuntu, type this command and press Enter:
wsl --unregister Ubuntu - This will remove Ubuntu from WSL, and you can reinstall it fresh from the Microsoft Store.
Summary
You can fix WSL Ubuntu on Windows 11 by either repairing it to restore settings while keeping files, or resetting it for a clean start that deletes all data.Was this guide helpful?
0% of readers found this helpful (1 votes)

About the Author
Richard
Tech Writer, IT Professional
Richard, a writer for Geek Rewind, is a tech enthusiast who loves breaking down complex IT topics into simple, easy-to-understand ideas. With years of hands-on experience in system administration and enterprise IT operations, he’s developed a knack for offering practical tips and solutions. Richard aims to make technology more accessible and actionable. He's deeply committed to the Geek Rewind community, always ready to answer questions and engage in discussions.


No comments yet — be the first to share your thoughts!