
This article explains how to turn Out of Office (OoO) automatic replies on or off in the new Outlook app in Windows 11.
The new Outlook for Windows brings the latest features and a modern and simplified design with support for Exchange-backed Microsoft 365 work or school, Outlook.com, Hotmail, and Gmail accounts.
The app has many features, including support for email signatures, external email accounts, and setting out-of-office automatic replies.
An out-of-office autoreply is an automatic email response sent to anyone who emails you while you are away from your desk or out of the office. It lets people know you are unavailable and provides information about when you will return.
You can customize the message to include details such as the reason for your absence, emergency contact information, or instructions on who to contact.
This feature is useful for maintaining professional communication while you are out of the office and can help avoid misunderstandings or delays in response time.
Set up out-of-office autoreply in Outlook
As mentioned above, users can turn out-of-office automatic replies on or off in the new Outlook app on Windows.
Here’s how to do that.
First, open the new Outlook app on Windows 11.
You can do that by clicking Start -> All app -> Outlook app. Or use the Start menu search box to search for Outlook and open it.

When the app opens, click the Settings button (gear on the top right) to proceed.

On the Settings page, click the Accounts tab on the left sidebar and select Automatic replies under the Email accounts.
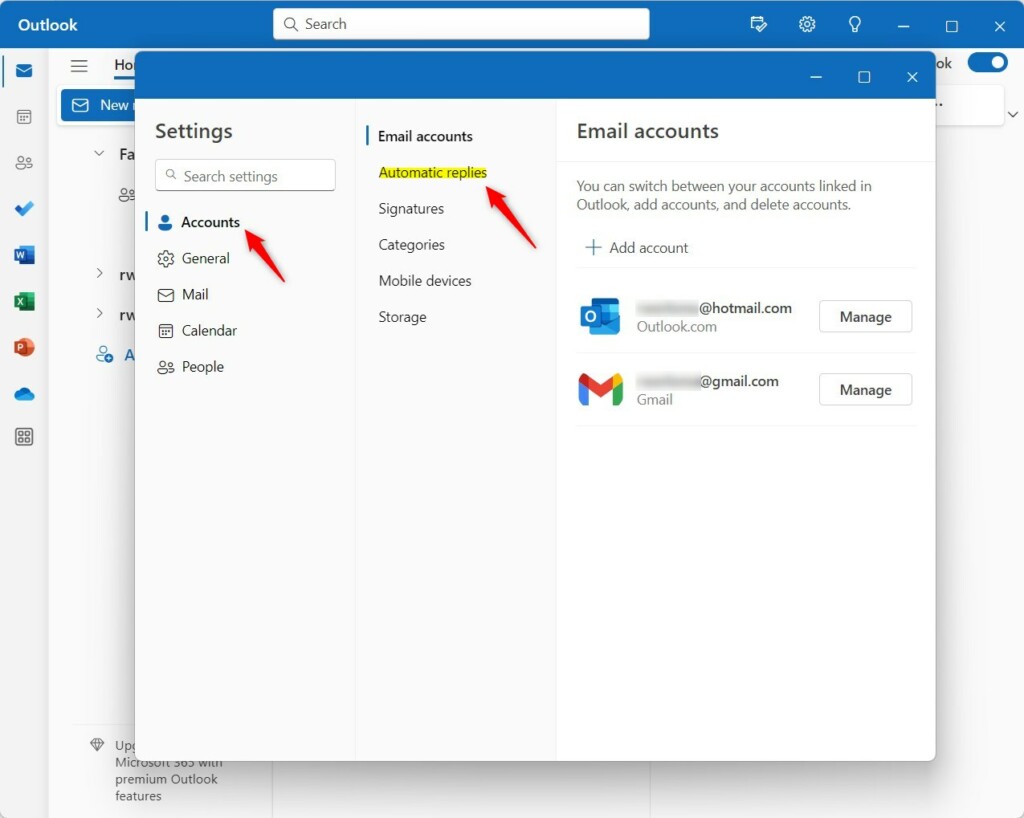
Next, select the email account you want to apply the automatic replies settings if you have multiple accounts set up in Outlook.
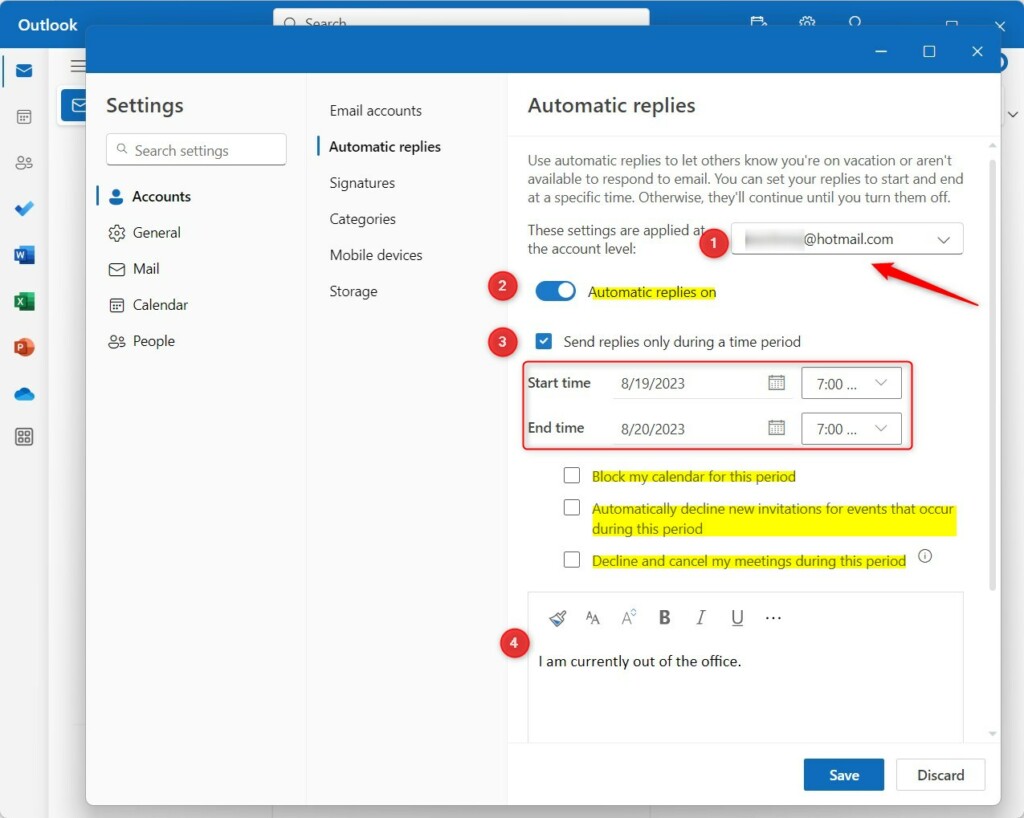
Then toggle the Automatic replies button to the On position to enable all the settings.
To disable Automatic replies, toggle the button to the Off position.
When the Automatic replies are on, you can choose additional options below:
- Send replies only during a time period.
- Start time
- End time
Note: If you do not select a specific time period, Outlook will continue sending automatic replies until you manually turn it off.
Additional Automatic replies options include:
- Block my calendar for this period.
- Automatically decline new invitations for events that occur during this period.
- Decline and cancel my meetings during this period.
Finally, type your automatic replies in the text box provided.
These are the steps that are needed.
- Select the account you want the automatic replies settings to apply if you have multiple accounts in Outlook.
- Toggle Automatic replies to turn it on.
- Choose to send Automatic replies only during a specific period. If you do not, Automatic replies will continue to be sent until you turn it off again.
- Type the message you want to send within the text box provided.
Save your changes and exit.
That should do it!
Conclusion:
- In conclusion, this article provided a clear guide on setting up automatic replies in the new Outlook app in Windows 11.
- The step-by-step instructions and illustrative images ensure a comprehensive understanding of the process.
- Readers are encouraged to leave comments with any corrections or additional insights to enrich the content further.
Leave a Reply