How to Control Windows Copilot Startup Settings
You can control whether Windows Copilot launches automatically when you log into your PC.
Windows Copilot is the AI assistant built directly into Windows 11, accessible via a taskbar icon or the ⊞ Win+C shortcut. It leverages capabilities introduced in builds like Windows 11 23493.
Choosing your Copilot startup preference directly affects your Windows experience. You decide if the AI is immediately available the moment you sign in, or if you’d rather launch it on demand.
Adjust the “Open Copilot when Windows starts” toggle in Settings > Personalization > Copilot in Windows. Alternatively, modify the AutoOpenCopilotLargeScreens DWORD value to 1 or 0 in the Registry Editor. This determines if Copilot launches automatically upon Windows login.
Method 1Using the Settings App
This is a common way to change your preferences.
- Open the Windows Settings app. You can do this via the Start menu or by pressing the Windows key + I to launch the Settings app.
- Click on Personalization in the left menu.
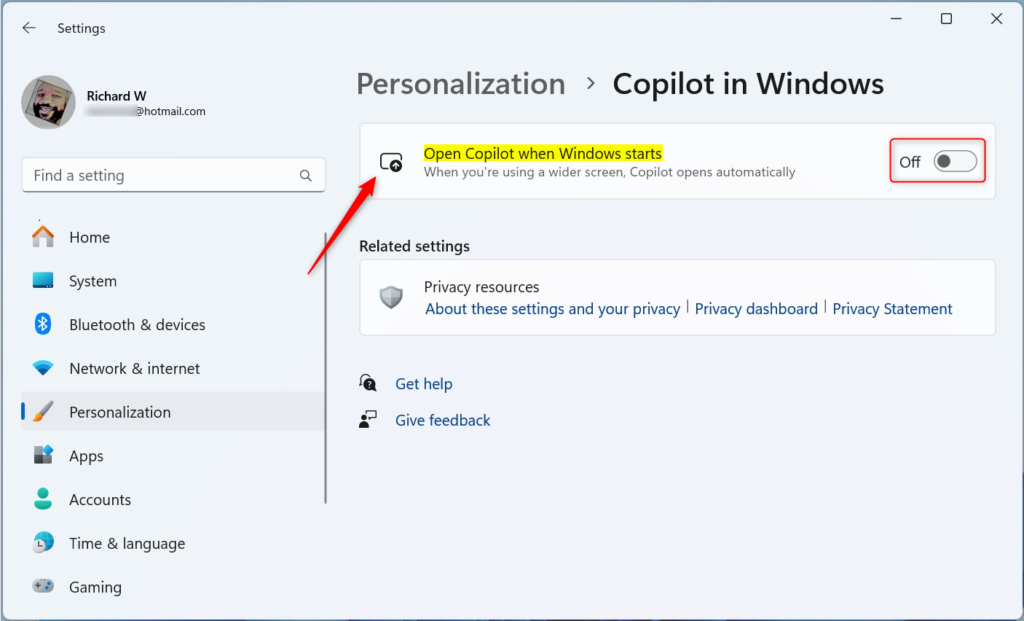
- Select the Copilot in Windows tile on the right.
Open the Windows Settings app. You can do this from the Start menu or by pressing Windows key + I. Click ‘Personalization’ in the left menu. Then, select the ‘Copilot in Windows’ tile on the right. Find the ‘Open Copilot when Windows starts’ option and click the toggle switch to turn it On or Off. Close Settings when you’re done.

- Find the “Open Copilot when Windows starts” option.
- Click the toggle switch to turn it On or Off.
Close the Settings app when you’re done.
Method 2Using the Registry Editor
Note: This method requires admin privileges. Be careful when changing registry settings, as incorrect changes can affect your system.
- Open Windows Registry Editor by searching for it in the Start menu.
- Navigate to this path:
Computer\HKEY_CURRENT_USER\Software\Microsoft\Windows\CurrentVersion\Notifications\Settings - Look for
AutoOpenCopilotLargeScreensin the right pane. - Double-click it to change the value. Enter
1to enable automatic startup or0to disable it . - If you do not see this item, right-click an empty space, select New > DWORD (32-bit) Value, name it
AutoOpenCopilotLargeScreens, and set your value.
Open the Windows Registry Editor by searching for it in the Start menu. Go to this path: 🗝️HKEY_CURRENT_USER\SOFTWARE\Microsoft\Windows\CurrentVersion\Explorer\Advanced. If you don’t see this item, right-click an empty space, choose ‘New’ > ‘DWORD (32-bit) Value,’ name it ‘EnableCopilot,’ and set your value. Set the value data to 1 to enable Copilot at startup, or 0 to disable it .

You may need to restart your computer for these changes to take effect.
Summary
Windows Copilot is a helpful AI tool, but you do not have to let it run automatically. You can manage its startup behavior using the Settings app for a clear interface or the Registry Editor for more advanced control. By choosing your own settings, you keep your computer running exactly how you like it.
Was this guide helpful?

About the Author
Richard
Tech Writer, IT Professional
Richard, a writer for Geek Rewind, is a tech enthusiast who loves breaking down complex IT topics into simple, easy-to-understand ideas. With years of hands-on experience in system administration and enterprise IT operations, he’s developed a knack for offering practical tips and solutions. Richard aims to make technology more accessible and actionable. He's deeply committed to the Geek Rewind community, always ready to answer questions and engage in discussions.

[…] Copilot is available on your device, you can pin or unpin the side pane, open Copilot when Windows starts, Turn Copilot on or off, enable or disable Copilot using content from Edge, refresh […]
[…] Copilot is installed on Windows, you can enable or disable it, open Copilot when Windows starts, Pin or Unpin the Copilot side panel, Resize the Copilot side panel, delete chat […]
[…] Copilot is installed on Windows, you can enable or disable it, open Copilot when Windows starts, Pin or Unpin the Copilot side panel, Resize the Copilot side panel, delete chat […]
[…] Copilot is installed on Windows, you can enable or disable it, open Copilot when Windows starts, Pin or Unpin the Copilot side panel, Resize the Copilot side panel, delete chat […]
[…] Open Copilot when Windows starts […]
[…] Copilot is installed on Windows, you can enable or disable it, open Copilot when Windows starts, Pin or Unpin the Copilot side panel, Resize the Copilot side panel, delete chat history in […]
[…] Copilot is installed on Windows, you can enable or disable it, open Copilot when Windows starts, Pin or Unpin the Copilot side panel, Resize the Copilot side panel, delete chat […]
[…] Copilot is installed on Windows, you can enable or disable it, open Copilot when Windows starts, Pin or Unpin the Copilot side panel, Resize the Copilot side panel, delete chat history in […]
[…] Copilot is installed on Windows, you can enable or disable it, open Copilot when Windows starts, Pin or Unpin the Copilot side panel, Resize the Copilot side panel, delete chat history in […]