How to Enable ClickLock in Windows 11 Easily

ClickLock in Windows 11 lets you drag files and highlight text without holding down the mouse button. You press and hold the button for a moment, release it, and Windows keeps it held down. Move the pointer to select text or drag an item, then click again to let go. It helps if long drags strain your hand, and it also helps with trackballs and touchpads.
You can turn on ClickLock through the Mouse Properties window, which you reach from the Control Panel . You can also adjust how long you need to hold the button before it locks, anywhere from a short to a long delay. It works the same on Windows 11 Home and Pro, and you don’t need to restart.
Open Settings , go to Accessibility Mouse, and toggle Click lock to On. Adjust the lock time slider if needed, then close Settings. ClickLock activates immediately without restart.
Turning ClickLock On or Off Using Windows Settings
The Settings app is the first place to look. If your build shows the option, the toggle lives under Accessibility. If you don’t see it, use the Mouse Properties route at the end of this section and in the Control Panel section below.
- Open Settings . Press the Win+I on your keyboard. Or click the Start button and choose the gear icon labeled Settings. The Settings window opens.
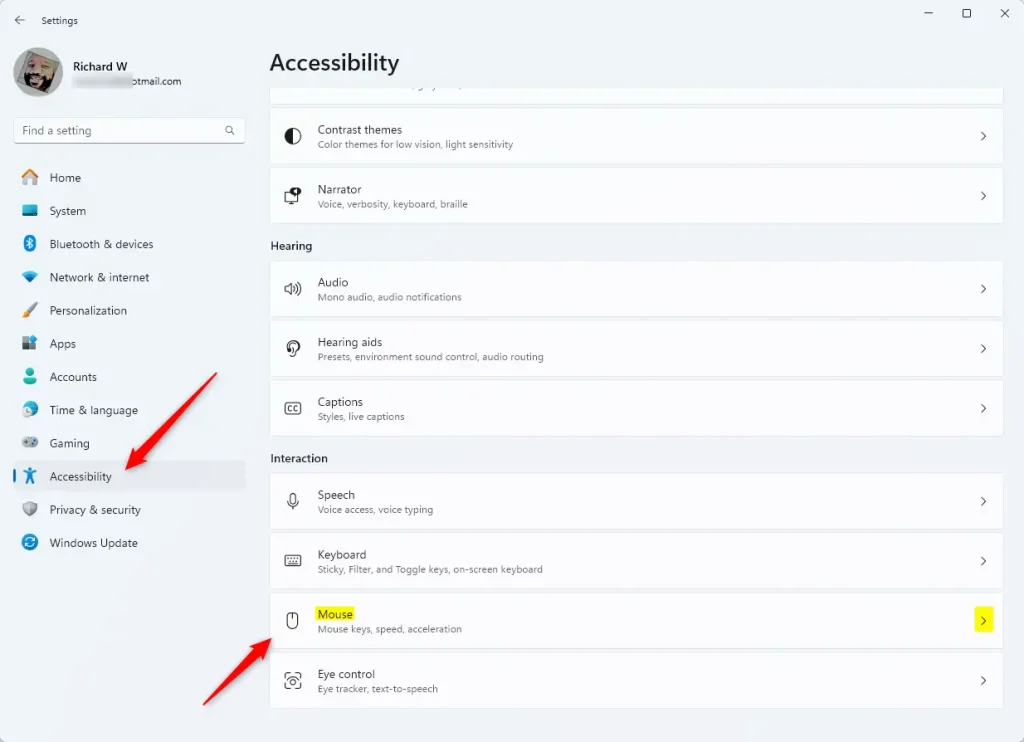
- Go to Accessibility. In the list on the left, click Accessibility. The Accessibility options appear on the right.
- Find the Mouse settings. On the right, scroll down to the Interaction section and click Mouse. The mouse options for your PC open.
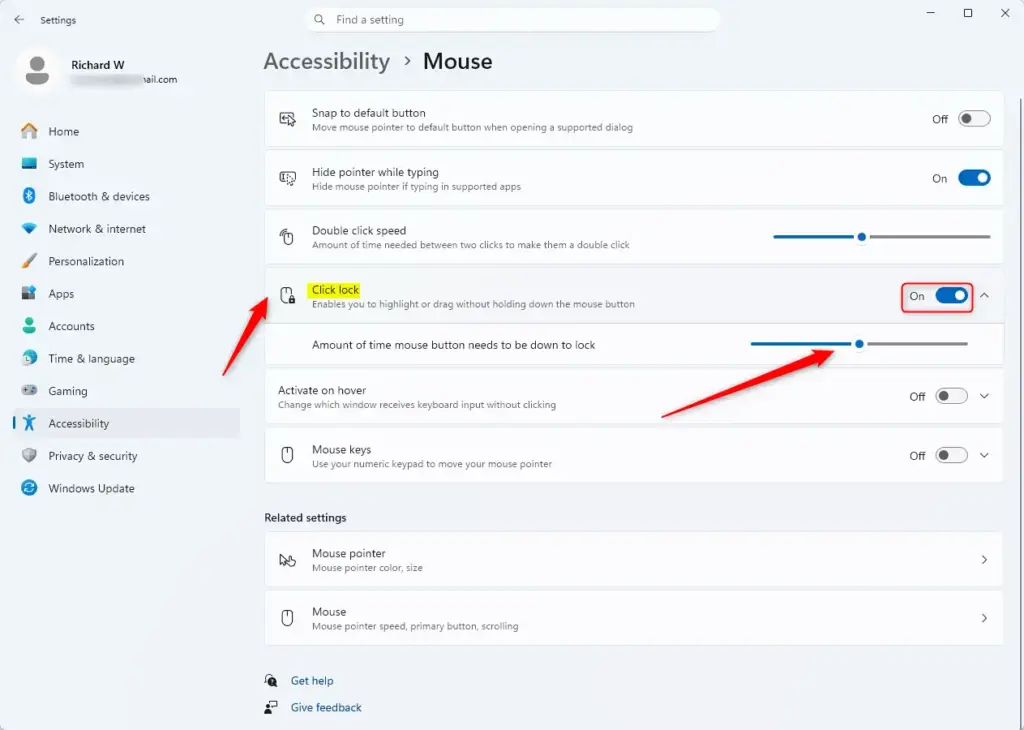
- Turn Click lock on or off. Look for the option called Click lock. Move the switch to On to enable it, or to Off to disable it. Turn it off here whenever you want to undo the change.
- Adjust the lock time (if turned on). With Click lock on, a slider appears below it, labeled Amount of time mouse button needs to be down to lock. It sets how long you press and hold before the button locks. Move the slider left for a shorter time, so it locks faster. Move it right for a longer time, so you need a longer press. The default is usually about 1.2 seconds (1200 milliseconds). If ClickLock kicks in by accident while you click normally, move the slider to the right.
- Close Settings. Once you are happy with your choices, close the Settings app. The change applies right away, and you can test it by pressing and holding the button on a file, releasing, moving the pointer, and clicking again to drop it.
If you can’t find Click lock on the Accessibility Mouse page, go to Settings Bluetooth & devices Mouse and click Additional mouse settings. That opens the Mouse Properties window, which has the ClickLock option on its Buttons tab. The Control Panel steps below use the same window.
Managing ClickLock Through the Control Panel
It is also the more reliable way, because the Mouse Properties window has had this option for many Windows versions.
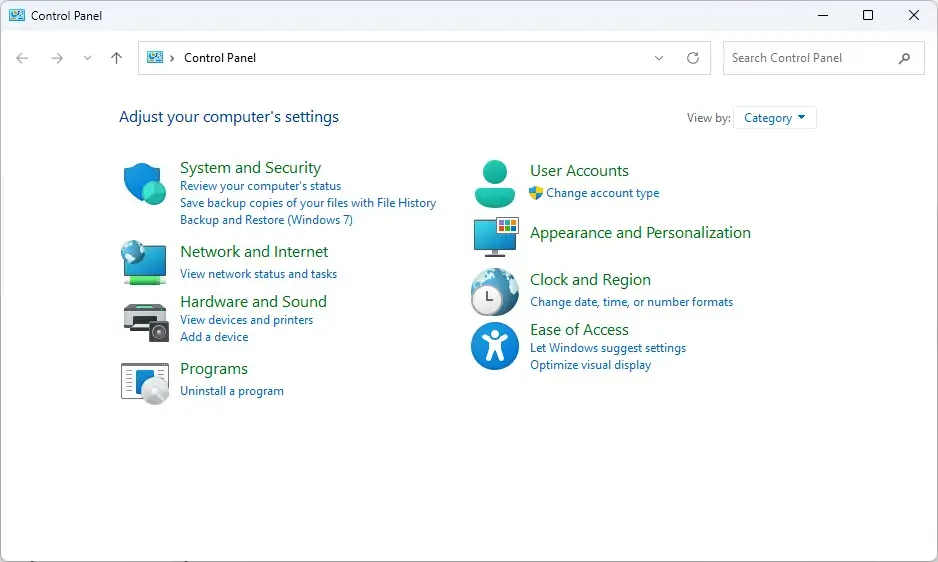
- Open the Control Panel . Click Start, type Control Panel , and press Enter. The Control Panel window opens.
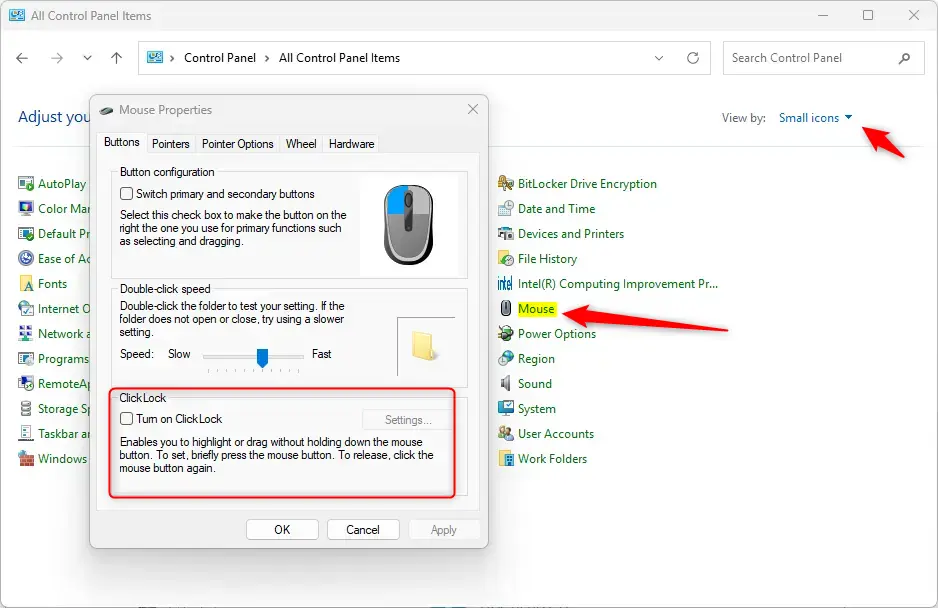
- Open Mouse. Set View by (top right) to Large icons or Small icons, then click Mouse. The Mouse Properties window opens.
- Select the Buttons tab. Click Buttons if it is not already showing. Look for the ClickLock section at the bottom.
- Turn on ClickLock. Tick the Turn on ClickLock check box. The Settings… button next to it, which was greyed out, becomes available.
- Set the delay. Click Settings…. In the small window that opens, drag the slider between Short and Long, then click OK. Short locks sooner. Long needs a longer press.
- Save your changes. Click Apply, then OK. ClickLock is now active. To undo it, return to this tab, clear the Turn on ClickLock check box, and click Apply.
Turning ClickLock On or Off via Control Panel
You can enable ClickLock through the classic Control Panel if you prefer traditional Windows settings. Type Control Panel in the Windows search bar, open Mouse settings from the icon view, and check the box next to Turn on ClickLock on the Buttons tab.- Open Control Panel . Type “Control Panel ” in the Windows search bar and select it from the results. Make sure your Control Panel is set to show “Large icons” or “Small icons,” not “Category,” so you can see all the options clearly.
- Access Mouse Settings. Find and click on the “Mouse” icon. This will open a new window with different mouse settings.
- Go to the Buttons Tab. In the Mouse Properties window, click the “Buttons” tab at the top.
- Enable or Disable ClickLock. Look for a checkbox labeled “Turn on ClickLock.” Check this box to turn it on, or uncheck it to turn it off. It’s usually off by default.
- Confirm Changes. Click “OK” at the bottom of the Mouse Properties window to save your choice.
- Close Control Panel . You can now close the Control Panel window.
Adjusting the ClickLock Time in Control Panel
You can change how long you must hold your mouse button before ClickLock kicks in by adjusting the settings in the Control Panel . Open Mouse properties, select the Buttons tab, click Settings next to the ClickLock option, and move the slider to your preferred time.
- Open Control Panel and Mouse Settings. Follow steps 1 and 2 from the section above: type "Control Panel" in search, open it, set the view to icons, and click the "Mouse" icon.
- Find ClickLock Settings. On the "Buttons" tab in the Mouse Properties window, look for a "Settings" button under the "ClickLock" section. Click this button.
- Set the Duration. A new window will appear with a slider. This slider lets you adjust the "ClickLockTime." Move the slider towards "Short" to make the lock activate faster (you hold the button for less time), or towards "Long" to make it activate slower (you need to press for a longer time). The time can be set from 200 milliseconds to 2200 milliseconds (2.2 seconds). The default is usually 1200 milliseconds.
- Apply the Settings. Click "OK" in the ClickLock Settings window to save the duration you chose.
- Save All Changes. Click "OK" again in the main Mouse Properties window to save all your mouse settings.
- Exit Control Panel. You can now close the Control Panel.
Adjusting ClickLock Time Using the Registry Editor (Advanced)
Open Registry Editor by typing regedit in the Run dialog box, go to HKEY_CURRENT_USER\Control Panel\Desktop, and change the ClickLockTime value to your desired duration.
- Open Registry Editor. Press the Windows key + R to open the Run box. Type
regeditand press Enter, or click "OK." You might see a message asking if you want to allow the app to make changes; click "Yes." - Go to the Desktop Key. In the Registry Editor, on the left side, you need to go to a specific location. Double-click through the folders to reach this path:
HKEY_CURRENT_USER\Control Panel\Desktop - Find the ClickLockTime Value. On the right side of the "Desktop" key, look for a value named
ClickLockTime. It should be a DWORD (32-bit) Value. - Change the Value Data. Double-click on
ClickLockTimeto open its editor window. By default, it's set to a hexadecimal number, but you should change it to decimal so it's easier to understand. Select the "Decimal" radio button. Now, type a number between 200 (for a very short press) and 2200 (for a longer press). The default value is 1200. - Confirm the Change. Click "OK" in the "Edit DWORD (32-bit) Value" window.
- Close Registry Editor. You can now close the Registry Editor application.
- Apply the Changes. For the registry change to work, you usually need to sign out of your Windows account and sign back in or restart your computer.
Summary
ClickLock lets you highlight, drag, and move files without holding down your mouse button. You can easily turn it on and change its timing using either the modern Settings app, the classic Control Panel, or the Registry Editor depending on your preference.
Have a question about this guide?
Answered by AI from this guide. Good questions may be added to this page — please don't include personal details.
Did this guide fix your problem?

About the Author
Richard
Tech Writer, IT Professional
Richard is a writer at Geek Rewind who turns complex IT tasks into clear, step-by-step guides. He draws on years of hands-on experience in system administration and enterprise IT operations, focusing on Windows, Linux and WordPress: the problems people actually run into, and the fixes that work. His server and WordPress guides come from systems he runs himself. Richard builds and maintains the platform behind Geek Rewind, from its Ubuntu servers and Nginx configuration to its custom WordPress plugins. Many new tutorials start with readers' questions, and he's always glad to answer them in the comments.
No comments yet — be the first to share your thoughts!