How to Enable Device Discovery in Windows 11 Developer Mode

You find advanced device discovery in Windows 11 under Settings System Advanced, where the Device discovery switch sits below Developer Mode. Turn Developer Mode on first, then switch Device discovery to On. This lets your PC broadcast its presence so other devices on your network can find and connect to it. You need that when you test apps you build or set up secure remote connections such as SSH.
For everyday computing, you do not need Device Discovery. Leaving it off keeps your PC less visible on the network, which is the safer default. Turn it on only while you are working, and turn it off again afterwards, especially on shared or public networks.
Open Settings System Advanced, turn Developer Mode on, then switch Device discovery to On. Your PC will broadcast its presence so other devices on your network can find it, which you need for testing apps or setting up SSH. Switch it back off when you finish, especially on shared or public networks, because leaving it on keeps your PC more visible.
Before You Start: What You Need
Before you change anything, check two things: your account type and the state of Developer Mode. Both apply to Home and Pro editions of Windows 11.
- Administrator access: You need to be signed in as an administrator to change these settings. To check, open Settings Accounts Your info If the word Administrator appears under your name, you are fine. If it does not, sign in with an administrator account or ask the person who manages the PC to make the change.
- Developer Mode: Device Discovery is tied to Developer Mode. If Developer Mode is off, the Device Discovery option will be missing or greyed out, and you will not be able to turn it on. Work PCs managed by an organization may also lock this option through policy. If it stays greyed out even with Developer Mode on, that is the likely reason, and your IT department will need to change it.
If you haven’t turned on Developer Mode yet, don’t worry. The steps below cover it.
Option 1Turning Device Discovery On or Off Through Settings
The simplest way to turn Device Discovery on or off is the Windows Settings app. This method does not require editing the registry, and it works the same on Home and Pro.
Step 1Open Windows Settings
These steps turn on Developer Mode device discovery from the Settings app, and the same switch turns it off again. The full process is one numbered list, and the screenshots fall between the steps.
- Open Settings. Press Windows key + I, or click the Start button and then the Settings gear icon. The Settings window should now be open, with a list of categories on the left.

Step 2Go to Developer Settings
Next, find the page that holds the developer options.
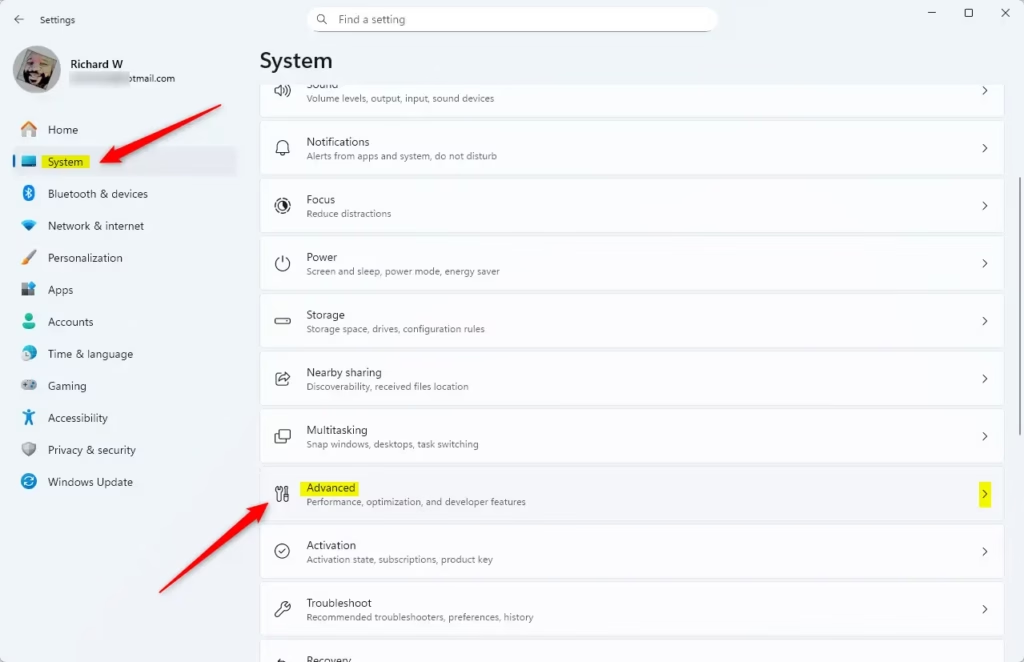
- Click System. It is in the menu on the left side of the Settings window, and the System pages appear on the right.
- Scroll down and click Advanced. On older builds of Windows 11, this page is named For developers instead. If you do not see Advanced, look for that name in the same System list.
Step 3Manage Device Discovery
You're in the right spot. This page lists the developer features, including Developer Mode.
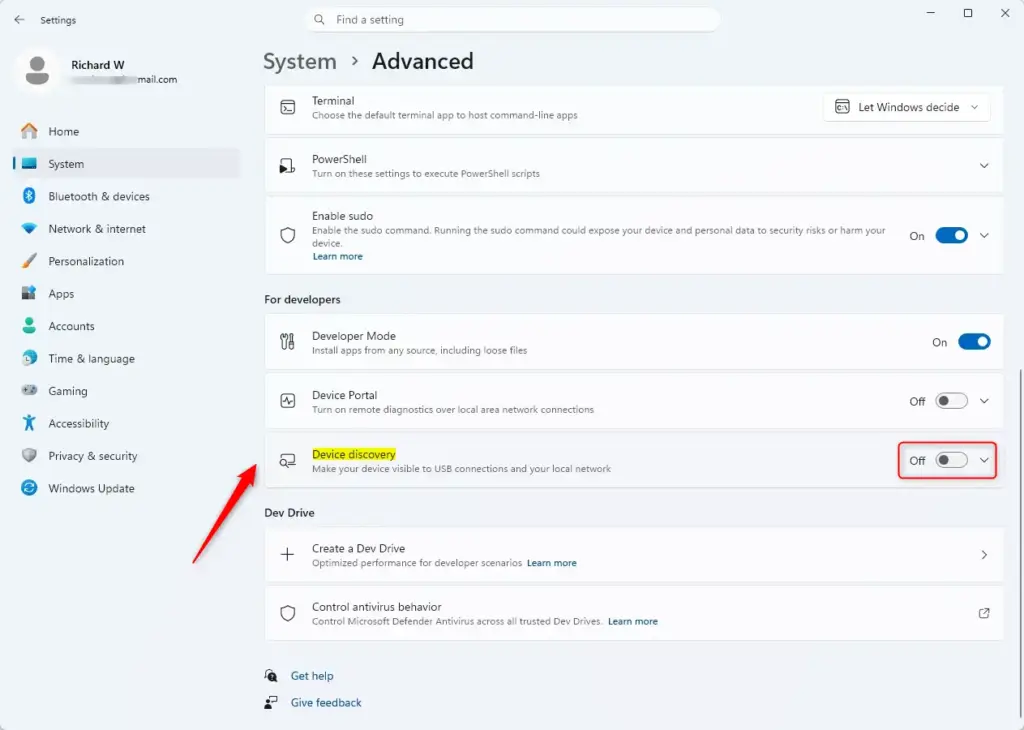
- Switch Developer Mode to On if it is off. Confirm any prompt that appears. If it is already on, go straight to the next step.
- Click the switch next to Device discovery so it reads On. The label should change right away. If the option is missing or greyed out, recheck Developer Mode and the policy note at the top of this guide.
To turn Device Discovery Off, click the same switch so it reads Off. Clicking the switch again always undoes the last change.
Step 4Close Settings
- Close the Settings window. Your choice is saved automatically, so there is no Save or Apply button to look for.
Option 2Turning Device Discovery On or Off Using the Registry Editor (For Advanced Users)
The Registry is a database that stores low-level system and app settings. A wrong edit can cause system instability, so work carefully. Consider exporting the key first (File Export in Registry Editor) so you have a backup you can double-click to restore.
Why Use the Registry Editor?
Manual editing gives you direct control, and it is useful when instructions call for it. It is also handy when you need to set the same option on several computers. Registry Editor is available in both Home and Pro editions.
Step 1Open the Registry Editor
You must run Registry Editor as an administrator so you have permission to change system settings.
- Click the Start button.
- Type
regeditinto the search bar. - Right-click Registry Editor in the search results. Choose Run as administrator.
- Click Yes if a User Account Control (UAC) window appears. This allows the app to make changes.
Registry Editor should now open, with a folder tree in the left pane.
Step 2Go to the Correct Registry Location
The setting lives in the debugregsvc service key under HKEY_LOCAL_MACHINE. This is the path that holds the developer tools settings you need to adjust.
- Look at the left pane of the Registry Editor window. This is where you will browse.
- Expand the folders one by one to reach this path:
HKEY_LOCAL_MACHINE\SOFTWARE\Microsoft\Windows\CurrentVersion\AppModel
Alternatively, copy the path and paste it into the address bar at the top of the Registry Editor window, then press Enter. This is faster and avoids clicking through the wrong folder. When you arrive, the right pane should list the values stored in that key, including DebugState.
Step 3Change the 'DebugState' Value
You turn the feature on or off by editing a single registry value, DebugState. A value of 1 turns it on, and a value of 0 turns it off.
To turn Device Discovery ON:
- Double-click DebugState in the right pane. An edit window opens.
- Type
1in the Value data box. - Set Base to Hexadecimal. Leave it alone if it already shows that.
- Click OK.
To turn Device Discovery OFF:
- Double-click DebugState in the right pane. An edit window opens.
- Type
0in the Value data box. - Set Base to Hexadecimal. Leave it alone if it already shows that.
- Click OK.
After you click OK, the dialog closes and the new number appears in the Data column next to DebugState. If you cannot find DebugState in the key, use the Settings method above instead of creating values by hand.
Explanation of Values:
To check your work, read the Data column for the value. A value of 1 for AllowDevelopmentWithoutDevLicense indicates that Device Discovery is currently enabled.
A value of 0 for AllowDevelopmentWithoutDevLicense signifies that Device Discovery is disabled.
Step 4Close the Registry Editor
There is no save step, because registry changes are written as soon as you click OK.
Step 5Restart Your PC (Recommended)
For changes made in the Registry to take full effect, restart your computer. This makes sure all system components pick up the new setting. Save your open work first. If you ever need to reverse the change, set the value back and restart again.
Summary
Device Discovery in Windows 11 lets other devices on your network find your PC, which is useful for app development. For most users, keeping it off is safer. You can switch it on or off in Windows Settings under System Advanced, or edit the registry for more control. Either way, you need an administrator account and Developer Mode turned on.
Have a question about this guide?
Answered by AI from this guide. Good questions may be added to this page — please don't include personal details.
Did this guide fix your problem?

About the Author
Richard
Tech Writer, IT Professional
Richard is a writer at Geek Rewind who turns complex IT tasks into clear, step-by-step guides. He draws on years of hands-on experience in system administration and enterprise IT operations, focusing on Windows, Linux and WordPress: the problems people actually run into, and the fixes that work. His server and WordPress guides come from systems he runs himself. Richard builds and maintains the platform behind Geek Rewind, from its Ubuntu servers and Nginx configuration to its custom WordPress plugins. Many new tutorials start with readers' questions, and he's always glad to answer them in the comments.
This article does not tell how to open or close the Device Discovery app using the Settings App
Thank you! Fixed the post.