How to Enable Email Forwarding in Outlook for Windows 11
You enable email forwarding in Outlook for Windows 11 by configuring a rule to send incoming messages to a different email address.
This lets you automatically redirect your emails, a useful feature for consolidating mailboxes or having someone manage your messages when you’re unavailable. You can set this up in both the newer Outlook experience and the traditional Classic Outlook.
Be aware that some organizations might restrict automatic forwarding due to security policies, particularly for emails sent to external addresses. If you successfully configure it, all new emails will be sent to your chosen recipient.
In New Outlook, go to Settings, Mail, and Forwarding, then enable forwarding and enter the destination address. In Classic Outlook, create a new rule under Rules & Alerts to forward incoming messages to your desired email address.
New Outlook vs. Classic Outlook
The ‘New Outlook’ is built on web-based technology, much like the Outlook Web App (OWA), which is Outlook’s web version. The ‘Classic Outlook,’ on the other hand, is a traditional desktop application. If you’re on an Exchange Server, your administrator might have turned off automatic forwarding to prevent data leaks. If you can’t find the forwarding settings, it’s always a good idea to check with your IT department.
How to Enable Forwarding in New Outlook
Follow these steps to configure your mailbox settings in the modern interface:
1. Open the new Outlook for Windows app.
2. Click the Settings gear icon in the top right corner.

3. Go to Mail and select Forwarding.
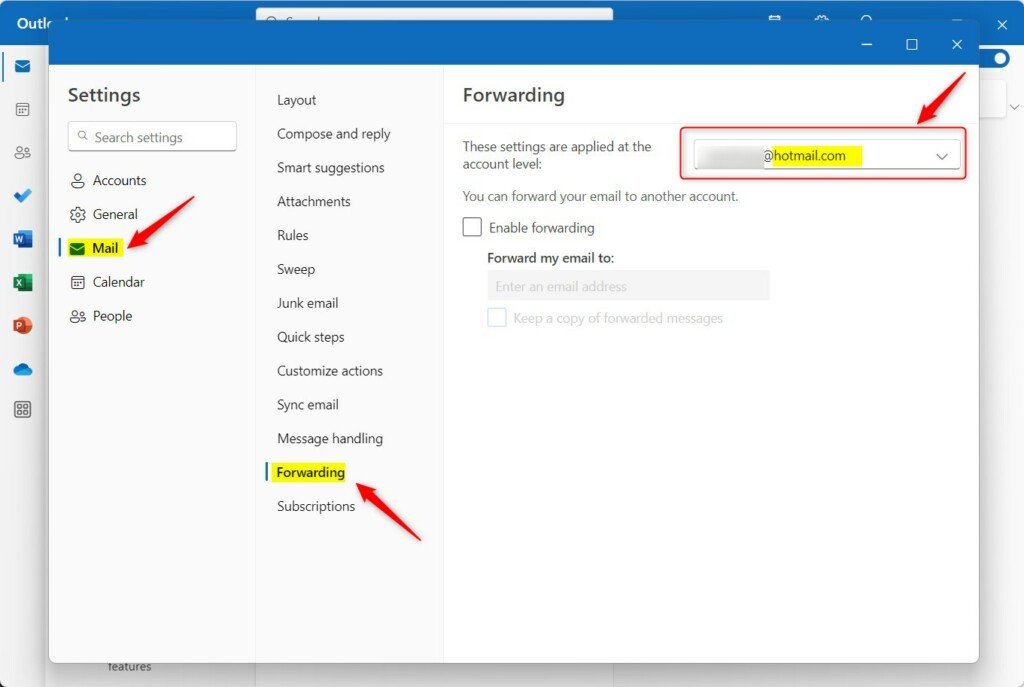
4. Toggle Enable forwarding to the ‘On’ position.
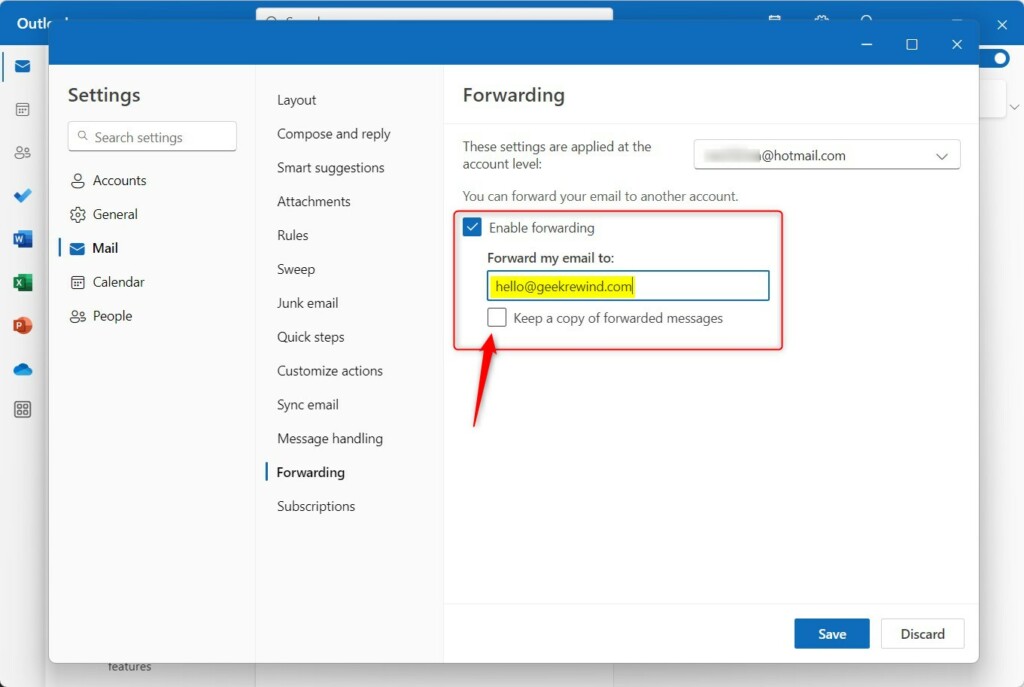
5. Enter the destination email address and click Save.
How to Enable Forwarding in Classic Outlook
In the classic version, you typically use email rules to manage forwarding:
1. Open Classic Outlook and go to the Home tab.
2. Click Rules and select Manage Rules & Alerts.
3. Click New Rule and choose Apply rule on messages I receive.
4. Select the conditions (or leave blank to forward all) and choose forward it to people or public group.
5. Click the underlined text to enter the email address and finish the wizard.
Troubleshooting and Security
If your forwarding isn’t working, check your SMTP (Simple Mail Transfer Protocol) forwarding settings. Note that forwarding sensitive information to personal accounts can violate company security policies. Always ensure your destination account is secure.
Summary
In a nutshell, email forwarding in Outlook 11 is a powerful way to manage your inbox. Whether you’re using the New Outlook or the Classic desktop client, you can automate your workflow by following the steps above. Remember to check your company policies regarding email migration and security before setting up automatic redirects. If you no longer need this feature, head back to the same settings menu and toggle forwarding off, or delete the rule you created.
Can I forward emails to multiple addresses?
Can I forward emails to multiple addresses?
In the standard Outlook settings, you can usually only set one forwarding address. To send mail to multiple people, you should create an email distribution list or use specific inbox rules to redirect copies of incoming messages to different recipients based on the sender or subject line.
Does forwarding keep a copy of the email?
Yes, in the New Outlook settings, there is a specific checkbox labeled ‘Keep a copy of forwarded messages’. If you check this, the original email remains in your inbox. If you leave it unchecked, the email is moved directly to the destination address, leaving your original inbox empty.
Was this guide helpful?

About the Author
Richard
Tech Writer, IT Professional
Richard, a writer for Geek Rewind, is a tech enthusiast who loves breaking down complex IT topics into simple, easy-to-understand ideas. With years of hands-on experience in system administration and enterprise IT operations, he’s developed a knack for offering practical tips and solutions. Richard aims to make technology more accessible and actionable. He's deeply committed to the Geek Rewind community, always ready to answer questions and engage in discussions.
[…] app has many features, including support for subscription management, email forwarding, setting default From address, backing up your mailbox, changing the reading […]
[…] app has many features, including support for subscription management, email forwarding, setting default From address, backing up your mailbox, changing the reading […]
[…] app has many features, including support for subscription management, email forwarding, setting default From address, backing up your mailbox, changing the reading […]
[…] app has many features, including support for subscription management, email forwarding, setting default From address, backing up your mailbox, changing the reading pane, opening a […]
[…] app has many features, including support for subscription management, email forwarding, setting default From address, backing up your mailbox, changing the reading pane, opening a […]
[…] app has many features, including support for subscription management, email forwarding, setting default From address, backing up your mailbox, changing the reading […]
[…] app has many features, including support for subscription management, email forwarding, setting default From address, backing up your mailbox, changing the reading pane, opening a […]
[…] app has many features, including support for subscription management, email forwarding, setting default From address, backing up your mailbox, changing the reading […]
[…] app has many features, including support for subscription management, email forwarding, setting default From address, backing up your mailbox, changing the reading […]
[…] app has many features, including support for subscription management, email forwarding, setting default From address, backing up your mailbox, changing the reading […]
[…] app has many features, including support for subscription management, email forwarding, setting default From address, backing up your mailbox, changing the reading […]
[…] automatic replies, email sorting, subscription management, email forwarding, setting default From address, backing up your mailbox, and […]
[…] app has many features, including support for subscription management, email forwarding, setting default From address, backing up your mailbox, changing the reading […]
[…] accounts, setting out-of-office automatic replies, email sorting, subscription management, email forwarding, setting default From address, choosing between HTML and Plain text format, and […]
[…] app has many features, including support for subscription management, email forwarding, setting default From address, backing up your mailbox, changing the reading […]