How to Quit and Close OneDrive in Windows 11

Stopping OneDrive on Windows 11 prevents cloud file syncing, freeing up system resources. This guide explains how to stop the OneDrive application from running on your Windows 11 computer, ensuring your files only exist locally.
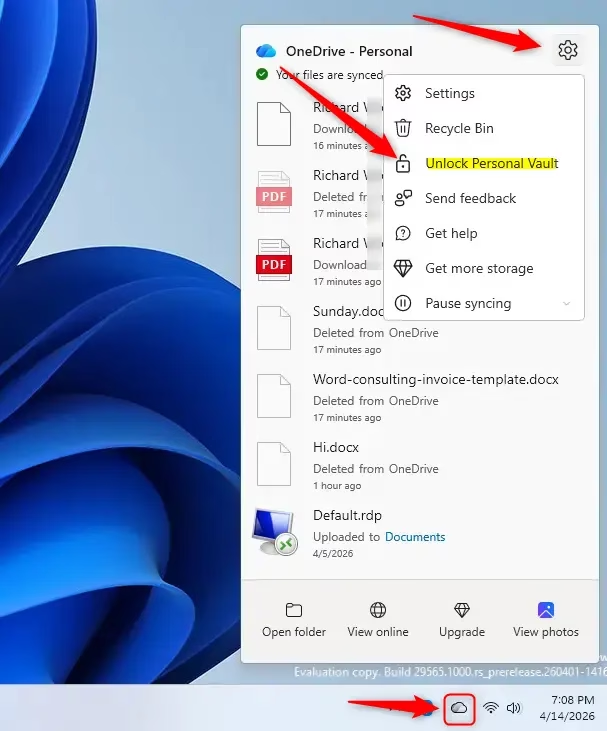
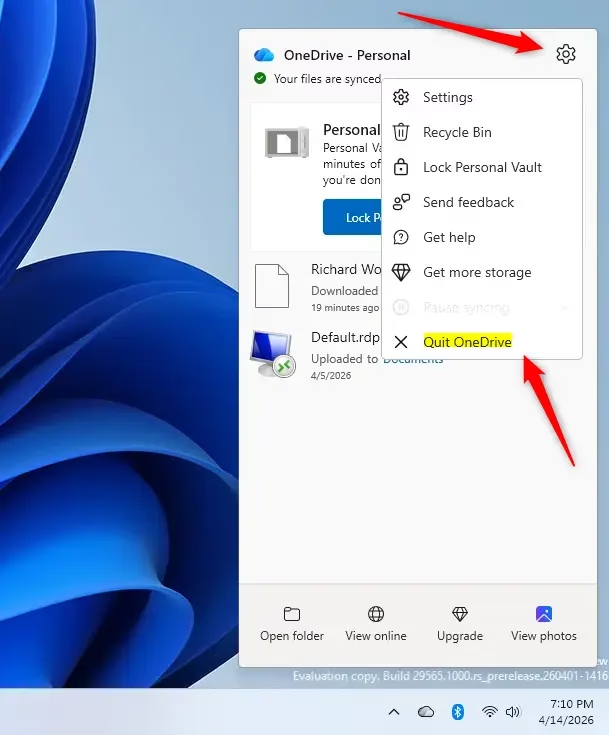
Click the OneDrive icon in your taskbar system tray, then click the gear icon for Help & Settings. Select “Quit OneDrive” from the menu to stop the application and pause syncing.
Why quit OneDrive?
You might want to stop OneDrive to save battery life, fix a syncing error, or if you don’t want your files automatically uploading to the cloud.
What happens when you quit?
Quitting OneDrive stops the OneDrive application from running in the background on a Windows 11 computer. This stoppage prevents files from automatically syncing between the user's PC and cloud storage until the OneDrive application is opened again.
Follow these steps to shut down the application:
- Click the OneDrive icon located in your taskbar system tray.
- Click the Help & Settings (gear) icon
3. Based on your current status, here’s what to do with your Personal Vault:
- If your Personal Vault is locked, click Pause syncing to expand the menu, then click Quit OneDrive.
- If your Personal Vault is already unlocked, simply click Quit OneDrive.
Summary
Closing OneDrive is a quick way to pause cloud syncing and stop the app from running in the background. Keep in mind this doesn’t delete your files; it just disconnects your computer from online storage until you manually restart the OneDrive app.
What happens if I quit OneDrive?
Any changes you make to your local files won’t upload or update online until you restart the OneDrive app on your Windows device.
Can I just turn off OneDrive?
Yes, you can turn off OneDrive by clicking its icon in the taskbar system tray, then selecting the gear icon for Help & Settings, and finally choosing ‘Quit OneDrive’.
How do I force OneDrive to quit?
To force OneDrive to quit, open Task Manager by pressing Ctrl+Shift+Esc. Locate Microsoft OneDrive in the list of running processes, right-click it, and select ‘End task’. This will immediately terminate the app if it is unresponsive or failing to close through the standard settings menu.
How do I stop OneDrive from taking over my computer?
To stop OneDrive from managing your files, close the app using the system tray settings. For a permanent solution, navigate to Windows Settings, select Apps, find OneDrive, and uninstall it. This stops the software from launching automatically and prevents it from syncing your local folders to the cloud.
Was this guide helpful?

About the Author
Richard
Tech Writer, IT Professional
Richard, a writer for Geek Rewind, is a tech enthusiast who loves breaking down complex IT topics into simple, easy-to-understand ideas. With years of hands-on experience in system administration and enterprise IT operations, he’s developed a knack for offering practical tips and solutions. Richard aims to make technology more accessible and actionable. He's deeply committed to the Geek Rewind community, always ready to answer questions and engage in discussions.
No comments yet — be the first to share your thoughts!